Do you have a question about the DARCHE 270 FREESTANDING LED AWNING and is the answer not in the manual?
Covers installation correctness, safe use, and vehicle handling changes.
Advises keeping flame and heat sources away from awning materials.
Details the process for assembling corner plates and face plates to base plates.
Provides guidance on mounting brackets to various roof rack configurations.
Instructions for securing the awning to the assembled mounting brackets.
Guides on releasing straps and allowing the canvas to drape.
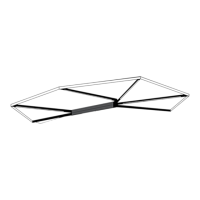
Instructions for swinging out rear and front arms to the 90° position.
Details on using tension straps to secure the front and rear of the awning.
Guidance on adjusting support legs for desired height and stability.
Instructions for anchoring and tensioning guy ropes for stability.
Instructions for connecting and operating the integrated LED light strip.
Initial steps for packing down the awning, including unplugging jacks and undoing ropes.
Information on freestanding mode, wind limits, and safety precautions.
Guidance on cleaning the awning using cold water and a soft brush.
Notes on the transit cover's water resistance and periodic checks.
Advice on professional fitting and regular checks of fasteners and connections.
Information on the awning's design as a temporary shelter and extreme weather use.
Details on power requirements (USB, 5V, 1.2A) and warranty voiding alterations.
Important safety notes regarding power sources, extension leads, and direct eye exposure.
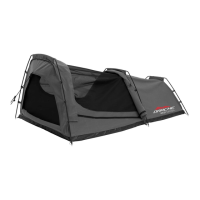
The DARCHE 270 Freestanding LED Awning is a robust and versatile outdoor camping accessory designed to provide shelter and illumination for various outdoor adventures. It is engineered for quick and easy setup, allowing users to deploy it in under a minute, making it an ideal companion for spontaneous trips or extended stays. The awning is constructed from durable materials, offering excellent protection against rain and wind, ensuring comfort and safety in diverse weather conditions.
The primary function of the DARCHE 270 Freestanding LED Awning is to provide a temporary, freestanding shelter that extends from a vehicle. Its 270-degree coverage offers extensive shade and protection, making it suitable for various activities such as camping, picnicking, or as a base for outdoor work. The integrated LED lighting system enhances its utility, providing illumination for evening activities under the awning. This lighting system offers both white and amber light modes, with adjustable brightness, catering to different ambient lighting needs and preferences. The freestanding design means that, under certain conditions, the awning can be used without additional support legs or guy ropes, offering greater flexibility and ease of use.
The awning requires some basic assembly before its first use. It mounts directly to a vehicle's roof rack or aftermarket roof bars using supplied brackets. The installation process involves attaching bracket corner plates to a bracket base plate, followed by securing a bracket face plate. These plates are assembled using M6 bolts, nyloc nuts, flat washers, and spring washers, allowing for various height adjustments to suit different vehicle setups. The mounting brackets are designed to fit most common roof rack configurations, though specific attachments may be needed for certain roof bars. It is crucial to ensure the awning is installed correctly and securely, with regular checks of all nuts and bolts, especially during trips or when traveling on uneven terrain. The manufacturer recommends using an experienced aftermarket 4x4 accessories fitter for mounting to ensure proper installation and safety.
Once installed, setting up the awning is straightforward:
The integrated LED lighting system is a key feature, providing convenient illumination.
Packing down the awning is also designed for efficiency:
Regular inspection is crucial for the longevity and safe operation of the awning. Users should frequently check that all nuts and bolts attaching the awning to the vehicle, as well as those on all mechanical components of the awning, are tight and in good condition. This is especially important during trips and after traveling on uneven, rough, or corrugated terrain, which may require more frequent inspections.
The awning should be cleaned with cold water and a soft bristle brush. It is important to avoid using soaps, detergents, petrol, diesel, oils, or any other chemicals, as these can damage the material. When cleaning the awning transit cover, avoid spraying water directly at the zip to prevent water penetration. If water does enter the cover, the awning should be opened and allowed to air dry thoroughly before packing away to prevent mould growth.
Correct storage is vital for maintaining the awning's condition. If the awning must be stowed wet, it is essential to unpack and dry it as soon as possible. Rot and mildew damage, as well as failures caused by incorrect storage, are not covered under the general warranty. The transit cover, while designed to mitigate water ingress, is not fully waterproof and should be opened periodically and checked, particularly after heavy rain, to ensure the awning remains dry.
The DARCHE 270 Freestanding LED Awning is designed as a temporary shelter for general camping in normal conditions, not as a permanent structure. It should not be left up for extended periods or unattended. To prevent personal injury or property damage, it is recommended not to erect or use the awning in extreme weather conditions. The vehicle should not be moved while the awning is deployed. The manufacturer disclaims all responsibility for accidents due to improper use, maintenance, or failure to check fastener tightness. Wind damage is not covered under general warranty.
| Water Resistance | Yes |
|---|---|
| UV Protection | Yes |
| Awning Type | Freestanding |
| Material | Polyester |
| LED Lighting | Yes |
| Frame | Aluminum |