EasyManua.ls Logo

DataComm Electronics Easy Mount Series - User Manual

DataComm Electronics Easy Mount Series
2 pages
Print Icon
To Next Page IconTo Next Page
Loading...
2-1/4
Parts Included Tools Needed
1. Cable Plate with Flexible Opening, 1-Gang 1. Drywall saw
2. 6 Ft. tape measure
3. Pencil
4. Screwdriver
Use the Cable Plate with Flexible Opening to install low voltage cables behind
your flat panel TV, (see Figures 2 & 3), your amplifier or other audio and video devices.
This wall plate is designed for use with Low Voltage / Data Cables “ONLY”.
The Cable Plate with Flexible Opening is designed with the low voltage mounting brackets molded to the back of the plate (see Figure 1).
Determine the location of your flat panel TV, amplifier or audio/video device. Use the enclosed template to cut a hole in the drywall. When cutting the
hole in the drywall, allow for the location of the stud. Now simply pull your audio/video cables through the wall and through the opening in the Cable Plate
with Flexible Opening. Now insert the Cable Plate with Flexible Opening flush into the wall. Next, screw down the wall plate screws with wings. The
wings will fasten tightly against the back of the drywall (see Figure 3) and your installation is complete.
This Cable Plate with Flexible Opening is Designed for Use with Low Voltage / Data Cables “ONLY”.
Do Not Run or Pull the TV Cord or Other Electrical Cords Inside the Drywall.
National Electrical Code (NEC) Does Not Allow the Installation of the TV Power Cord or an Extension Cord Behind the Wall.
CAUTION
Never install low voltage wiring during lightning storms.
Never install low voltage wiring in wet locations unless the wire is specifically designed for wet locations.
Never touch un-insulated low voltage wires or terminals unless the wire has been disconnected at its source.
Use caution when installing low voltage cables.
IMPORTANT INSTRUCTIONS
Read and understand all instructions.
Follow all warning and instructions marked on the product.
Do not use this product near water, for example near a bath tub, wash bowl, kitchen sink, or laundry tub, in a wet basement, or near a
swimming pool.
SAVE THESE INSTRUCTIONS.
Figure 2 - Front View
Instruction / Installation Sheet
DataComm Electronics Easy Mount Series
45-0014 Cable Plate with Flexible Opening, 1-Gang
This product is patent protected
by U.S. Patent number 7495171
RoHS Compliant
Figure 1
Figure 3 - Back View
45-0014 – Front View
45-0014 Back View
4”
CUT ALONG DOTTED LINE
TEMPLATE
45-0014
Cable Plate with
Flexible Opening
1-Gang
ACTUAL SIZE
Concealed Low Voltage Wiring
(hidden in wall)
Receiver
Surge Protector
Flat Screen TV
Flat Screen TV
Concealed Low Voltage Wiring
(hidden in wall)
Receiver
Surge Protector
Using
Template,
Cut a Hole
in the Drywall
Low Voltage
Mounting
Bracket Wing
Question and Answer IconNeed help?

Do you have a question about the DataComm Electronics Easy Mount Series and is the answer not in the manual?

Summary

DataComm Electronics Easy Mount Series 45-0014 Cable Plate Installation

Parts and Tools Needed for Installation

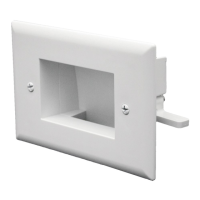
Lists the components included and tools required for installing the 1-Gang cable plate.

Installation Procedure Overview

Details the steps for cutting a hole, pulling cables, and mounting the cable plate.

Important Safety Precautions

Highlights crucial safety warnings regarding electrical storms, wet locations, and handling wires.

General Usage and Safety Guidelines

Provides essential instructions for product use, warnings, and general safety advice.

DataComm Electronics Easy Mount Series 45-0015 Cable Plate Installation

Parts and Tools Needed for 2-Gang Installation

Lists the components included and tools required for installing the 2-Gang cable plate.

2-Gang Cable Plate Installation Procedure

Details steps for cutting, pulling cables, and mounting the 2-Gang cable plate.

Safety Warnings for 2-Gang Installation

Highlights crucial safety warnings pertinent to the 2-Gang cable plate installation.

Usage and Safety Guidelines for 2-Gang Plates

Provides essential instructions, warnings, and safety advice for the 2-Gang cable plate.

Overview

This document describes the DataComm Electronics Easy Mount Series, specifically the 45-0014 Cable Plate with Flexible Opening (1-Gang) and the 45-0015 Cable Plate with Flexible Opening (2-Gang). These devices are designed for innovative structured wiring solutions, primarily for managing low voltage cables behind flat panel TVs, amplifiers, or other audio and video devices.

Function Description:

The DataComm Cable Plates with Flexible Opening serve as a pass-through solution for low voltage cables, allowing them to be routed neatly and discreetly through drywall. They are specifically designed to conceal cables within the wall, providing a clean and organized appearance for entertainment systems. The flexible opening accommodates multiple cables while maintaining a secure and flush installation. The plates integrate low voltage mounting brackets molded into the back, which use screws with wings to fasten tightly against the drywall, ensuring a stable installation.

Important Technical Specifications:

  • Model Numbers: 45-0014 (1-Gang) and 45-0015 (2-Gang).
  • Gang Configuration: Available in 1-gang and 2-gang options to suit different cable management needs.
  • Opening Type: Features a flexible opening designed to allow cables to pass through while minimizing dust and maintaining a neat appearance.
  • Mounting: Utilizes low voltage mounting brackets with screws and wings for secure, flush installation into drywall.
  • Material: The product is RoHS Compliant, indicating it adheres to restrictions on hazardous substances.
  • Patent Protection: This product is patent protected by U.S. Patent number 7495171.
  • Certification: The product is ETL listed (3026001), signifying compliance with North American safety standards.
  • Intended Use: Specifically designed for "Low Voltage / Data Cables ONLY."
  • Dimensions (Template):
    • 45-0014 (1-Gang): Cutout dimensions are approximately 4" (height) x 2-1/4" (width).
    • 45-0015 (2-Gang): Cutout dimensions are approximately 4-5/16" (width) x 3-13/16" (height).

Usage Features:

  • Application: Ideal for installing low voltage cables behind flat panel TVs, audio amplifiers, and other audio/video devices.
  • Installation Process:
    1. Location Determination: Identify the desired location for the cable plate, considering the position of the TV or device and avoiding wall studs.
    2. Template Use: Use the provided template to mark and cut a hole in the drywall.
    3. Cable Routing: Pull audio/video cables through the wall and then through the flexible opening of the cable plate.
    4. Plate Insertion: Insert the cable plate flush into the cut hole in the wall.
    5. Secure Fastening: Screw down the wall plate screws. The integrated wings will expand and fasten tightly against the back of the drywall, securing the plate in place.
  • Concealed Wiring: Enables the concealment of low voltage wiring within the wall, contributing to a clean and professional installation.
  • Ease of Installation: Designed for straightforward installation using common household tools.
  • Compatibility: Compatible with various low voltage and data cables.

Maintenance Features:

  • Durability: Constructed for long-term use in structured wiring applications.
  • Safety Warnings and Instructions:
    • Low Voltage Only: Strictly for low voltage/data cables. DO NOT run or pull TV cords or other electrical cords inside the drywall. The National Electrical Code (NEC) prohibits the installation of TV power cords or extension cords behind walls.
    • Lightning Storms: Never install low voltage wiring during lightning storms.
    • Wet Locations: Only install low voltage wiring in wet locations if the wire is specifically designed for such environments.
    • Insulated Wires: Avoid touching un-insulated low voltage wires or terminals unless the wire's power source has been disconnected.
    • Installation Caution: Exercise caution when installing low voltage cables.
    • Product Placement: Do not use this product near water sources such as bathtubs, wash bowls, kitchen sinks, laundry tubs, wet basements, or swimming pools.
    • Instruction Retention: Users are advised to read, understand, and save all instructions and warnings provided with the product.

Tools Needed for Installation:

  1. Drywall saw
  2. 6 Ft. tape measure
  3. Pencil
  4. Screwdriver

DataComm Electronics Easy Mount Series Specifications

General IconGeneral
BrandDataComm
ModelElectronics Easy Mount Series
CategoryEnclosure
LanguageEnglish

Related product manuals