14
3.1 BEFORE EACH USE of this equipment inspect it according to
section 5.0 of this manual.
3.2 PLAN your system before use. Consider all factors that will affect
your safety during use of this equipment. The following list gives
important points to consider when planning your system:
A. ANCHORAGE: Select an anchorage that meets the
requirements specified in sections 1.2 and 2.5.
B. SHARP EDGES: Avoid working where system components
may be in contact with, come in contact with, or abrade
against, unprotected sharp edges.
C. AFTER A FALL: Any equipment which has been subjected
to the forces of arresting a fall or exhibits damage
consistent with the effect of fall arrest forces as described in
section 5.0, must be removed from service immediately and
destroyed by the user, the rescuer, or an authorized person.
D. RESCUE: The employer must have a rescue plan when
using this equipment. The employer must have the ability to
perform a rescue quickly and safely.
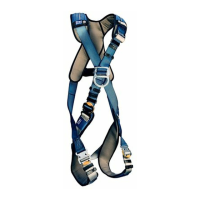
3.3 DONNING AND FITTING THE HARNESS:
A. ExoFit Vest Style Full Body Harness: See Figure 9 for
front and back views of the ExoFit Vest style full body
harness. Your harness incorporates loops for a removable
waist belt. The belt can be installed through the two loops in
the harness located in the lower back shoulder straps. The
belt will pass through the harness just below the padded
area. The hip pad, if used, is secured to the belt by passing
the belt through the hip pad loops.
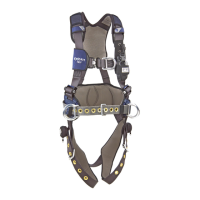
Don the ExoFit Vest style full body harness by following
these steps (see Figures 10 and 11):
Step 1. Locate back D-ring held in position by the D-ring pad; lift
up harness and hold by this D-ring. Ensure the straps are
not twisted.
Step 2. Grasp the shoulder straps and slip the harness onto one
arm. The D-ring will be located on your back side. Ensure
that the straps are not tangled and hang freely. Slip
your free arm into the harness and position the shoulder
straps on top of your shoulder. Ensure that the straps are
not tangled and hang freely. The chest strap, with quick
connect buckle, will be positioned on the front side when
worn properly.
Step 3. Reach between your legs and grasp the gray leg strap
on your left side. Bring the strap up between your legs
and connect it by inserting the tab of the buckle into