Page 17
Maintenance and Cleaning
7
1. Always disconnect the plug from the
mains socket before cleaning.
2. Never use any sharp instruments or
abrasive substances, soap, household
cleaner, detergent or wax polish for cleaning.
3. Use luke warm water to clean the cabinet
of the refrigerator and wipe it dry.
4. Use a damp cloth wrung out in a solution
of one teaspoon of bicarbonate of soda to
two litres of water to clean the interior and
wipe it dry with a soft cloth.
5. Make sure that no water enters the
temperature control box or lamp housing and
other electrical items.
6. If the refrigerator is not going to be used
for a long period of time, switch it off and
unplug the power cable, remove all food,
clean it and leave the door ajar.
7. Any dust that gathers on the condenser,
which is located at the back of the
refrigerator, should be removed once a year
with a vacuum cleaner or dusted using a soft
bristle brush.
8. Check door seals regularly to ensure they
are clean and free from food particles.
9. Never:
• Clean the refrigerator with unsuitable
material; e.g. petroleum based products.
• Subject it to high temperatures in any way,
• Scour, rub etc., with abrasive material.
10. Always ensure that the defrost drain,
located below the back wall evaporator in
the refrigerator section, is clean and free
from obstructions.
11. Shelves and freezer baskets may be
removed for cleaning purposes. Replace
baskets in original positions. To remove a
freezer drawer, pull it as far as possible, tilt it
upwards and then pull it out completely.
12.
There is no need to defrost semi no frost
models, the freezer defrosts automatically.
For static models see defrosting.
Warning: Do not damage the
refrigerant circuit. Do not use
electrical appliances inside the
food storage compartments of the
refrigerator, unless they have
been recommended by the
manufacturer.
Protection of plastic surfaces
Do not place liquid oils or oil-cooked meals in
your refrigerator in unsealed containers as
they may damage the plastic surfaces.
In case of spilling or smearing oil on the
plastic surfaces, clean and rinse the relevant
part of the surface at once with warm water.
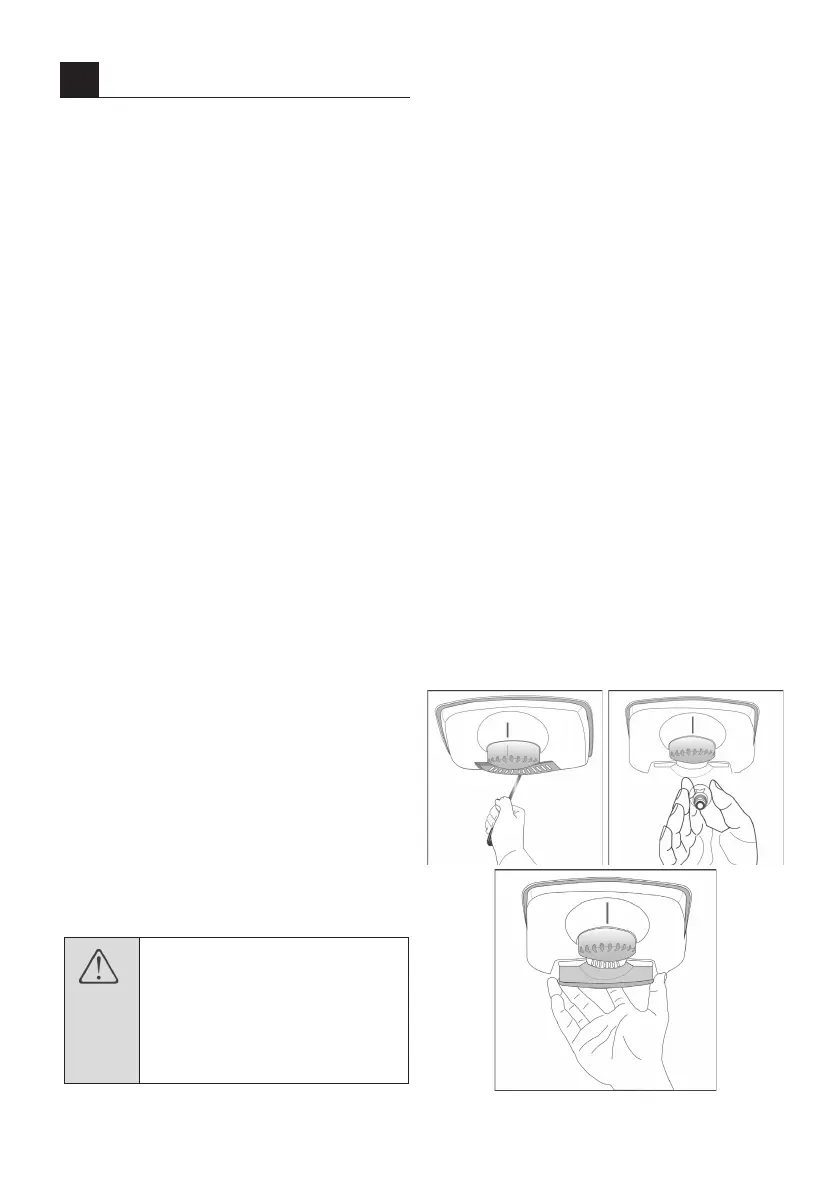
Replacing the light bulb
1. Switch off at the wall socket and pull out
the mains plug.
• Shelves may be removed for easy access.
2. Use a flat tipped screwdriver to remove the
light diffuser cover by inserting the blade into
each of the two recesses to prise off each
side.
3. First check that the bulb is not loose by
ensuring it is securely screwed into the
holder. Refit the plug and switch on. If the
bulb works, replace the light cover by
inserting the rear lug and pushing up to
locate the front two lugs.
4. If the light still fails to work, switch off at
the wall socket and pull out the mains plug.
Replace the bulb with a new 15 watt (max)
screw cap (SES) bulb.
5. Carefully dispose of the burnt-out light
bulb.
A replacement light bulb can be obtained
from a good local electrical or DIY store.