Dell SonicWALL SOHO Quick Start Guide
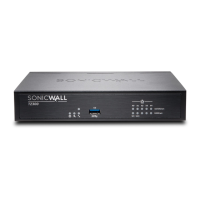
SOHO front and back panels
Figure 1. Front and back panels
Back Panel
Front Panel
10/100/act
SonicWALL
SOHO
1000/act
X0
lan
wan
X1
X2
X3
X4
wan SDHC powerlan
X0 X1 X2 X3 X4
console
SDHC Slot
For future use
Power
Test
Fast blinking is initializing
Slow blinking is SafeMode
Top - 10/100 Mbps when lit
Bottom - 1 Gbps when lit
X0 LAN Port
X2/X3/X4
USB port
Console Port
X1 WAN Port
Power
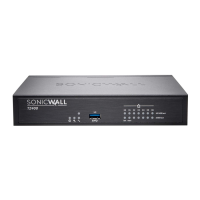
1 Check package contents
Verify your package has the following contents:
• SOHO appliance
• Ethernet cable
• Standard power adaptor
• Standard power cord
• Quick Start Guide
Figure 2. Package Contents
NOTE: The included power cord is approved for use
only in specific countries or regions. Before using a
power cord, verify that it is rated and approved for
use in your location.
2 Power on
• Connect the power adaptor to the appliance and to
the power cable. Plug the power cable into an
appropriate outlet (110-240 volts).
• The SOHO appliance powers on and the Test LED
blinks during the boot sequence.
Connect the interfaces
• Connect the WAN interface (X1) to your Internet
connection using a standard Ethernet cable.
• Connect the LAN interface (X0) to your computer
using a standard Ethernet cable.
Figure 3. Connecting WAN and LAN interfaces
4 Run the Setup Wizard
• In the Web browser on your computer, navigate to
https://192.168.168.168.
• In the window that opens, click on the word here
in the line that says, “To launch the Dell
SonicWALL Setup Wizard, click here.”
http://192.168.168.168/
http://192.168.168.168/
TIP: Your computer should be using DHCP IP
addressing.
• The SonicOS Startup Wizard opens.
• Click Next and enter the administrator credentials
to change the password, if you wish.
NOTE: The default administrator credentials are
Username: admin Password: password
• Click Next and follow the prompts on each screen
to configure any of following screens:
• Change Time Zone
• Configure Modular Device Type
• WAN Network Mode
• WAN Network Mode: NAT Enabled
• LAN Settings
• LAN DHCP Settings
• Ports Assignment
• Summary
• Setup Wizard Complete
• Example—On the WAN Network Mode page, select
the mode that you use to connect to your Internet
Service Provider (ISP). All modes except Router-
based offer automatic WAN IP addressing (DHCP).
Dell SonicWALL™ SOHO
Quick Start Guide
Regulatory Model Number: APL31-0B9