EasyManua.ls Logo

DeLonghi DNS80 User Manual

DeLonghi DNS80
4 pages
To Next Page IconTo Next Page
Page #1 background imageLoading...
Page #1 background image
10
Read the separate safety instructions before using the appliance
1. DESCRIPTION
1.1 Description of appliance (A)
A1. Control panel
A2. Deector
A3. Lifting handle
A4. Dust lter or nano silver lter
A5. Air inlet grille
A6. Water level viewing window
A7. Condensate collection tank
A8. Tank extraction grip
A9. Air outlet grille
A10. Continuous drain rubber stopper
A11. Condensate drain hose
1.2 Description of control panel (B)
B1. ON/STAND-BY button
B2. Mode button
B3. Dimming button
B4. Ioniser button
B5. Delay shutdown button
B6. Deector swing button
1.3 Display (C)
C1. Mode indicators
C2. Humidity indicator
C3. Delay shutdown (1~12 hours) + dimming level
C4. Ioniser indicator (ON)
C5. Swing indicators
C6. Alarm (blinks when the unit is malfunction)
C7. Water full/absent (blinks when the tank is full or not in place)
C8. Timer indicator (ON)
C9. Dimmer indicator (ON)
Please note: Before plugging the appliance check the cap on
back of water tank is correctly inserted.
2. INSTALLATION
min. 50 cm
min. 20 cm
min. 20 cm
min. 20 cm
min. 60 cm
Position the appliance in the room to be dehumidied.
Please follow the minimum distances between the appliance
and furniture or walls, as stated in gure.
Failure to do so would obstruct ventilation, jeopardising correct
operation of the appliance.
When the appliance is functioning, you should keep all doors
and windows closed while the appliance is in operation.
If doors and windows are opened, the temperature and humidity
in the room may change and it could therefore require longer to
dehumidify the room.
With temperatures of less than 1°C or above 40°C,
dehumidication is automatically deactivated and the appliance
switches to fan only mode.
If the humidity is lower than 20%, the safety circuit triggers
automatically and the dehumidier shuts down to avoid
damage.
If the humidity in the room drops, the dehumidication capacity
is automatically reduced.
Do not drop or tilt the appliance.
If the appliance falls over, place it upright immediately.
Even when the room is dehumidied, condensation and mould
may form externally or in poorly ventilated points, for example
behind furniture.
3. DRAINING THE CONDENSATE WATER
The condensate can be drained in 2 ways:
3.1 Draining into the tank
The condensate is drained directly into the tank (A7).
When the tank is full, the appliance stops and the display (C)
shows the tank alarm
B4C7
C3
C2
C1
C5
B5
B3
B2
B6
B1
C6 C4
(C7). Proceed as follows:
1. Extract the tank slowly using the designed grip, holding
the appliance rmly (g. 1) and empty it into a sink or a
bathtub.
2. Position the handle of the tank vertically as shown (g. 2)
for carrying to the pouring site.
3. Empty the tank by the opening (g. 3) No need to remove
the lid unless for washing the tank.
4. (Replace the lid and) lower the handle.
5. Put the tank back in the appliance.
When the empty tank is put back, the appliance starts
functioning according to the previous settings. The tank full icon
goes o.
Please note:
Do not remove the oat inside the tank. The oat is required
to sense when tank is full.
Replace the lid correctly before returning the tank to the
appliance.
When you remove the tank, do not touch internal parts of
the dehumidier. It could damage the appliance.
Question and Answer IconNeed help?

Do you have a question about the DeLonghi DNS80 and is the answer not in the manual?

DeLonghi DNS80 Specifications

General IconGeneral
DisplayLCD
HygrometerYes
Noise level34 dB
Input voltage220-240 V
Product colorBlack, Grey
Number of speeds2
Water tank capacity2.8 L
Humidity control typeStep
Timer duration (maximum)12 h
Dehumidifying capacity (max)7.5 l/24h
Power supply input frequency50 Hz
Suitable for room volume up to- m³
Operating temperature (T-T)1 - 35 °C
Operating relative humidity (H-H)30 - 95 %
AC input voltage220 - 240 V
Package depth390 mm
Package width245 mm
Package height570 mm
Package weight7400 g
Quantity per pallet27 pc(s)
Weight and Dimensions IconWeight and Dimensions
Depth192 mm
Width340 mm
Height501 mm
Weight6500 g

Summary

Description of Dehumidifier

Appliance Components Overview

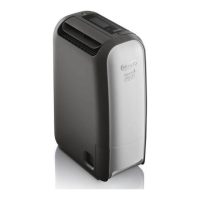
Details the physical components of the dehumidifier appliance, including the control panel, filters, and tank.

Control Panel Button Functions

Explains the function of each button on the appliance's control panel for user interaction.

Display Indicators Explained

Details the various indicators and symbols displayed on the unit to show operational status and settings.

Installation and Placement Guidelines

Condensate Water Drainage

Draining into the Collection Tank

Instructions for emptying the condensate collection tank when it is full, including handling and replacement.

Continuous External Draining Setup

Details how to set up continuous draining using a hose for extended operation without manual tank emptying.

Mode Selection and Operation

Dehumidifying Modes Explained

Explains the different dehumidifying modes like AUTO, DRY, MIN, MAX, and ECO, and their operational characteristics.

Using the Ioniser Function

Describes how to activate and use the ioniser function to emit negative ions from the air outlet.

Setting the Delayed Shutdown Timer

Explains how to set a timer for automatic shutdown of the appliance after a specified duration.

Adjusting LCD Display Brightness

Details how to adjust the brightness of the appliance's LCD display backlight.

Air Swing Function Control

Instructions on how to activate and control the automatic swing function of the deflector for air distribution.

Cleaning and Maintenance Procedures

Monthly Tank Cleaning

Provides a monthly schedule and procedure for cleaning the condensate collection tank.

Cabinet Exterior Cleaning

Outlines the correct methods and precautions for cleaning the exterior surfaces of the appliance.

Dust Filter or Nano Silver Filter Cleaning

Explains how to clean or replace the air filter to maintain efficient dehumidification and air quality.

Storage for Long Downtime

Steps to take when storing the appliance for extended periods to ensure it remains protected.

Technical Specifications

Alarms and Troubleshooting

Understanding Display Alarms

Explains the different alarm indicators shown on the display and their potential causes.

Common Malfunctions and Solutions

Provides a guide to common problems, their causes, and recommended solutions for the appliance.

Related product manuals