Do you have a question about the DeLonghi ECAM35025SB and is the answer not in the manual?
Essential safety measures for operating electrical appliances, including handling, immersion, children's safety, and proper usage.
Guidelines for using short power cords to reduce tripping hazards and ensure safe electrical connection.
Explanation of symbols like Danger, Important, and Please Note used to convey critical information and warnings.
Reference to bracketed letters used in the machine description for identification.
Guidance on resolving problems by referring to lights and troubleshooting sections, and contacting customer service.
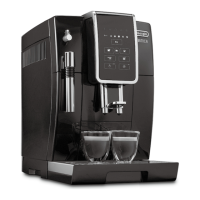
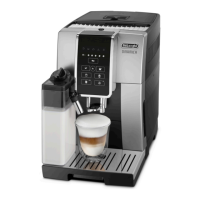
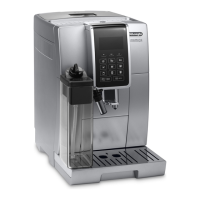
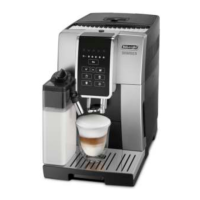
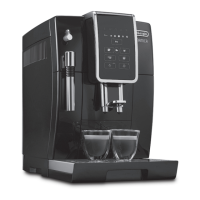
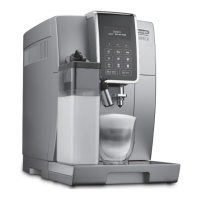
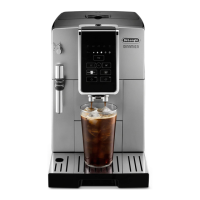
Detailed list and identification of all parts of the coffee machine, labeled from A1 to A24.
Explanation of touch screen icons, their functions, and status indicators (e.g., heating, water level, alarms).
List of accessories included with the machine, such as test paper, scoop, descaler, filter, and brush.
Verify machine completeness and condition after unpacking, contact customer service if damaged.
Guidance on installing the machine, including ventilation space, avoiding water damage, and proper cord placement.
Ensure voltage compatibility and connect to a properly earthed socket with adequate current rating.
Detailed steps for initial setup, including filling the water tank, performing a rinse cycle, and recommendations for water softener filter.
Description of the automatic preheat and rinse cycle performed each time the machine is turned on.
Explanation of the light indicator showing the machine is heating up.
Details the automatic rinse cycle performed when the machine is turned off.
Guide on calibrating the grinder for optimal coffee strength and delivery, with notes on adjustment dial usage.
Recommendations to achieve hotter coffee, including preheating cups and adjusting temperature.
Step-by-step instructions for making coffee using whole beans, including cup placement and selecting beverages.
How to temporarily adjust the coffee strength and aroma using the strength selector.
Instructions and precautions for using pre-ground coffee, including quantity limits and single-cup brewing.
Guide to customizing coffee strength and quantity to personal taste, saving preferred settings.
Guide on programming the length of TrueBrew Over Ice™ coffee by selecting strength and quantity.
Instructions for preparing hot milk without froth using the frother.
Detailed steps for cleaning the frother immediately after use to prevent blockages and residue buildup.
List of parts to be cleaned regularly and precautions against using solvents or abrasive detergents.
Recommended rinse cycles after periods of inactivity for internal circuit hygiene.
Instructions for emptying and cleaning the grounds container when the indicator light flashes.
How to remove, empty, and clean the drip tray and condensate tray, noting the level indicator.
Procedure for cleaning internal parts accessed after removing the drip tray, emphasizing safety.
Routine cleaning of the water tank, including filter removal and replacement.
Regular cleaning of coffee spouts and checking for blockages.
Checking and cleaning the pre-ground coffee funnel for blockages.
Monthly cleaning procedure for the infuser, including removal, soaking, and reassembly, with specific warnings.
How to identify when the machine needs descaling via the flashing light indicator.
Important notes on using De'Longhi descaler only and the implications for the manufacturer's guarantee.
Detailed instructions for descaling the machine, including preparing the solution and running the cycle.
Procedure for measuring water hardness using the indicator paper and interpreting the color results.
How to program the machine with the measured water hardness level for optimized performance.
Step-by-step guide on how to install the water softener filter, including date setting and activation.
Instructions for replacing the water softener filter after the recommended usage period.
Solutions for when the coffee is not hot, including preheating cups and adjusting temperature.
Resolving the 'water circuit empty' indication by operating the steam/hot water dial.
Guidance for cleaning the machine's interior when indicated.
Instructions for correctly inserting the infuser after cleaning.
Interpreting and acting on indications related to the steam/hot water dial.
Guidance on the descaling procedure when indicated by the machine.
Fixes for weak or not creamy coffee, typically related to coffee grind fineness.
Solutions for slow coffee delivery, often due to coffee grind fineness or blockages.
Steps to resolve issues when the machine does not make coffee, such as internal circuit checks.
Guidance if the infuser cannot be extracted, usually related to the machine not being turned off correctly.
Solutions for large bubbles in frothed milk, often due to milk temperature or froth quality.
Fixes for milk not frothing, related to the frother setting or milk type.
Resolving the issue of a third rinse request after descaling, typically due to water tank level.
Explanation for why steam delivery might stop and how to resume it.
Steps to take if the machine does not power on, checking the power connection and main switch.
Solutions for when coffee is not dispensed from the spouts, usually due to blockages.
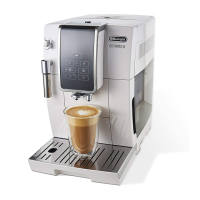
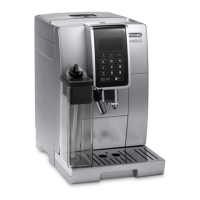
This document describes an automatic coffee machine with a frother, designed for household use. It covers various functions, usage instructions, and maintenance procedures to ensure optimal performance and longevity of the device.
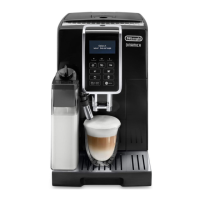
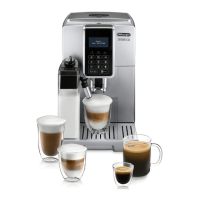
The coffee machine is designed to prepare a variety of coffee beverages, including espresso, espresso lungo, and TrueBrew Over Ice™ coffee. It features a built-in coffee grinder, a frother for hot milk and cappuccino, and a hot water delivery function. The machine is equipped with a touch screen interface for easy operation and setting adjustments.
Coffee Preparation: The machine can make coffee using either coffee beans or pre-ground coffee. Users can adjust the coffee strength and quantity to their preference. For coffee beans, the integrated grinder allows for adjustment of the grinding level, which impacts the coffee's strength and creaminess. The machine can prepare one or two cups of espresso or espresso lungo simultaneously.
Milk Frothing: The frother (A20) is a key component for preparing cappuccinos and hot milk. It can be set to either "CAPPUCCINO" for frothed milk or "HOT MILK" for unfrothed hot milk. The frother delivers steam to heat and froth milk, allowing users to create creamy textures for their beverages.
Hot Water Delivery: The machine also provides hot water on demand, which can be used for warming cups or preparing other hot beverages.
Customization and Settings: Users can customize several settings to tailor their coffee experience:
Before First Use: Upon unpacking, it is essential to check for completeness and any visible damage. The machine requires an initial setup process that involves filling the water tank, placing a container under the frother, and turning the steam/hot water dial to perform a rinse cycle. This ensures the internal circuits are clean and heated.
Turning On and Off: The machine is turned on by pressing the power button (A24) after ensuring the main switch (A6) is pressed. When turning on, the machine performs an automatic preheat and rinse cycle. To turn off, the power button is pressed again, which also triggers an automatic rinse cycle if coffee has been made. For extended periods of non-use, it is recommended to unplug the machine from the mains socket.
Making Coffee:
Making Cappuccino and Hot Milk: Fill a container with milk (preferably cold, skimmed or semi-skimmed). Position the frother selection ring (A21) to "CAPPUCCINO" for froth or "HOT MILK" for unfrothed milk. Immerse the frother (A20) in the milk, ensuring the black ring is not immersed. Press the general alarm icon (B14) to start heating, then turn the steam/hot water dial (A23) to the "I" position to deliver steam. Once the desired froth is achieved, turn the dial back to "0".
Rinsing: The rinsing function delivers hot water from the coffee spouts to clean and heat the machine's internal circuit. It is recommended to perform 2-3 rinses if the machine has not been used for several days.
Regular cleaning and maintenance are crucial for the machine's performance and hygiene.
Cleaning the Machine: Several parts require regular cleaning:
Descaling: The machine needs descaling when the descaling light (B5) flashes. The descaling procedure involves:
Water Softener Filter: If the machine is equipped with a water softener filter (C4), it should be installed and replaced every two months or after three weeks of non-use. Installation involves removing the filter from its packaging, setting the date disk, running tap water through it, immersing it in the water tank, inserting it into the filter housing (A18), and delivering hot water to activate it.
Important Safeguards: The manual emphasizes several safety precautions, including reading all instructions, ensuring correct voltage, avoiding hot surfaces, not immersing the machine in liquids, keeping it out of reach of children, unplugging when not in use or before cleaning, and not operating with damaged cords or plugs. Repairs should only be done by authorized service personnel to avoid voiding the warranty. The machine is for household use only.
| Model | ECAM35025SB |
|---|---|
| Color | Silver |
| Power | 1450 watts |
| Voltage | 120 volts |
| Water Tank Capacity | 60 ounces |
| Pressure | 15 bar |
| Milk Frother | Yes |
| Programmable | Yes |
| Adjustable Coffee Spout | Yes |
| Removable Water Tank | Yes |
| Removable Drip Tray | Yes |
| Type | Automatic Coffee Machine |
| Display | Yes |
| Grinder | Integrated burr grinder |
| Coffee Strength Settings | Yes |