EasyManua.ls Logo

Delta Children babyGap 14982 - User Manual

Delta Children babyGap 14982
25 pages
Print Icon
To Next Page IconTo Next Page
Loading...
Customer Service gcs@DeltaChildren.com
www.DeltaChildren.com
1
INSTRUCTION MANUAL
This stroller is not from, sponsored or endorsed by Graco Children’s Products Inc.
This stroller is not from, sponsored or endorsed by Evenflo Company, Inc.
This stroller is not from, sponsored or endorsed by Artsana S.p.A.
Copyright Britax. All rights reserved.
Fits Graco® SnugRide® Click Connect™ Infant Car Seat (not included)
Fits Evenflo® Embrace™ Select Infant Car Seat (not included)
Fits Evenflo® Nurture™ Infant Car Seat (not included)
Fits Chicco® Keyfit 30™ Infant Car Seat (not included)
Fits Britax® B-Safe 35™ Infant Car Seat (not included)
WARNING:
Adult assembly required because of
small parts. Keep assembly parts
out
of reach of children under 3 years.
CHOKING HAZARD
STYLES AND COLORS MAY VARY
14982
DCP-IM-08312022
www.DeltaChildren.com
Customer Experience Center
email: gcs@DeltaChildren.com
Read all instructions BEFORE assembly and USE of product
KEEP INSTRUCTIONS FOR FUTURE USE.
TREK JOGGING
STROLLER
Question and Answer IconNeed help?

Do you have a question about the Delta Children babyGap 14982 and is the answer not in the manual?

Summary

Safety and Warnings

General Safety Advice

Follow all instructions for child safety and avoid injury from falling or tip-over.

Care and Maintenance

Clean stroller with mild soap and water. Inspect parts regularly for wear and tear.

Product Support

Returns and Assistance

Contact customer service for help with assembly, parts, or product use issues.

Warranty Information

Details on limited and extended warranty coverage, registration, and exclusions.

Assembly Instructions

Front Wheel Assembly

Steps to attach the front wheel using axle lock nuts and retainer plate.

Testing Wheel Installation

Verify front wheel is securely attached and front swivel wheel is locked.

Rear Wheel Assembly

Instructions for attaching the rear wheels until they click into place.

Parent Tray and Canopy

Attach parent organizer using velcro straps and operate stroller canopy.

Sun Visor and Child Tray

Open sun visor and attach/remove the child tray securely.

Adjustable Handle

Adjust stroller handle height by pressing release buttons and locking into position.

Seat Back Recline

Recline or adjust seat to upright position using cord housing mechanism.

Attaching Car Seats

Guide to securely attach Graco, Evenflo, Chicco, and Britax car seats.

Jogging Setup

Lock front swivel wheel and connect safety tether strap for safe jogging.

Folding and Unfolding

Steps for safely folding and unfolding the stroller to prevent finger entrapment.

Safety Operations

Brake Operation

How to lock and release the rear wheel brakes for parking the stroller.

Securing the Child

Properly secure child with the 5-point harness, including tightening straps.

Other Information

Flat Tire Maintenance

Instructions for inflating bicycle air tires to 25 psi.

Overview

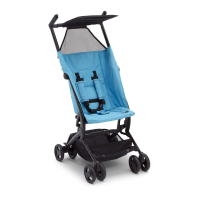
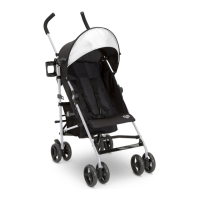
This document is an instruction manual for the babyGap Trek Jogging Stroller, model number 14982. It provides comprehensive information on assembly, usage, safety, maintenance, and warranty.

Function Description:

The babyGap Trek Jogging Stroller is designed as a single-occupant jogging stroller for one child. It is compatible with several infant car seats (adapters sold separately), including Graco® SnugRide® Click Connect™, Evenflo® Embrace™ Select, Evenflo® Nurture™, Chicco® Keyfit 30™, and Britax® B-Safe 35™. The stroller is intended for jogging, running, or fast walking, and features a lockable front swivel wheel for stability during these activities. It includes a 5-point safety harness to secure the child, an adjustable handle, a canopy with a sun visor and peek-a-boo window, and storage options like a lower basket, child tray, and parent organizer.

Important Technical Specifications:

  • Occupancy: Single occupant.
  • Maximum Child Weight: 50 pounds (22.62 kg).
  • Maximum Child Height: 42 inches (106.7 cm).
  • Minimum Child Age for Jogging: 6 months.
  • Storage Capacity (Lower Basket, Child Tray, Parent Fabric Tray, Parent Organizer): 3 lbs (1.36 kg) each.
  • Tire Type: Bicycle air tires.
  • Tire Inflation Pressure: 25 psi.
  • Car Seat Compatibility:
    • Graco® SnugRide® Click Connect™ Infant Car Seat (not included)
    • Evenflo® Embrace™ Select Infant Car Seat (not included)
    • Evenflo® Nurture™ Infant Car Seat (not included)
    • Chicco® Keyfit 30™ Infant Car Seat (not included)
    • Britax® B-Safe 35™ Infant Car Seat (not included)
    • Note: Car seat adapters are sold separately.

Usage Features:

Assembly:

The stroller requires adult assembly. Components to be installed include the front wheel, rear wheels, parent tray, and child tray.

  • Front Wheel Installation: The front wheel uses an axle lock nut system. The stroller should be leaned backward with the front fork pointing upward. The front wheel axle hooks into the fork's slots. A retainer plate slides onto the axle with its bent tab facing and trapped inside the front fork slot. Axle lock nuts are then tightened with a standard wrench until secure. Proper installation is confirmed by pulling on the wheel and ensuring the front swivel wheel is locked.
  • Rear Wheel Installation: Lay the stroller on its side. Align the back wheel axle with the rear wheel axle housing and push inward until a "click" is heard, indicating a fully locked position. Pull outward to verify security.
  • Parent Tray Attachment: The parent fabric organizer attaches to the jogger handle using velcro straps. The strap wraps around the handle, threads through a plastic buckle, and is pulled tight. An internal velcro strip secures the organizer.
  • Canopy Operation: To open, pull the front edge forward until fully extended. To close, push the front edge backward until collapsed.
  • Sun Visor Operation: To open, pull down and rotate the front edge of the sun visor under the canopy until fully extended.
  • Peek-A-Boo Window: To open, flip the window backward.
  • Child Tray Attachment: Rotate and align the child tray posts with the stroller tray posts. Press the posts into a fully locked position. Press the child tray button and snap the tray onto the stroller posts, then release the button to lock. Verify security by pulling upward.
  • Child Tray Removal/Access: To access the child seat, press the left or right release buttons and rotate the tray upward. To remove the tray, press both release buttons and pull upward.
  • Adjustable Handle: Press the handle release button and push the handle upward or downward to the desired position. A "click" indicates it is safely locked.

Safety and Operation:

  • Brakes: Rear wheel brakes are located on each rear wheel. To lock, press downward on the brake lever until it clicks. To release, gently push upward. Brakes should always be locked when the stroller is parked on a hill or incline, and the child should never be left unattended.
  • Securing the Child:
    1. Place the child in the stroller, positioning the crotch belt between their legs.
    2. Pull shoulder straps over the child's arms and shoulders, fastening both strap ends to the restraint system.
    3. Fasten both waist belts to the buckle on each side of the crotch belt until a "click" is heard.
    4. Check that the restraint system is securely attached by pulling it away from the child.
    5. Tighten the waist belts and shoulder straps by feeding the anchored end of the waist belt up through the buckle to form a loop, then pulling the free end. For shoulder straps, feed the top end through the plastic stay to form a loop, then pull the bottom end down.
    6. To loosen, reverse the process: feed the free end of the waist belt up through the buckle to enlarge the loop, then pull the anchored end. For shoulder straps, feed the bottom end through the plastic stay, then pull the top end up.
    7. Always ensure the restraint system is snug and securely fastened after adjustment.
  • Seat Back Recline: Squeeze both sides of the cord housing and pull away to recline the seat. To return to an upright position, hold the bottom cord loops, squeeze the cord housing, and move it upward toward the backseat. The three back buttons must always remain attached to the back of the seat.
  • Car Seat Attachment (Adapters Sold Separately):
    1. Lock back wheels, close the canopy, and recline the seat. Turn and lock the grey latches.
    2. Align the car seat (feet first) and lower it into a locked position on the child tray until it "clicks." Verify security by pulling upward.
    3. Secure the car seat to the stroller using velcro straps. The top strap secures Graco, Chicco, and Evenflo car seats. The lower strap secures Britax car seats.
    4. For Chicco and Britax car seats, specific adapters are required. These adapters are labeled for left/right placement and must be inserted into the stroller arm posts with locking tabs facing inward. Ensure the release button is securely fastened.
    5. To remove a car seat, lift the back lever (if applicable) and lift the car seat upward.
  • Jogging with Stroller:
    • Front Swivel Wheel Lock: Push upward on the front swivel wheel lock to put the wheel in a straight position, preventing swiveling during jogging, running, or fast walking.
    • Safety Tether Strap: Always connect the tether strap to either the right or left wrist when jogging to prevent the stroller from rolling away. The strap must remain connected to the rear lower frame cross member. It can be stored on the side with velcro when not in use. The tether strap also helps prevent the stroller from tipping backward.

Folding and Unfolding:

  • Folding: Close the canopy and recline the seat. Simultaneously pull each trigger fold located on the right and left handle above the canopy. The handle will rotate and lower toward the floor. The stroller is fully folded when the locking fold latch is secured over the "T" post on the right side.
  • Unfolding: Place the stroller on the ground with all three wheels touching. Release the locking folding latch on the right side. Lift the stroller handle with both hands until the frame is in a fully opened and locked position. Ensure both side handle latches are fully engaged and locked before placing a child in the stroller.
  • Warning: Exercise care during folding and unfolding to prevent finger entrapment.

Maintenance Features:

  • Cleaning: Use a mild household soap with warm water on a sponge or clean cloth.
  • Regular Checks: Periodically inspect for loose screws, worn parts, torn material, or stitching. Replace or repair parts as needed.
  • Discontinuation of Use: Discontinue use if the stroller becomes damaged or malfunctions. Contact customer service for repair or replacement parts.
  • Flat Tires: The bicycle air tires can go flat. Inflate them to 25 psi using a standard bicycle hand air pump. Flat tire repair can also be done at a bicycle shop.

Warranty and Support:

  • Limited Manufacturer Warranty: 90 days from the date of purchase for defects under normal use. Covers repair or replacement of defective parts/products. Valid for the original retail purchaser with proof of purchase or gift registration. Excludes floor models, "as-is" items, second-hand products, resale products, final sale, "going out of business" sale, or liquidation sale.
  • Extended Warranty: Delta offers a 2-year extended warranty covering mechanical failure from normal use, wear and tear, and unexpected surprises. Registration and purchase details are available on their website.
  • Customer Service: For assembly difficulties, missing parts, damaged parts, or general assistance, contact the Consumer Experience Center via email at gcs@DeltaChildren.com. Do not return the item to the store for these issues. Provide the Style#, Model#, and Lot# (found on a white rectangular sticker on the product, registration card, or product box) when contacting customer service.
  • Product Registration: Register the product at www.deltachildren.com for safety alerts and updates.
  • Reporting Problems: Log on to www.deltachildren.com and click the Consumer Care Tab, or email gcs@DeltaChildren.com.

Delta Children babyGap 14982 Specifications

General IconGeneral
BrandDelta Children
ModelbabyGap 14982
CategoryStroller
LanguageEnglish

Related product manuals