EasyManua.ls Logo

Delta Children Mickey Mouse Playhouse User Manual

Delta Children Mickey Mouse Playhouse
12 pages
To Next Page IconTo Next Page
Page #1 background imageLoading...
Page #1 background image
Mickey Mouse Playhouse
PH86530MM
PLAYHOUSE
WARNING:
THIS ITEM REQUIRES ASSEMBLY BY AN ADULT BECAUSE OF
SMALL PARTS AND SHARP POINTS. CARE SHOULD BE
TAKEN UNPACKING AND ASSEMBLY OF THIS PRODUCT.
PHILLIPS SCREWDRIVER REQUIRED
Colors and styles may vary slightly.
Accessories not included.
CASITA DE JUEGOS
ADVERTENCIA:
ESTE ARTÍCULO DEBE SER ENSAMBLADO POR UN ADULTO DEBIDO
A SUS PEQUEÑAS Y PUNTIAGUDAS PIEZAS. SE DEBE TENER
CUIDADO EN EL DESEMPAQUE Y MONTAJE DE ESTE PRODUCTO.
CABANE POUR ENFANTS
AVERTISSEMENT:
CET ARTICLE DOIT ÊTRE ASSEMBLÉ PAR UN ADULTE EN RAISON DES
PETITES PIÈCES ET D'ENDROITS POINTUS. UNE ATTENTION DOIT
ÊTRE PORTÉE AU DÉBALLAGE ET À LASSEMBLAGE DE CE PRODUIT.
SE REQUIERE DESTORNILLADOR PHILLIPS
Los colores y los estilos pueden variar ligeramente
Los accesorios no están incluidos
TOURNEVIS PHILLIPS REQUIS
Les couleurs et les styles peuvent varier légèrement
Les accessoires ne sont pas inclus
SCAN ME
for video instructions
Question and Answer IconNeed help?

Do you have a question about the Delta Children Mickey Mouse Playhouse and is the answer not in the manual?

Delta Children Mickey Mouse Playhouse Specifications

General IconGeneral
Product TypePlayhouse
CharacterMickey Mouse
MaterialPlastic
Minimum Recommended Age2 years
BrandDelta Children
Recommended UseIndoor
ColorMulticolor
ThemeMickey Mouse

Summary

Mickey Mouse Playhouse Identification and Safety

Assembly and Usage Warnings

Product requires adult assembly due to small parts and sharp points. Handle with care during unpacking and assembly.

Playhouse Parts and Hardware Inventory

List of Playhouse Parts

Visual identification of all numbered parts A through M used in assembly.

List of Hardware Components

Visual identification of screw types AA and BB with quantities for assembly.

Mickey Mouse Playhouse Stickers

Sticker Identification Chart

Visual guide to all available stickers labeled A through Q for decorating the playhouse.

Sticker Application Instructions

Sticker Application Best Practices

Apply all stickers on individual parts before assembly on a flat surface.

Sticker Placement Guide

Diagrams showing specific sticker placements on playhouse components before assembly.

Playhouse Assembly - Initial Steps 1-4

Step 1: Attaching Part M to Part C

Attach two part M's to part C using six screws AA.

Step 2: Connecting Parts B to Part A

Slide part B's into part A at an angle and swing down.

Step 3: Connecting Part A to Parts B

Slide part A into two part B's at an angle and swing down.

Step 4: Attaching Part C to Part A

Place part C into part A at an angle and swing up.

Playhouse Assembly - Steps 5-8

Step 5: Attaching Parts E & D to Part C

Place part E and D into part C and slide down to snap.

Step 6: Attaching Part C to Part A

Place part C into part A at an angle and swing up.

Step 7: Attaching Parts E & D to Part C

Place part E and D into part C and slide down to snap.

Step 8: Connecting Parts F to Parts D & E

Slide both part F's into part D & E.

Playhouse Assembly - Steps 9-12

Step 9: Attaching Part G to F, D & E

Place part G into parts F, D, and E and slide down.

Step 10: Attaching Part H to F, E & D

Place part H into parts F, E, and D and slide down.

Step 11: Securing Parts G & H with Screws BB

Screw two screws BB on the underside of parts G & H.

Step 12: Securing Side Panels

Press down on corners to ensure side panels are snapped in.

Playhouse Assembly - Steps 13-14

Step 13: Attaching Part J to E & B

Place top of part J into part E and bottom into part B.

Step 14: Attaching Part J to E & B

Place top of part J into part E and bottom into part B.

Playhouse Assembly - Steps 15-16

Step 15: Attaching Part K to Part C

Snap both part K's into both part C's.

Step 16: Attaching Parts L to C & E

Wedge both part L's into both part C's and both part E's.

Playhouse Assembly - Steps 17-18

Step 17: Attaching Mickey Ears to G & H

Snap both 'Mickey Ears' into part G & H.

Step 18: Ensuring Screw Installation

Verify screws BB are installed on the underside of the roof.

Playhouse Usage and Orientation

Correct Playhouse Orientation

Playhouse should always be upright; not intended for side or roof use.

Safety Information and Consumer Care

Detailed Safety Warnings

Comprehensive warnings regarding choking hazards, age limits, placement, and supervision.

Consumer Care and Contact Information

Contact details, website, and manufacturer information for support.
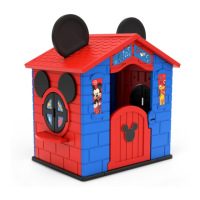
Related product manuals