EasyManua.ls Logo

Delta Children Simmons Juvenile Crib ‘N’ More User Manual

Delta Children Simmons Juvenile Crib ‘N’ More
22 pages
To Next Page IconTo Next Page
Page #1 background imageLoading...
Page #1 background image
Style #:
Lot:
Date:
___________
___________
___________
A
REV
Note: The style of your item may vary from what is pictured in
the instruction sheet.
Remarque : Le modèle de votre article peut être différent de
celui qui est illustré dans le feuillet d’instructions.
Note: El estilo de su artículo puede variar de la ilustración en la
hoja de instrucciones.
26409 - April 21,2016
Conforms to
ASTM F1169 & F1821
Safety Standards
Lea todas las instrucciones antes de
ensamblar y usar. MANTENGA LAS
INSTRUCCIONES PARA SU USO FUTURO.
Read all instructions before assembly
and use. KEEP INSTRUCTIONS
FOR FUTURE USE.
ADULT ASSEMBLY
REQUIRED
Due to the presence of small parts during assembly,
keep out of reach of children until assembly is complete.
DEBE SER ENSAMBLADO
POR UN ADULTO
Debido a la presencia de piezas pequeñas durante el ensamblaje,
mantenga fuera del alcance de los niños hasta que complete el
ensamblaje.
Lisez toutes les instructions avant l’assemblage et
l’utilisation. CONSERVEZ LES INSTRUCTIONS
POUR RÉFÉRENCE ULTÉRIEURE.
L’ASSEMBLAGE DOIT ETRE FAIT
PAR UN ADULTE
A cause de la présence de petites piéces, pendant l’assemblage gardez
hors de portée des enfants jusqu'à ce que celui-ci soit terminé.
When contacting Consumer Care please reference the below information. Before contacting Consumer Care please ensure that the
information below matches the information found on the label on the Back Rail, please reference the information found on the
product when contacting Consumer Care.
Lorsque vous contactez le Service client, veuillez faire référence aux informations ci-dessus. Avant de contacter le Service client,
veuillez vous assurer que les informations ci-dessous correspondent aux informations indiquées sur l’étiquette qui se trouve sur
Panneau Arrière; veuillez faire référence aux informations indiquées sur le produit lorsque vous contactez le Service client.
Al contactar al servicio al cliente, entregue la información anteriormente mencionada. Antes de contactar al servicio de atención al
cliente, asegúrese de que la información abajo calza con la que aparece en la etiqueta en Barandilla Posterior; al contactar al
centro de atención al cliente, mencione la información que aparece en el producto.
Need Help?
Please visit www.SimmonsKids.com/assembly-videos to watch our
easy and effective assembly videos
Besoin d’aide?
Veuillez visiter www.SimmonsKids.com/assembly-videos pour
regarder nos vidéos faciles et efficaces concernant l’assemblage
Necesita ayuda?
Por favor, visite www.SimmonsKids.com/assembly-videos para que
vea nuestros videos que muestran como ensamblar de una manera
efectiva y fácil.
To register your product for important safety alerts and updates to your product please visit
www.SimmonsRegistration.com
Pour enregistrer votre produit afin de recevoir des alertes de sécurité et des mises à jour importantes
relatives à votre produit, veuillez visiter le site www.SimmonsRegistration.com
Para registrar su producto a fin de recibir importantes alertas y actualizaciones de seguridad, visite
www.SimmonsRegistration.com
Distributed in Canada by
Distribué au Canada près
Delta Children’s Products
Care of/Soins de:
501 Franklin Boulevard
Cambridge, Ontario N1R8G9
Canada
212-645-9033
Assembly Instructions for your Crib ‘N’ More
Directives de Montage pour votre Lit de Bébé Crib ‘N’ More
Instrucciones de Ensamble de su Cuna Crib ‘N’ More
Simmons Juvenile Furniture
A Division Of Delta Children's Products Corp.
114 West 26th Street
New York, NY 10001
1-800-218-2741
©2016 Simmons Juvenile Furniture, A Division of Delta Children's Products Corp.
Question and Answer IconNeed help?

Do you have a question about the Delta Children Simmons Juvenile Crib ‘N’ More and is the answer not in the manual?

Delta Children Simmons Juvenile Crib ‘N’ More Specifications

General IconGeneral
BrandDelta Children
ModelSimmons Juvenile Crib ‘N’ More
CategoryBaby & Toddler Furniture
LanguageEnglish

Summary

Adult Assembly Required

Safe Sleep Tips

Safe Sleep Environment

Use JPMA certified crib, firm mattress. Avoid pillows, blankets, or items in crib.

Strangulation and Placement Hazards

Never place crib near windows or hangings. Avoid strings around child's neck.

Recommended Sleep Position

AAP recommends always laying baby on its back to sleep. Consult your doctor.

Assembly & Support

Read all warnings and instructions. Contact Consumer Care for missing parts.

Furniture Safety Tips

Furniture Tip-Over & Climbing Hazards

Serious injuries from tip-over. NEVER allow climbing or hanging on furniture.

Safe Furniture Use & Restraints

Do not place heavy objects on furniture. Always use provided tipover restraints.

Drawer Safety Precautions

Place heaviest items low. Do not open more than one drawer at a time.

Assembly & Consumer Support

Read all warnings and instructions. Contact Consumer Care for parts or questions.

Crib Parts Identification

Crib Frame Components

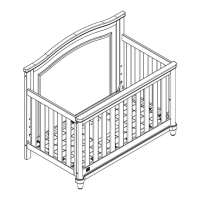
Identification of crib sides, posts, and rails for assembly.

Mattress Support

Component for supporting the crib mattress.

Instruction Sheet Pouch

Pouch containing assembly instructions and warnings.

Crib Hardware and Tools

Hardware Fasteners

List of bolts and barrel nuts required for assembly.

Required Assembly Tools

M4 Allen Wrench (provided) and Flat Head Screwdriver (not provided).

Assembly Precautions

No drills necessary. Do not use power screwdrivers.

Step 1: Assemble Rear Posts to Back Rail

Connecting Rear Posts and Back Rail

Attach Left/Right Rear Posts to Back Rail using specified bolts and nuts.

Tool Usage for Assembly

Tighten with M4 Allen Wrench; use screwdriver for barrel nut alignment.

Label Orientation

Ensure the label on the parts is oriented towards the inside.

Step 2: Attach Crib Sides

Attaching Right Crib Side

Attach Right Crib Side (Part #5) to assembly using M6x45mm Bolts (Part #10).

Attaching Left Crib Side

Attach Left Crib Side (Part #4) to assembly using M6x45mm Bolts (Part #10).

Tightening and Label Alignment

Tighten bolts with Allen Wrench. Ensure label faces inward.

Step 3: Install Mattress Support

Securing the Mattress Support

Attach Mattress Support (Part #7) using bolts (Part #11).

Mattress Support Height Positions

Note three positions for mattress support based on child's height.

Scratch Prevention During Installation

Use care to prevent scratching crib posts when positioning support.

Mattress Support Installation Warnings

Ensure pouch warnings face up and support is level.

Step 4: Attach Front Rail

Connecting the Front Rail

Attach Front Rail (Part #6) to assembly using M6x45mm Bolts (Part #10).

Final Tightening

Tighten all bolts securely with the M4 Allen Wrench.

Crib Safety Warnings and Precautions

Mattress Size and Thickness Requirements

Mattress must be 27 1/4 x 51 5/8 in. with thickness not exceeding 6 in.

Infant Safety Hazards

Hazards include suffocation, strangulation, and entrapment in gaps.

Fall Prevention Measures

Stop use when child climbs or reaches 35 inches. Remove climbing aids.

General Product Safety

Check for damage, use safe finishes, ensure secure components.

Toddler Bed Safety Guidelines

Toddler Bed Entrapment and Strangulation Hazards

Openings can entrap head/neck. Avoid cords. Never use for infants under 15 months.

Toddler Bed Mattress Requirements

Use full-size crib mattress: 51 5/8 L x 27 1/4 W x 6 in. thick.

Toddler Bed Assembly and Usage

Follow instructions, use soft surface, monitor child, no climbing.

Toddler Bed Care and Maintenance

Clean gently, inspect periodically, avoid extreme temperatures and abrasives.

Toddler Bed Conversion Option

Toddler Guard Rail Requirement

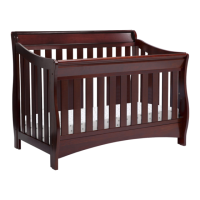
Crib converts to toddler bed with Simmons Item #328725 Toddler Guard Rail.

Full Size Bed Conversion

Full Size Bed Rails

Converts to Full Size Bed with purchase of Item #0050 Bed Rails.

Attaching Bed Rails

Attach bed rails to Back Rail (Part #3) and Front Rail (Part #6) using bolts.

Related product manuals