Do you have a question about the DELTA DORE TYXIA 5630 and is the answer not in the manual?
Essential safety step before starting installation.
Instructions for connecting solid and stranded wires to terminals.
Guidance for connecting the switch to IN1-COM-IN2 terminals.
Steps to connect the 230V power supply to terminals 1 and 2.
Behavior when an overload is detected.
Configures the receiver for a Hold switch type.
Configures the receiver for a double push-button.
Configures the receiver for a single push-button.
Overview of functions accessible via the receiver button.
Verifies the current operating mode of the transmitter.
Steps to pair a transmitter with the receiver.
Procedure to change receiver configuration settings.
Deletes a specific transmitter from the receiver.
Deletes all paired transmitters from the receiver.
Resets the receiver to its default settings.
The TYXIA 5630 and TYXIA 5730 are receivers designed for roller shutters, enabling remote control and integration into a broader smart home system. These devices function as an interface between your roller shutter motor and control mechanisms, including switches, push-buttons, and wireless remote controls.
At its core, the device allows you to control the raising, lowering, and stopping of your roller shutter. It supports various control inputs, making it adaptable to different user preferences and existing installations. When an overload is detected, the receiver enters an "off" mode for 30 seconds, indicated by a rapidly flashing LED, before allowing further activation. This safety feature protects the device and the roller shutter motor from potential damage. For the TYXIA 5630, if an overload occurs, it is recommended to replace the receiver with a TYXIA 5730. For the TYXIA 5730, customer service should be contacted in such an event.
Before installation, it is crucial to switch off the installation power supply to ensure safety. The receiver can be installed in a flush-mounted box behind a switch or control push-button, or within a sealed box inside the roller shutter itself. When installing, ensure a safe distance from metal parts to avoid interference.
The device requires a 10A circuit breaker for protection. When connecting wires, it's important to use an electrically isolated tool for actions involving the receiver's configuration button. The control wires, which are not insulated from the mains power supply, can be extended up to 10 meters, provided they are kept separate from the 230V wiring. All connected equipment must be CE marked and comply with low voltage device and assembly recommendations. Crucially, the roller shutter's high and low stops must be set before the receiver is installed to ensure proper operation.
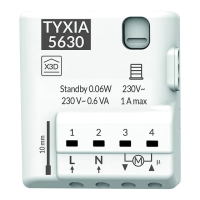
For solid wires, connections are made by pressing the button of the front terminal with a 2.5 mm screwdriver before inserting the wire. For stranded wires, the provided wires should be pushed fully into the terminal. It's important not to strip the wires when connecting them to the product, as this could damage the internal connector. The strip length specified on the product (7mm for 0.5mm² wires, or Ø 0.75 - 1.5 mm² for other wires) should be respected when preparing wires for connection.
The motor control wires are connected to terminals 3 and 4 (terminal 3 for lowering, terminal 4 for raising). The switch is connected to the IN1 - COM - IN2 terminals. The 230V power supply is connected to terminals 1 and 2. Once all connections are made, the installation power can be switched back on to proceed with the association process.
To associate the receiver with a transmitter (e.g., a remote control), press and hold the receiver button for 3 seconds until the LED flashes, then release it. While the LED is flashing, send the association command from your transmitter (refer to its user guide). The association is complete when the receiver LED stops flashing.
The receiver supports three modes, configurable based on the type of switch connected:
To modify the configuration, press the receiver's button for 6 seconds. The LED will flash, then become steady. The number of flashes indicates the current mode (1 flash for Mode 1, 2 flashes for Mode 2, 3 flashes for Mode 3). Briefly press the receiver button to cycle through the modes. To confirm the selected mode, press the button for 3 seconds until the LED switches off.
The device can learn the full travel time of the roller shutter. To do this, perform a complete cycle from stop to stop: first, lower or raise the roller shutter completely to one stop, then reverse the action until the opposite stop is reached. It is crucial not to interrupt the roller shutter travel during this process. The device automatically adjusts the shutter travel time for each complete cycle from stop to stop.
The receiver button also provides access to several functions for troubleshooting and maintenance:
Quick Press (Checking Operating Mode): A brief press of the button will cause the LED to flash, indicating the current operating mode (1 red flash for Mode 1, 2 red flashes for Mode 2, 3 red flashes for Mode 3).
Press and Hold for x Seconds:
When removing wires, first switch off the power supply. For solid wires, use a 2.5 mm screwdriver to press the button of the front terminal before pulling the wire. For stranded wires, turn the wire while pulling on it to facilitate removal.
| Power Supply | 230V AC |
|---|---|
| Radio Frequency | 868 MHz |
| Max Load | 16 A |
| Operating Temperature | -10°C to +40°C |
| Protection Class | Class II |
| Protection Index | IP 20 |
| Type | Receiver |
| Compatibility | DELTA DORE TYXIA |
| Range | Up to 300 m in free field |