CALIBRATING THE INSTRUMENT DO 9721
The DO 9721 is calibrated in the factory, however if you think it necessary to perform calibration
again, the procedure described below must be followed scrupulously.
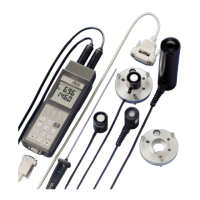
1) Equipment required:
1.a. TP870 probe simulator for applying on channel A of the instrument.
1.b. Photometric probe simulator for applying on channel B of the instrument.
2) Ensure that the date on the instrument clock is correct, if necessary following the instructions to
regulate it (program P4 and subsequent steps).
3) Switch off the instrument and switch it on again, holding down the PROG key at the same time.
4) The message C99 will appear; use the
s
and
t
to make the number equal to 17.
5) Press ENTER.
6) On the top display will appear the temperature value measured on channel A, generated by the
simulator. The message C01 will appear at the bottom of the display.
7) Select the temperature 0°C on the simulator. Normally the instrument display must show a tem-
perature differing from zero °C by a few tenths.
8) Press PROG, the display will indicate 0.0 with the decimal point flashing.
9) Press PROG again, the display will gradually come to indicate 0.0, as an effect of the correc-
tion applied.
10) On the simulator set the temperature of 197 °C, the display must show a temperature differing
from this by a few tenths.
11) Press PROG, the display will indicate 197.0 with the decimal point flashing.
12) Press PROG again, the display will gradually come to indicate 197.0, as an effect of the correc-
tion applied.
13) Press ENTER, the top of the display will now indicate C01, while the bottom part will display the
value in lux corresponding to the voltage applied with the simulator.
14) Apply a voltage of 0.0V and make the zero correction, as in the previous case, pressing the
PROG key twice.
15) The filtering of the photometric measurement channel is different from that of the temperature.
At the end of the operation described above, the display may therefore vary between -0.1 and
0.0 or 0.1; this is to be considered normal and acceptable.
16) Apply a voltage of 437.0mV, corresponding to 190.0 lux, the instrument must indicate 190.0
with a maximum deviation of a few units.
17) As in the previous steps, press PROG twice in sequence, the instrument will indicate 190.0 lux.
18) Ensure that the indication is correct: 190.0 and that the scale is in lux.
19) Switch off the instrument, when switching on again, check for correct operation.
20) The instrument is now calibrated and has recording the date on the clock as its calibration date.
111
ENGLISH
 Loading...