7
27134 Rev. C
G.
1
3
4
5
2
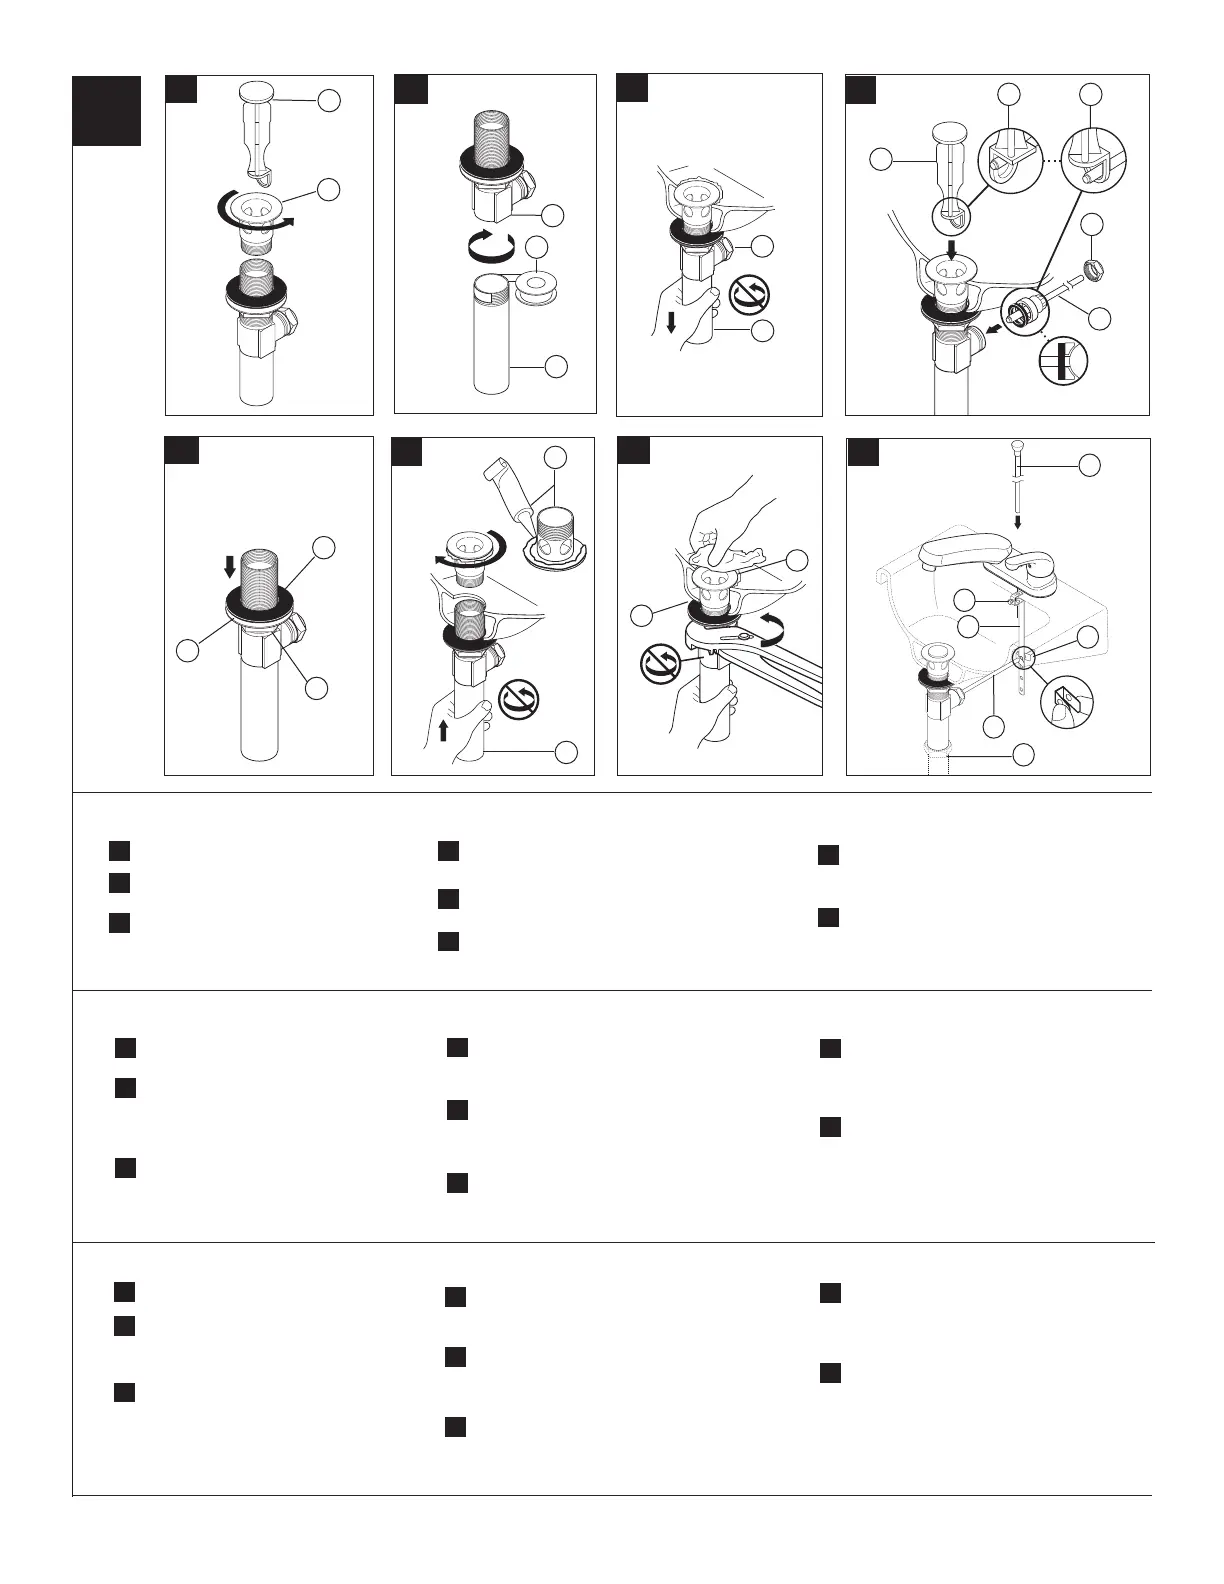
Remove pivot nut (1). Install horizontal rod (2)
and stopper (3) as removable (4) or non-remov-
able (5). Hand tighten pivot nut (1).
Attach horizontal rod (1) to strap (2) using
clip (3). Install lift rod (4), tighten screw (5).
Connect assembly to drain (6).
H.
G.
E.
1
2
F.
1
2
Quite la tuerca del pivote (1). Instale la barra
horizontal (2) y el tapón (3) como
desmontable (4) o fijo (5). Apriete a mano la
tuerca del pivote (1).
Una la barra horizontal (1) a la barra chata
(2) utilizando el gancho (3). Instale la barra
de alzar (4), apriete el tornillo (5). Conecte el
ensamble al desagüe (6).
H.
G.
Enlevez l’écrou du pivot (1). Installez la tige
horizontale (2) et la bonde (3) de manière que
la bonde soit amovible (4) ou non amovible
(5). Serrez l’écrou (1) du pivot à la main.
Fixez la tige horizontale (1) au feuillard (2)
à l’aide de l’agrafe (3). Installez la tige de ma-
noeuvre (4) et serrez la vis (5). Fixez l’ensem-
ble au renvoi (6).
H.
G.
Remove stopper (1) and flange (2).
Screw nut (1) all the way down. Push
washer (2) and gasket (3) down.
Remove tailpiece (1) from body (2), add
C.
B.
A.
3
Apply silicone to underside of flange (1). Insert
body (2) into sink. Screw flange into body.
Pivot (1) must face faucet. Pull assembly (2)
down firmly and hold in place. DO NOT TWIST.
Tighten nut/washer/gasket (1), clean off excess
silicone (2). DO NOT TWIST.
F.
E.
D.
A.
B.
C.
Quite el tapón (1) y el reborde (2).
Atornille la tuerca (1) completamente
hasta abajo. Empuje la arandela/
roldana (2) y el empaque (3) hacia
abajo.
Quite el tubo de cola (1) del cuerpo (2),
vez el tubo de cola.
C.
B.
A.
Aplique silicón a la parte interior del reborde
(1). Inserte el cuerpo (2) en el lavamanos.
Atornille el reborde (1) en el cuerpo (2).
El pivote (1) debe de estar de frente a
la llave. Hale el ensamble (2) hacia abajo
firmemente y sujételo en sitio. NO LO GIRE.
Apriete la tuerca/arandela/empaque (1),
limpie el exceso de silicón (2). NO LO GIRE.
F.
E.
D.
Enlevez la bonde (1) et la collerette (2).
Serrez l’écrou (1) pour le faire descen
complètement. Poussez la rondelle (2)
et le joint (3) vers le bas.
Enlevez le raccord droit de vidange (1)
du corps (2), appliquez du ruban de
droit en place.
C.
B.
A.
Appliquez du composé à la silicone sous la
collerette (1). Introduisez le corps (2) dans lavabo,
puis vissez la collerette (1) dans le corps (2).
Le pivot (1) doit faire face au robinet. Tirez
l’ensemble (2) vers le bas fermement et
maintenez- le en place. PRENEZ GARDE
DE LE TORDRE.
Serrez l’écrou contre la rondelle et le joint (1),
puis enlevez le surplus de composé à la
silicone (2). PRENEZ GARDE DE
TORDRE
LE PIVOT.
F.
E.
D.
1
2
1
2
3
1
2
3
Metal Pop-Up Installation
Instalación del desagüe automatico de metal
Installation du renvoi mécanique en métal
H.
1
5
3
4
2
6
SILICONE
D.
1
2
plumber tape (3), replace tailpiece.
aplique cinta plomero (3), coloque otra
plomberie(3), puis remettez le raccord
 Loading...