10 11
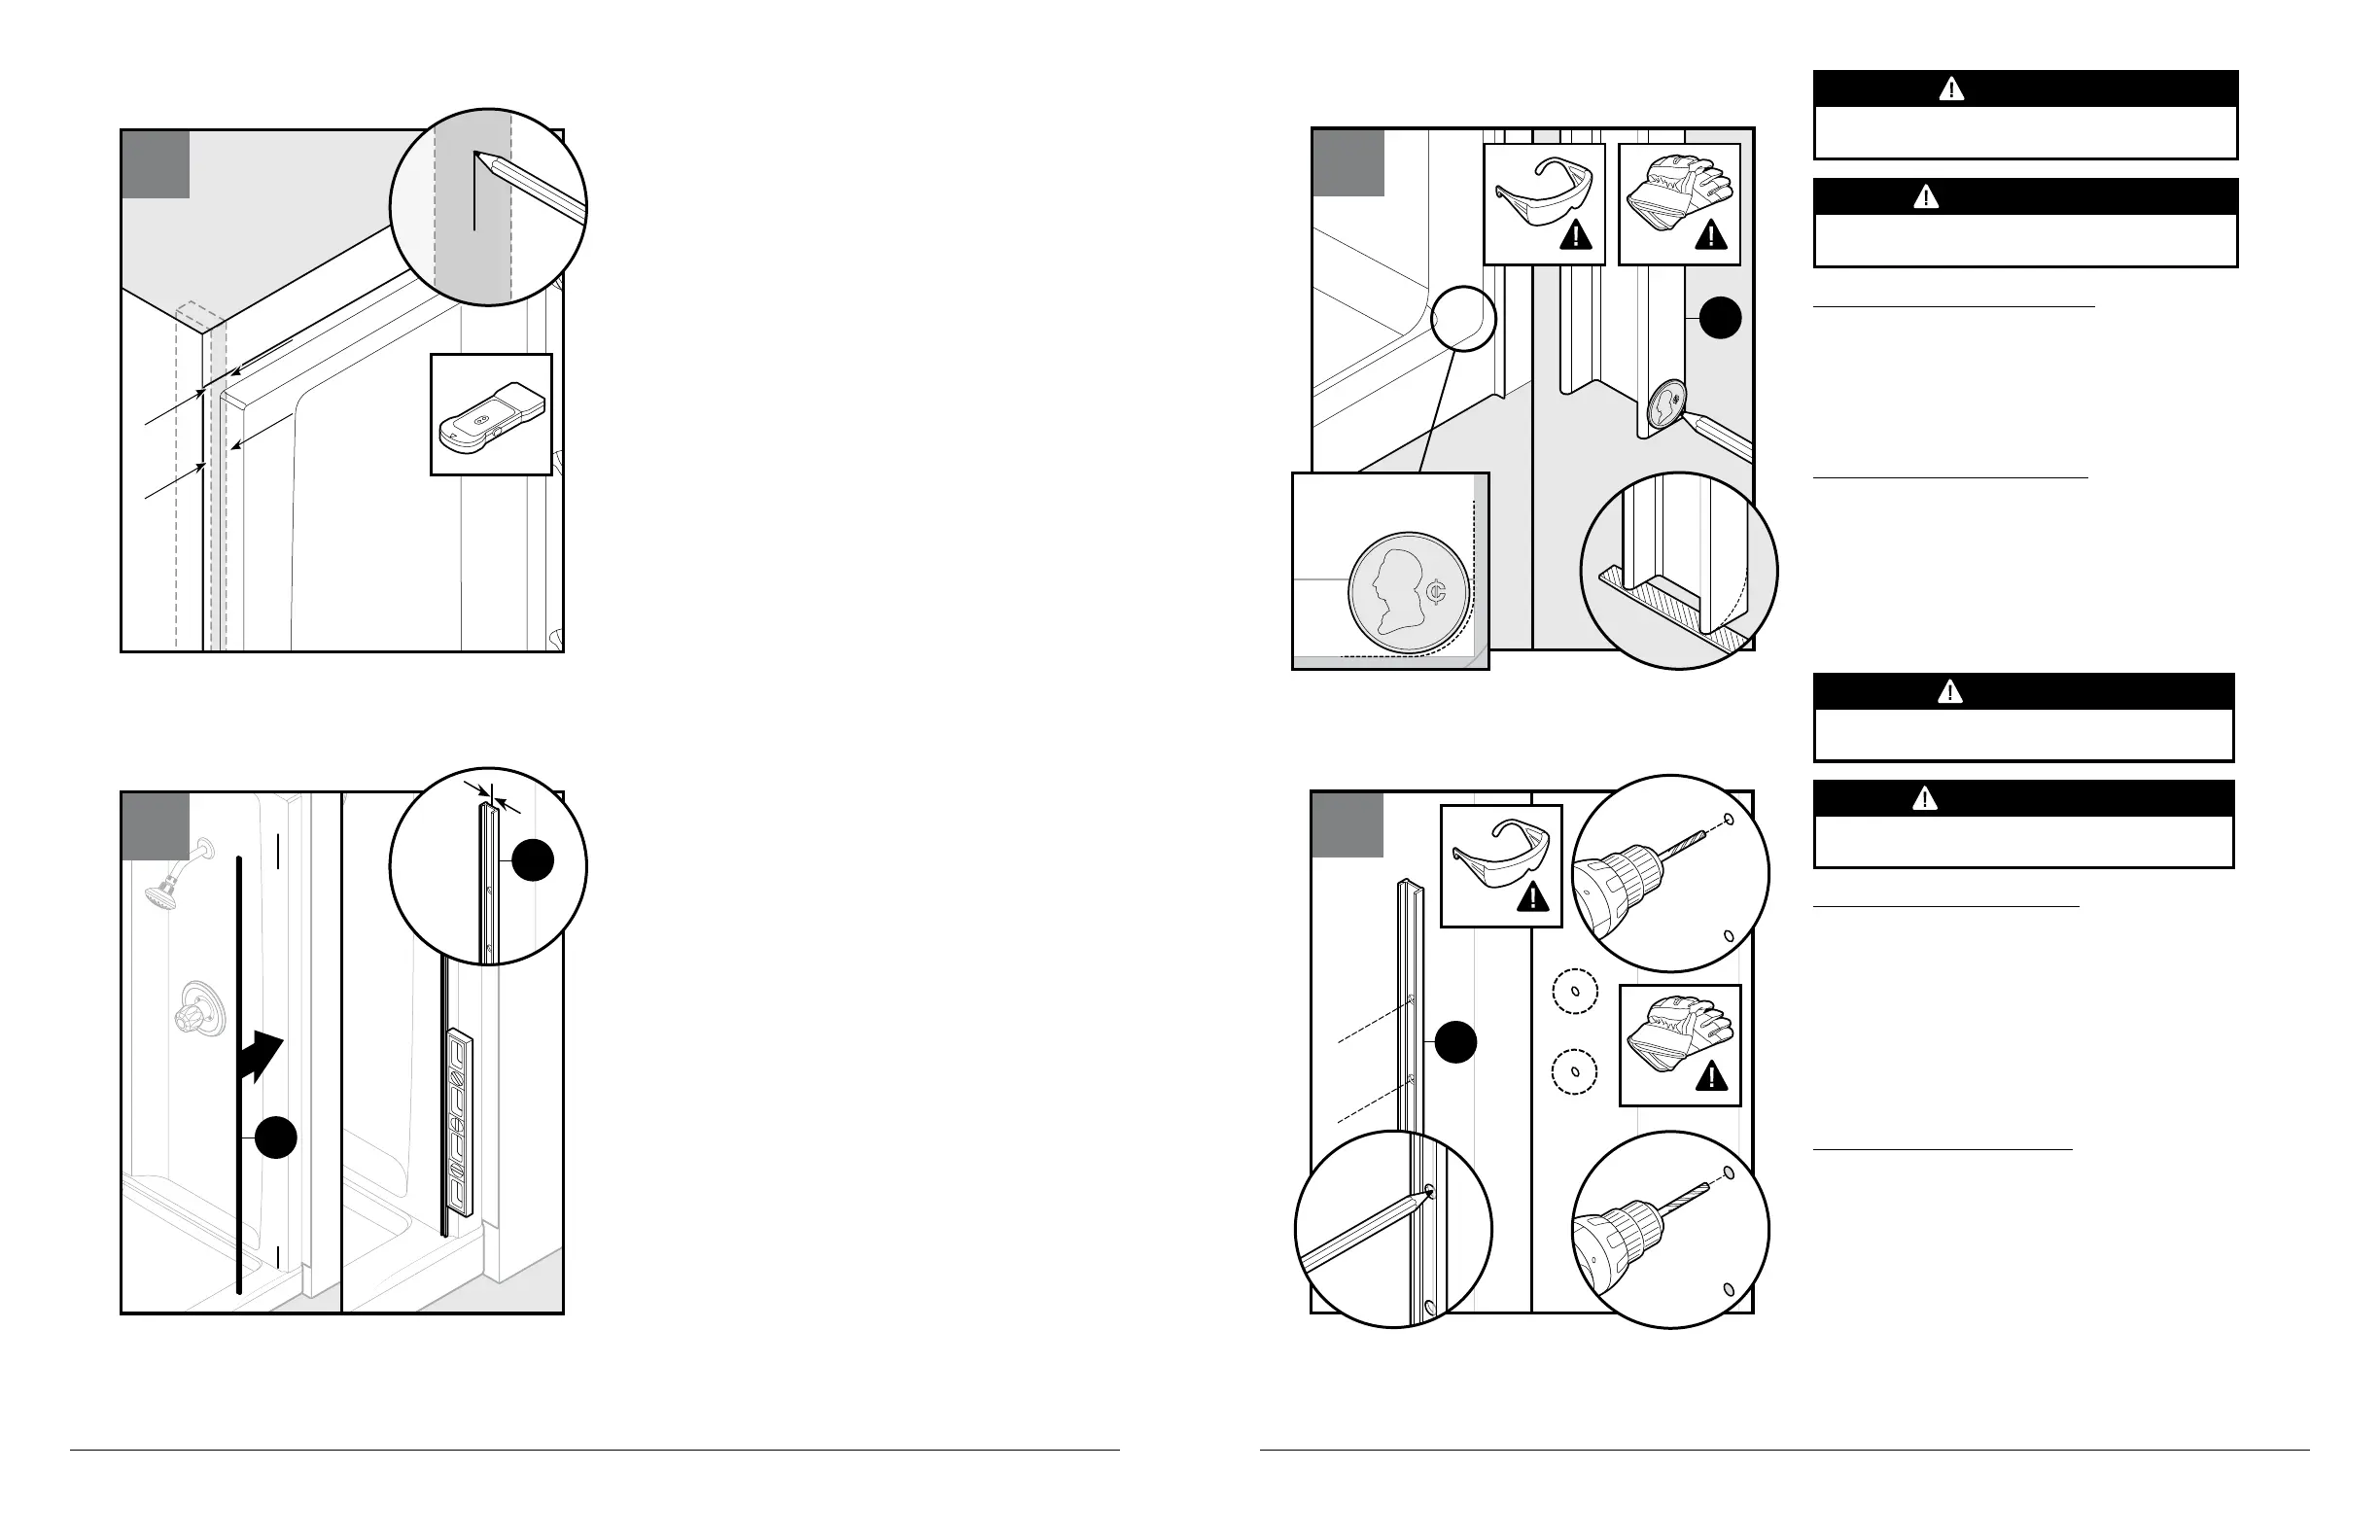
Curved Threshold Enclosures
IMPORTANT: The wall bracket template (S1) must sit flat against the
shower wall and bottom threshold ledge.
The area where the wall and bottom threshold meet may be curved.
If needed, use a coin to mark and transfer the corner radius of the
fixture to the bottom corner of wall bracket template (S1).
Using a flat file, round the wall bracket template (S1).
Cabinas con umbral curvado:
IMPORTANTE: La plantilla de soporte de pared (S1) debe estar bien
apoyada contra la pared de la ducha y la cornisa inferior del bordillo.
El área donde
la pared y el umbral inferior se encuentran puede
estar curvada. Si es necesario, utilice una moneda para marcar y
transferir el radio de la esquina de la instalación a la esquina inferior
de la plantilla de soporte de pared (S1).
Utilizando una lima plana, redondee la plantilla de soporte de
pared (S1).
Top Track Bracket Installation
Place wall bracket template (S1) against wall aligning the
holes with mark made in the previous step.
Using a level, make sure wall bracket template (S1) is
level (vertical). Tape in place.
For acrylic enclosures, proceed to steps 4a-4c.
For tile enclosures proceed to steps 5a-5b.
IMPORTANT:
This step is critical to completing the
installation.
Stud must be 2-1/2" or
greater from the front of the sill.
Instalación del soporte del carril superior
Coloque la plantilla del soporte de pared (S1) contra la
pared, alineando los orificios con la marca realizada en el
paso anterior.
Utilice un nivel para asegurarse de que la plantilla del
soporte de pared (S1) esté nivelada (vertical). Fije con
cinta.
Para recintos acrílicos, prosiga con los pasos 4a-4c.
Para recintos de baldosas prosiga con los pasos 5a-5b.
IMPORTANTE:
Este paso es crucial para completar la
instalación.
El montante debe estar a una distancia de 2-1/2" o más
del frente del bordillo.
3
S1
S1
Locating Mounting Stud Position
IMPORTANT: Using a stud finder, ensure that the wall on
each side of the enclosure has a stud in the location shown.
A stud in this location must be identified to support the top
track in order to proceed with the installation. This system
must be installed into a stud.
If you do not have a stud in the area shown this door
CAN NOT be installed, call Delta Shower Doors Customer
Care Team at 1-800-964-4850.
Using a markin
g tool, mark center of stud locations at the
bottom and top of enclosure on both sides.
Ubicación de la posición del montante de montaje
IMPORTANTE:
Utilizando un detector de montante,
asegúrese de que la pared de cada lado de la cabina
tenga un montante en la ubicación que se muestra. Debe
identificarse un montante en esta ubicación para apoyar
el carril superior que permita continuar con la instalación.
El sistema debe instalarse en un montante. Si no tiene un
montante en esta área, llame a atención al cliente al
1-800-964-4850.
Si no tiene un montante en el área que se muestra,
esta puerta NO se puede instalar; llame al equipo de
Atención al Cliente de Delta Shower Doors al 1-800-964-
4850. Utilizando una herramienta de marcado, marque el
centro de las ubicaciones de los montantes en la parte
inferior y superior de la cabina a ambos lados.
2
2
4a
3
1
Front / Frente
S1
CAUTION
PRECAUCIÓN
CAUTION
PRECAUCIÓN
CAUTION
Wear safety glasses and cut resistant gloves with non-slip
grip when drilling or cutting to avoid risk of injury.
PRECAUCIÓN
Use gafas protectoras y guantes anticorte y antideslizantes
al taladrar o cortar para evitar el riesgo de lesiones.
Use cut-resistant gloves with appropriate grip to avoid
risk of injury from sharp edges or corners.
Use guantes resistentes a los cortes con el agarre
apropiado para evitar el riesgo de lesiones por los bordes
y esquinas afiladas.
To avoid risk of injury or product damage, DO NOT remove
corner protectors on the glass panel(s) until the panels are
installed.
Para evitar el riesgo de lesiones o danos al producto NO quite
los protectores de las esquinas en el panel o paneles de vidrio
hasta que estos esten instalados.
4b
5/16"5/16"
S1
For Acrylic Enclosures Only
Using a marking tool, mark the holes in wall bracket
template (S1).
Remove wall bracket template (S1).
Drill a 1/8" pilot hole at each location.
Next, redrill a 5/16" hole at each location.
For Shower: Bottom hole is 67-3/16" (170.6 cm) from the sill. Top
hole is 68-3/4" (174.6 cm) from the sill.
For Tub: Bottom hole is 55-3/16" (140.2 cm) from the sill. Top hole
is 56-3/4" (144.2 cm) from the sill.
Solo para recintos acrílicos
Utilizando una herramienta de marcado, marque los orificios de la
plantilla de soporte de pared (S1).
Retire la plantilla de soporte de pared (S1).
Taladre un orificio piloto de 1/8" (3,17 mm) en cada ubicación que
se marcó en el paso anterior.
A continuación, vuelva a taladrar un agujero de 5/16"
(7,93 mm) en cada ubicación.
Para la ducha: El orificio del extremo inferior está a 67-3/16" (170.6
cm) del bordillo. El orificio del extremo superior está a 68-3/4"
(174.6 cm) del bordillo.
Para la tina: El orificio del extremo inferior está a 55-3/16" (140.2
cm) del bordillo. El orificio del extremo superior está
a 56-3/4"
(144.2 cm) del bordillo.
CAUTION
To avoid risk of injury or product damage, make sure that
you drill into studs.
PRECAUCIÓN
Para evitar el riesgo de lesiones o daños al producto,
asegúrese de perforar en los montantes.
CAUTION
Wear safety glasses and cut resistant gloves with non-slip
grip when drilling or cutting to avoid risk of injury.
PRECAUCIÓN
Use gafas protectoras y guantes anticorte y antideslizantes
al taladrar o cortar para evitar el riesgo de lesiones.
Use cut-resistant gloves with appropriate grip to avoid
risk of injury from sharp edges or corners.
Use guantes resistentes a los cortes con el agarre
apropiado para evitar el riesgo de lesiones por los bordes
y esquinas afiladas.
 Loading...