35
1
2
9
AA
3
AA
53
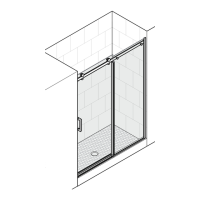
Attach grab bumper (F) to top enclosure with screw (DD).
Repeat steps 49 - 53 for other end of enclosure.
Ajuste el tope de agarre (F) al cerramiento con tornillo (DD).
Repita los pasos 49 a 53 para el otro extremo de la cabina.
Push in the center of the acrylic anchors (AA) and squeeze clips
together. Insert acrylic anchors (AA) into holes.
For ceramic tiles, insert tile anchors (BB).
If needed, gently use a rubber mallet to assist in install.
NOTE: Wall anchors MUST be used.
Ejerza presión hacia dentro en el centro del anclaje dezpared
(AA) y junte las pinzas. Inserte anclaje de acrílico para pared
en la pared.
Para baldosas de cerámica, inserte anclajes de pared para
baldosas (BB).
En caso de ser necesario, use un mazo de goma de manera
suave para instalarlos.
NOTEA: Es NECESARIO usar los anclajes de pared.
x8
AA
x8
BB
Tile Anchor
Acrylic anchor
Anclaje de acrílico
C
x2
#8-18 x 1.5" Pan
Head Screw
Tornillo
de cabeza
troncocónica
N.º 8 de 18 x 1.5 pulg.
B6
#8x 30mm Flat
Head Screw
Tornillo
de cabeza
plana FH
N.º 8 x 30 mm
x2
CC
x4
B
Hanger Bracket Assembly
Conjunto del soporte de estribo
11
54
F
DD