EasyManua.ls Logo

Delta Frameless Sliding

Delta Frameless Sliding
46 pages
To Next Page IconTo Next Page
Loading...
1
Frameless
Sliding
Contemporary Style Shower
and Bathtub Doors
Puertas para ducha y bañera
estilo Contemporary
STOP
PARE
BEFORE BEGINNING, READ ALL INSTRUCTIONS WITH PARTICULAR
ATTENTION TO SAFETY INFORMATION AND TO ENSURE YOU HAVE
ALL PARTS, TOOLS AND PROTECTIVE EQUIPMENT NEEDED TO SAFELY
INSTALL YOUR UNIT.
PLEASE DO NOT CONTACT STORE FOR REPLACEMENT PARTS
PLEASE CONTACT 1-800-964-4850 FOR ASSISTANCE
ANTES DE COMENZAR, LEA TODAS LAS INSTRUCCIONES PRESTANDO ATENCIÓN
ESPECIAL A LA INFORMACIÓN DE SEGURIDAD Y ASEGÚRESE DE TENER TODAS
LAS PIEZAS, HERRAMIENTAS Y EQUIPOS DE PROTECCIÓN NECESARIOS PARA
INSTALAR SU UNIDAD DE FORMA SEGURA.
POR FAVOR, NO CONTACTE A LA TIENDA PARA SOLICITAR PIEZAS DE REPUESTO
POR FAVOR LLAME AL 1-800-964-4850 PARA RECIBIR ASISTENCIA
INSTALLATION GUIDE / GUÍA DE INSTALACIÓN
CAUTION:
To reduce the risk of breakage, keep corner protectors on glass while installing. Avoid contact between shower
door and metal parts and/or hard surfaces. Always ensure glass panels are placed on padded surfaces.
PRECAUCIÓN: Durante la instalación, coloque vidrio o protectores de esquinas para reducir el riesgo de romperse. Evite el contacto
entre la puerta de la ducha y las piezas metálicas y/o superficies duras. Asegúrese siempre de que los paneles de vidrio estén
colocados sobre superficies acolchadas.
Consult your local plumbing codes prior to installation.
Consulte los códigos de fontanería locales antes de la instalación.
NOTE:
Installation widths: 60" Tub/shower: 50-1/8"minimum – 58-1/2" maximum,
48" Shower: 43-3/8" minimum – 47-3/8" maximum.
NOTA:
Installation widths: para ducha/bañera de 60" (152,40 cm): mínimo 50-1/8" (127,32 cm) – máximo 58-1/2”
(148,59 cm), ducha de 48" (121,92 cm): mínimo 43-3/8 (110,17 cm) – máximo 47 -3/8” (120,33 cm).
CP554098 04/03/2020
CAUTION identifies a potentially hazardous situation which,
if not avoided, may result in minor or moderate injury and/or
property/product damage.
IMPORTANT identifies information critical to installation,
operation, or maintenance.
NOTE indicates helpful advice to make installation, operation or
maintenance proceed well.
ADVERTENCIA identifica situaciones potencialmente peligrosas
que, de no evitarse, podrían provocar lesiones leves o
moderadas y/o daños a la propiedad/producto.
IMPORTANTE identifica información esencial para la instalación,
funcionamiento, o mantenimiento.
NOTA indica consejos útiles para una correcta instalación,
funcionamiento o mantenimiento.
Minimum Required Clearance Heights for Installation:
For Shower: 73.5 Inches (186.7 cm)
For Tub: 61.75 Inches (157 cm)
Minimum Required
Installation Wall Heights
for Installation:
For Shower: 71.25 Inches (181 cm)
For Tub: 59 Inches (150 cm)
Alturas mínimas de separación necesarias para la instalación:
Para la ducha: 73,5 pulgadas (186,7 cm)
Para la bañera: 61,75 pulgadas (157 cm)
Alturas mínimas de la pared necesarias para la instalación:
Para la ducha: 71,25 pulgadas (181 cm)
Para la bañera: 59 pulgadas (150 cm)
Question and Answer IconNeed help?

Do you have a question about the Delta Frameless Sliding and is the answer not in the manual?

Delta Frameless Sliding Specifications

General IconGeneral
Frame TypeFrameless
Door TypeSliding
Glass StyleClear
Hardware FinishChrome, Nickel
MaterialGlass
Water ResistanceYes

Summary

Installation Guide and Safety

Safety Information and Cautions

General warnings and safety advice before starting installation.

Opening and Clearance Dimensions

Key measurements for proper door fit and installation.

Tools and Preparation

Required Tools List

Lists all necessary tools for installation.

Installation Site Requirements

Details wall plumbness and stud layout needs.

Pre-Installation Checks and Care

Tempered Glass Handling Precautions

Critical safety for preventing glass breakage during installation.

Product Care and Cleaning Recommendations

Guidelines for maintaining the product after installation.

Parts Identification

Required Cartons for Installation

Identifies the necessary cartons for a complete installation.

Glass Panel Carton Contents

Details parts found within the glass panel carton.

Component Parts Lists

Track Assembly Carton Parts

Lists all parts included in the track assembly carton.

Handle Assembly Carton Parts

Lists all parts included in the handle assembly carton.

Door Assembly Overview

Glass Panel Handling and Protection

Cautions on handling glass and using corner protectors.

Door Assembly Diagram and Parts

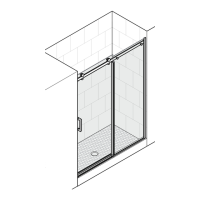
Visual guide to major assembly components.

Hardware Identification

Wall Anchors and Fasteners

Identification of wall mounting hardware.

Roller and Bracket Components

Identification of door roller and bracket parts.

Wall Jamb Installation

Installation Type Overview

Differentiates installation for acrylic vs. tile enclosures.

One-Piece Shower Wall Jamb Placement

Specific steps for installing jambs on a one-piece shower.

Wall Jamb Installation Details

Safety for Cutting and Drilling

Safety advice before performing cutting or drilling.

Positioning and Fitting Wall Jambs

Steps for correctly positioning and fitting wall jambs.

Wall Jambs for Tiled3-Piece Enclosures

Corner Fit and Alignment

Ensuring a 90° corner fit for tiled enclosures.

Jamb Positioning for Tiled Enclosures

Specific placement guidelines for tiled installations.

Securing Wall Jambs

Vertical Alignment and Temporary Securing

Ensures jambs are vertical and temporarily fixed.

Ensuring Consistent Jamb Spacing

Critical for proper door alignment.

Marking and Drilling for Wall Jambs

Marking Jamb and Wall Locations

Marking points for drilling on jambs and walls.

Hole Marking for Fasteners

Indicating precise locations for fastener holes.

Wall Anchor and Hole Drilling

Drilling Pilot and Main Holes

Steps for creating pilot and final holes.

Installing Wall Anchors

Procedures for inserting wall anchors into the wall.

Attaching Wall Jambs to Wall

Screw Installation and Gap Setting

Installing screws with a specific gap.

Sliding Jambs into Position

Final steps to seat the wall jambs.

Bottom Track Fit and Measurement

Checking Bottom Track Fit and Adjustment

Ensuring the track fits correctly and making adjustments.

Measuring Side Wall Distance

Critical measurement for overall door width.

Cutting and Preparing Bottom Track

Safety Precautions for Cutting

Warnings before cutting track components.

Marking and Cutting Bottom Track

Step-by-step process for cutting the track.

Bottom Track Sealing and Hole Drilling

Applying Sealant for Water Retention

Sealing the track to prevent water leaks.

Drilling for Track Alignment

Preparing for proper track alignment.

Bottom Track and Top Collar Preparation

Final Bottom Track Placement

Securing the bottom track in its final position.

Preparing Top Collars for Installation

Steps to ready top collars before attaching.

Top Collar Installation

Safety for Drilling Top Collars

Safety warnings before drilling into collars.

Positioning and Drilling Top Collars

Attaching collars to the wall jambs.

Wall Anchor and Top Collar Attachment

Wall Anchor Installation Procedure

How to insert wall anchors.

Securing Top Collar to Wall Jamb

Fastening the top collar to the jamb.

Top Track Installation Guidelines

Track Cutting and Protector Reminders

Important notes on cutting and keeping protectors on.

Measuring for Top Track Fit

Critical measurement for the top track length.

Cutting and Preparing Top Track

Safety Precautions for Top Track Cutting

Warnings before cutting the top track.

Marking and Cutting Top Track

The process for cutting the top track.

Attaching Top Track and Retention Plates

Positioning Top Track onto Collars

Sliding the top track into place.

Securing Retention Plates and Screws

Finalizing the top track installation.

Glass Panel Assembly and Inspection

Tempered Glass Handling Safety

Safety measures when handling glass panels.

Panel Inspection and Measurement

Checking panels for damage and measuring width.

Glazing Channel Installation

Glazing Component Installation Safety

Safety during installation of glazing components.

Cutting Glazing Channels

Steps for cutting glazing channels to size.

Glazing Channel and End Cap Sealing

Applying Sealant to End Caps

Sealing the end caps for a watertight fit.

Fit Testing and Sealant Application

Testing fit and applying sealant to channels.

Glass Panel and Roller Installation

Preparing Glass Panels with Channels

Attaching glazing channels and end caps to panels.

Installing Roller Brackets and Bushings

Attaching roller brackets and bushings to glass panels.

Inside Door Installation and Alignment

Inner Door Roller and Bolt Assembly

Assembling roller components for the inside door.

Positioning Inner Door in Track

Hanging the inside door panel correctly.

Outside Door Components and Preparation

Outer Roller Bracket and Bushing Installation

Preparing outer roller assemblies.

Removing Anti-Jump Components

Disassembling anti-jump parts from rollers.

Attaching Outer Door Rollers and Positioning

Outer Roller and Screw Installation

Assembling outer rollers and screws.

Positioning Outer Door Panel

Hanging the outer door panel correctly.

Inner Door Adjustment

Adjusting Inner Door Roller Bearings

Fine-tuning roller height for proper door fit.

Repositioning Rollers for Height Adjustment

Steps to adjust roller position for height.

Outer Door Adjustment Procedures

Lifting and Removing Outer Door

Steps to remove the outer door for adjustments.

Removing Outer Door Rollers and Screws

Disassembling rollers from the outer door.

Adjusting Outer Rollers and Anti-Jump Component

Reinstalling Outer Door Rollers

Reassembling rollers after adjustment.

Attaching Anti-Jump Component

Reattaching the anti-jump component.

Final Component Installation

Installing Decorative Covers

Adding decorative covers to rollers.

Installing the Center Guide

Installing the central guide for door panels.

Grab Bumper Installation

Placing and Orienting Grab Bumpers

Correctly positioning the grab bumpers.

Securing Grab Bumpers to Wall

Fastening the grab bumpers to the wall.

Marking and Drilling for Grab Bumpers

Marking Bumper Hole Locations

Marking points for drilling bumper holes.

Drilling Holes and Repeating Steps

Drilling holes and repeating for the other side.

Final Wall Anchor and Bumper Attachment

Installing Wall Anchors

Inserting wall anchors into the wall.

Attaching Grab Bumpers to Enclosure

Final attachment of grab bumpers.

Installing Seals

Blade Seal Installation

Attaching blade seals to the glass panels.

Bubble Seal Installation

Attaching bubble seals to the glass panels.

Final Sealing and Door Positioning

Sealing Bottom Track and Jambs

Applying sealant for water retention.

Sliding Doors to Center and Sealing

Final door placement and sealing.

Handle Installation

Handle Installation Precautions and Notes

Safety and general guidance for handle installation.

Installing Handle Components

Assembling the door handle parts.

Handle Assembly and Adjustment

Handle Post Alignment and Gasket Insertion

Aligning handle parts and inserting gaskets.

Securing Handle and Wiping Sealant

Finalizing handle attachment and cleaning excess sealant.

Troubleshooting and Solutions

Operation and Alignment Issues

Addresses problems with door movement and alignment.

Water Leaks and Maintenance Issues

Covers leaks and general maintenance troubleshooting.

Related product manuals