EasyManua.ls Logo

Delta T2753 User Manual

Delta T2753
8 pages
To Next Page IconTo Next Page
Page #1 background imageLoading...
Page #1 background image
1
1/22/16 Rev. B
SILICONE
?
T2753 T4753
86645
1/8" (3.17mm)
3/32"
(2.38mm)
www.deltafaucet.com
For easy installation of your Delta
®
faucet you will need:
• To READ ALL the instructions completely
before beginning.
To READ ALL warnings, care, and
maintenance information.
• To complete the deck and valve rough-in prior to
installing this trim kit.
TWO HANDLE ROMAN TUB TRIM
LLAVE Y SUS ACCESORIOS PARA BAÑERA
ROMANA DE DOS MANIJAS (MANERALES)
ACCESSOIRES DE FINITION DE ROBINET
À DEUX POIGNÉES POUR BAIN ROMAIN
86645
Write purchased model number here.
Escriba aquí el número del modelo comprado.
Inscrivez le numéro de modèle ici.
You may need/Usted puede necesitar/Articles dont vous pouvez avoir besoin:
Models/Modelos/Modéles
T2753 & T4753
Series/Series/Seria
Para instalación fácil de su llave Delta usted
necesitará:
LEER TODAS las instrucciones completamente
antes de empezar.
LEER TODOS los avisos, cuidados, e información
de mantenimiento.
• Para completar el borde y la instalación de válvulas
dentro de las paredes previa a la instalación de la
llave y sus accesorios.
Pour installer votre robinet Delta facilement,
vous devez:
LIRE TOUTES les instructions avant de débuter;
LIRE TOUS les avertissements ainsi que toutes les
instructions de nettoyage et d’entretien;
Installez le corps du robinet et terminez le pourtour
du bain avant de poser les accessories de finition.
Question and Answer IconNeed help?

Do you have a question about the Delta T2753 and is the answer not in the manual?

Delta T2753 Specifications

General IconGeneral
BrandDelta
Model NumberT2753
Handle StyleLever
Number of Handles1
FinishChrome

Summary

TWO HANDLE ROMAN TUB TRIM

CLEANING AND CARE

Parts and Finish

Guidance on cleaning and maintaining the faucet's parts and finish.

Limited Warranty on Delta Faucets

Maintenance

Model T2753 Leak Troubleshooting

Steps to resolve leaks from the spout outlet for the T2753 model.

Model T4753 Diverter Issues

Troubleshooting issues with the diverter for the T4753 model.

Backflow Protection System

Installation Steps

Step 1: Prepare Rough-in

Ensure deck and valve rough-in are complete before trim kit installation.

Step 2: Assemble Spout

Assemble spout to adapter with set screw and secure with spout nut.

Step 3: Install Handles

Install handle components, ensuring proper alignment and securing with screws.

Step 4: Attach Hose and Handshower

Connect hose to conical nut and handshower, ensuring secure fittings.

Step 5: Connect Trim Components

Thread stem extender into valve stem, install gasket, and secure with set screw.

Step 6: Test Operation

Check handle operation, water flow, and diverter function after installation.
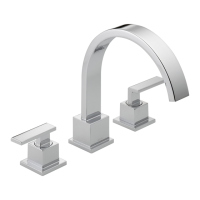