EasyManua.ls Logo

Delta Trinsic T4759 Series User Manual

Delta Trinsic T4759 Series
8 pages
To Next Page IconTo Next Page
Page #1 background imageLoading...
Page #1 background image
Para instalación fácil de su llave Delta
usted necesitará:
•LEER TODASlasinstruccionescompletamente
antesdeempezar.
•LEER TODOSlosavisos,cuidados,e
informacióndemantenimiento.
•Paracompletarelbordeylainstalaciónde
válvulasdentrodelasparedespreviaala
instalacióndelallaveysusaccesorios.
For easy installation of your Delta
faucet you will need:
•ToREAD ALLtheinstructionscompletely
beforebeginning.
ToREAD ALLwarnings,care,andmaintenance
information.
•Tocompletethedeckandvalverough-inpriorto
installingthistrimkit.
Pour installer votre robinet Delta
facilement, vous devez:
•LIRE TOUTESlesinstructionsavantdedébuter;
•LIRE TOUSlesavertissementsainsiquetoutes
lesinstructionsdenettoyageetd’entretien;
•Installezlecorpsdurobinetetterminezle
pourtourdubainavantdeposerlesaccessories
definition.
Model/Modelo/Modéle
T2759&T4759
Series/Series/Seria
Trinsic
®
Write purchased model number here.
Escriba aquí el número del modelo comprado.
Inscrivez le numéro de modèle ici.
You may need/Usted puede necesitar/Articles dont vous pouvez avoir besoin:
Icons
1/8"(3.17mm)
1/8"
(3.17mm)
1/8po
3/32"
(2.38mm)
3/32po
?
ASMEA112.18.1/CSAB125.1
ICC/ANSIA117.1
TWO HANDLE ROMAN TUB TRIM
LLAVE Y SUS ACCESORIOS
PARA BAÑERA ROMANA DE DOS
MANIJAS (MANERALES)
ACCESSOIRES DE FINITION DE
ROBINET À DEUX POIGNÉES POUR
BAIN ROMAIN
1
6/7/12Rev.B
72519
72519
www.deltafaucet.com
Question and Answer IconNeed help?

Do you have a question about the Delta Trinsic T4759 Series and is the answer not in the manual?

Delta Trinsic T4759 Series Specifications

General IconGeneral
BrandDelta
SeriesTrinsic
FinishChrome
Number of Handles2
Flow Rate1.2 GPM
Handle StyleLever
Valve TypeCeramic Disc
Drain Assembly IncludedYes
Valve IncludedYes
ADA CompliantYes
WaterSense CertifiedYes
Spout Reach5.5 inches
WarrantyLimited Lifetime

Summary

Cleaning and Care

Backflow Protection System

Lifetime Faucet and Finish Limited Warranty

Maintenance and Troubleshooting

Model T2759 Leak Troubleshooting

Resolving leaks from the spout outlet and persistent leaks by replacing parts.

Model T4759 Diverter Troubleshooting

Ensuring proper hand shower diversion by checking lift rod and diverter assembly.

Installation Steps

T2759 Initial Setup

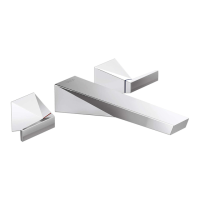
Removing test cap and preparing for spout installation.

T4759 Initial Setup

Removing set screw and test cap before proceeding.

Base and Spout Installation

Attaching bases, gaskets, spout, and securing with set screw.

Model T4759 Specific Installation

Lift Rod and Test Cap Removal

Installing lift rod and removing test cap and gasket.

Hose and Hand Piece Attachment

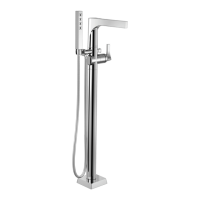
Connecting hose to conical nut and braided hose.

Base and Gasket Installation

Installing base and gasket, with optional silicone use.

Final Assembly and Flushing

Handle Installation

Properly seating glide ring and inserting hot/cold buttons.

Model T2759 Flushing Procedure

Flushing water lines to clear internal debris.

Model T4759 Flushing Procedure

Flushing lines with lift rod down and handles on.

Model T4759 Final Steps

Hose Extension and Flushing

Extending hose, flushing lines, and turning off handles.

Hand Piece Connection

Attaching hand piece to hose with gasket for proper function.

Related product manuals