EasyManua.ls Logo

Denali D3 - User Manual

Denali D3
2 pages
Print Icon
To Next Page IconTo Next Page
Loading...
Instruction Rev00
0mm
10 20
30
40
50
60
70
80
90
Thank you for choosing DENALI
We know you would rather be riding your bike than wrenching on it, so we go the extra
mile to make sure our instructions are clear and as easy to understand as possible. If
you have any questions, comments, or suggestions don’t hesitate to give our gear
experts a call at 401.360.2550 or visit WWW.DENALIELECTRONICS.COM
Please Read Before Installing
DENALI products should always be installed by a qualified motorcycle technician. If
you are unsure of your ability to properly install a product, please have the product
installed by your local motorcycle dealer. DENALI takes no responsibility for damages
caused by improper installation. Caution: When installing electronics it is extremely
important to pay close attention to how wires are routed, especially when mounting
products to the front fender, front forks, or fairing of your motorcycle. Always be sure
to turn the handlebars fully left, fully right, and fully compress the suspension to
ensure the wires will not bind and have enough slack for your motorcycle to operate
properly.
Installation Tips
We strongly recommend using medium strength liquid thread locker on all screws,
nuts, and bolts. It is also important to ensure that all hardware is tightened to the
proper torque specifications as listed in your owner’s manual. For included accessory
hardware please refer to the default torque specifications provided below. Inspect all
hardware after the first 30 miles to ensure proper torque specifications are
maintained.
Hardware Sizing Guide
Not sure what size bolt you have? Use this ruler to measure screws, bolts, spacers, etc.
Remember, the length of a screw or bolt is measured from the start of the “mounting
surface” to the end of the screw, so only include the screw head when measuring
countersunk screws.
M3 10.0 in-lbs - 1.0 Nm
M4
23.0 in-lbs
- 2.5 Nm
M5 44.5 in-lbs 3.5 ft-lbs 5.0 Nm
M6 78.0 in-lbs 6.5 ft-lbs 9.0 Nm
M8 - 13.5 ft-lbs 18.0 Nm
M10 - 30.0 ft-lbs 41.0 Nm
M12 - 52.0 ft-lbs 71.0 Nm
in-lbs
ft-lbs NmBolt Size
0in 1 2
3
What’s In The Box?
DENALIELECTRONICS.COM
Instruction Manual
(a) Mounting Bracket................................................................Qty 2
(b) M4x12 Thread Forming Screw................................................Qty 8
(c) PSX24W Wring Adapter.........................................................Qty 2
(d) H10 Wiring Adapter..............................................................Qty 2
Kit Contents
(a)
(c)
(d)
(b)
D3 Fog Light Mounting Kit
Jeep Wrangler JK/JL
Jeep Gladiator JT
LAH.50.10400

Other manuals for Denali D3

Question and Answer IconNeed help?

Do you have a question about the Denali D3 and is the answer not in the manual?

Summary

Please Read Before Installing

Installation Tips

Whats In The Box?

Installing the D3 Fog Lights

Installing The Mounting Bracket

Attach the mounting bracket to the D3 pod using M8 hardware.

Installing The D3 Fog Light

Remove OEM fog lights and install the D3 lights into the vehicle.

Connecting The D3 Fog Light

Connect the D3 light to the vehicle's OEM wiring harness.

Overview

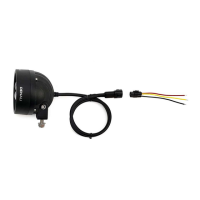
The DENALI D3 Fog Light Mounting Kit is designed to replace the OEM fog lights on Jeep Wrangler JK/JL and Jeep Gladiator JT models, providing an upgrade in illumination and seamless integration with the vehicle's existing electrical system. This kit allows the D3 lights to plug directly into the OEM harness, maintaining control through the original fog light switch.

Function Description:

The primary function of this kit is to facilitate the installation of DENALI D3 fog lights as a direct replacement for factory-installed fog lights. It ensures that the new D3 lights are securely mounted and electrically connected to the vehicle's OEM wiring harness, allowing them to operate as intended by the vehicle's original fog light controls. The kit is specifically tailored for Jeep Wrangler JK/JL and Jeep Gladiator JT models, ensuring a precise fit and straightforward installation process.

Important Technical Specifications:

  • Compatibility: Designed for Jeep Wrangler JK/JL and Jeep Gladiator JT.
  • Mounting Hardware: Includes M8 hardware for attaching the mounting bracket to the D3 pod.
  • Wiring Adapters: Comes with PSX24W and H10 wiring adapters (Qty 2 each) to ensure compatibility with various OEM connectors. These adapters allow the D3 lights to connect directly to the OEM fog light harness.
  • Mounting Bracket: Two mounting brackets are included, designed to integrate with the D3 pod and the vehicle's bumper.
  • Fasteners: Includes M4x12 thread forming screws (Qty 8) for securing components.
  • Torque Specifications (General Guidelines):
    • M3: 10.0 in-lbs (1.0 Nm)
    • M4: 23.0 in-lbs (2.5 Nm)
    • M5: 44.5 in-lbs (3.5 ft-lbs / 5.0 Nm)
    • M6: 78.0 in-lbs (6.5 ft-lbs / 9.0 Nm)
    • M8: 13.5 ft-lbs (18.0 Nm)
    • M10: 30.0 ft-lbs (41.0 Nm)
    • M12: 52.0 ft-lbs (71.0 Nm)
    • Note: Always refer to your owner's manual for specific vehicle hardware torque specifications.

Usage Features:

  • Direct OEM Replacement: The kit is engineered for a direct swap, minimizing modifications to the vehicle.
  • Seamless Integration: D3 lights connect directly to the OEM harness, retaining the use of the original fog light switch for control.
  • Robust Mounting: The mounting brackets and included hardware ensure a secure and stable installation of the D3 lights.
  • Adapter Versatility: The inclusion of both PSX24W and H10 wiring adapters covers different OEM connector types, ensuring broad compatibility within the specified Jeep models.
  • Clear Installation Steps: The manual provides a step-by-step guide for installation, starting with attaching the mounting bracket to the D3 pod, followed by removing OEM fog lights, installing D3 lights, and finally connecting the wiring.

Maintenance Features:

  • Thread Locker Recommendation: The manual strongly recommends using medium strength liquid thread locker on all screws, nuts, and bolts during installation to prevent loosening due to vibrations.
  • Regular Hardware Inspection: Users are advised to inspect all hardware after the first 30 miles of operation to ensure proper torque specifications are maintained. This proactive check helps prevent potential issues caused by initial settling or vibrations.
  • Professional Installation Recommended: DENALI products should always be installed by a qualified motorcycle technician. If users are unsure about their ability to properly install the product, they should seek assistance from a local motorcycle dealer. This recommendation emphasizes safety and proper function, minimizing the risk of damage due to incorrect installation.
  • Wiring Route Caution: When installing electronics, it is crucial to pay close attention to how wires are routed, especially near moving parts like the front fender, forks, or fairing. Users must ensure that the handlebars can turn fully left and right, and the suspension can fully compress without the wires binding or having insufficient slack. This prevents damage to the wiring and ensures safe operation of the vehicle.

The DENALI D3 Fog Light Mounting Kit is a comprehensive solution for upgrading the fog lights on compatible Jeep models, offering enhanced lighting performance while maintaining the vehicle's original aesthetic and control mechanisms. The detailed instructions and recommendations aim to ensure a safe, secure, and long-lasting installation.

Denali D3 Specifications

General IconGeneral
BrandDenali
ModelD3
CategoryLighting Equipment
LanguageEnglish