The model BK3 blower system (shown in figure 1) can be installed in any
existing circulating model wood-burning or un-vented firebox having a pre-
wired 120 VAC duplex power receptacle.
ACCESSING THE BLOWER
COMPARTMENT
1. Remove glass doors (if equipped)
by following the instructions shown
in Figure 2.
2. Remove the front refractory access
panel by lifting up and angling out
through the fireplace opening.
See Figure 3 on page 2.
3. Remove the control cover panel.
4. Remove the lower louver panel (if
installed) by gently pushing out the
panel from inside the mounting
frame.
5. Remove the knockout plug from
the lower louver panel. See Figure
3, on page 2.
6. Place the fan assembly with the
blades pointing towards the rear of
the fireplace and in between the
two leg stands. See Figure 4 on
page 2.
7. Using 2 of the screws provided,
fasten the upper flange of the
blower bracket to the hearth pan.
Then fasten the end flanges to the
leg stands with the remaining 4
screws. See Figure 4 on page2.
NOTE: The wire assembly must be
arranged in front and away from the
fan blades to freely reach the power
receptacle plug.
MODEL BK3 FAN KIT INSTALLATION
MODEL BK3 FAN KIT INSTALLATION MODEL BK3 FAN KIT INSTALLATION
MODEL BK3 FAN KIT INSTALLATION
INSTRUCTIONS
INSTRUCTIONSINSTRUCTIONS
INSTRUCTIONS
Triple Fan Blower System
Triple Fan Blower SystemTriple Fan Blower System
Triple Fan Blower System
For Use With DESA Model Wood B
For Use With DESA Model Wood BFor Use With DESA Model Wood B
For Use With DESA Model Wood Burning and Vent Free Fireboxes
urning and Vent Free Fireboxesurning and Vent Free Fireboxes
urning and Vent Free Fireboxes
CAUTION: Turn off the gas supply, disconnect the electric
circuit and allow the appliance to fully cool down before performing
this installation. Glass and refractory panels may be heavy for some
individuals. If this is the case, please request help from someone else.
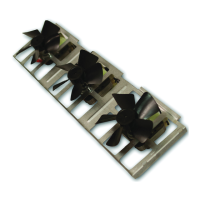
Figure 1 – BK3 Triple Fan Assembly
PIVOT PLATE
SPRING CLIP
TO RELEASE THE PIVOT PIN
DEPRESS THE SPRING CLIP
FOLD THE BI-FOLD
REMOVE THE BOTTOM PIN
DOOR AFTER RELEASING
THE SPRING CLIP, TO
FROM THE PIVOT PLATE
WHILE SLIDING THE DOOR
OUT OF THE UPPER TRACK
SLIDE THE DOOR OUT
OF THE UPPER TRACK
Figure 2 – Removing Glass Doors