12
ENGLISH
• This product is not intended for use by persons (including
children) suffering from diminished physical, sensory or
mental abilities; lack of experience, knowledge or skills
unless they are supervised by a person responsible for their
safety. Children should never be left alone with thisproduct.
ASSEMBLY AND ADJUSTMENTS
WARNING: To reduce the risk of serious
personal injury, turn appliance off and remove
battery before making any adjustments or
removing/installing attachments or accessories. An
accidental start-up can causeinjury.
WARNING: Use only
battery packs
andchargers.
WARNING: Never operate appliance
without guard firmly in place. Damage or personal injury
couldresult.
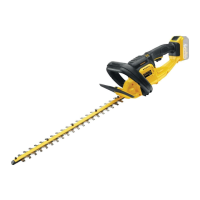
Inserting and Removing the Battery Pack
(Fig. B)
NOTE: Make sure your battery pack
12
is fullycharged.
WARNING: Before removing or installing
battery, make certain the lock-off lever is not engaged to
prevent triggeractuation.
To install the battery pack into the tool handle
1. Align the battery pack
12
with the rails inside the
tool’shandle.
2. Slide it into the handle until the battery pack is firmly seated
in the tool and ensure you hear the lock snap intoplace.
To remove the battery pack from the tool
1. Press the release button
13
and firmly pull the battery pack
out of the toolhandle.
2. Insert battery pack into the charger as described in the
charger section of thismanual.
Fuel Gauge Battery Packs (Fig. B)
Some
battery packs include a fuel gauge which
consists of three green LED lights that indicate the level of
charge remaining in the batterypack.
To actuate the fuel gauge, press and hold the fuel gauge
button
15
. A combination of the three green LED lights will
illuminate designating the level of charge left. When the level
of charge in the battery is below the usable limit, the fuel gauge
will not illuminate and the battery will need to berecharged.
NOTE: The fuel gauge is only an indication of the charge left on
the battery pack. It does not indicate tool functionality and is
subject to variation based on product components, temperature
and end-userapplication.
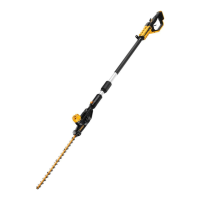
Assembling the Pole (Fig. C, D)
1. To assemble the pole, line up the upper trimmer pole
6
and the lower trimmer pole
7
as shown in FigureC. Press
down the latching button
16
and slide the upper pole into
the lower pole. Ensure the latching button engages the
latch hole
17
.
2. Secure the poles by tightening the middle bolt
18
with the
supplied hex wrench
19
as shown in FigureD.
Attaching the Auxiliary Handle (Fig. E)
1. Slide the auxiliary handle
4
into the top hole of the handle
base
20
.
2. Hold the auxiliary handle in place and thread the
handle bolt
21
into the handle from the bottom of the
handlebase.
3. Tighten the handle bolt with the supplied hex wrench
19
.
Ensure the handle is securelyattached.
4. Repeat for the other side of the auxiliaryhandle.
Adjusting Auxiliary Handle (Fig. F)
The trimmer comes fully assembled. The auxiliary handle
4
is positioned to maximize balance. However, if adjustment is
necessary, loosen the four bolts
22
with a hex wrench and slide
the auxiliary handle up or down the upper trimmer pole
6
.
OPERATION
Instructions for Use
WARNING: Always observe the safety
instructions and applicableregulations.
WARNING: To reduce the risk of serious
personal injury, turn appliance off and remove
battery before making any adjustments or
removing/installing attachments or accessories. An
accidental start-up can causeinjury.
WARNING: Always use proper eye protection
that conforms to ANSI Z87.1 (CAN/CSA Z94.3) while
operating thisappliance.
CAUTION: Before you begin trimming, only use
the appropriate type of cuttingline.
CAUTION: Inspect area to be trimmed and
remove any wire, cord, or string-like objects which
could become entangled in the rotating line or spool. Be
particularly careful to avoid any wire which might be bent
outwardly into the path of the appliance, such as barbs at
the base of a chain linkfence.