4
ENGLISH
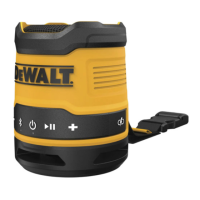
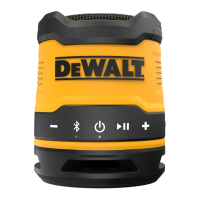
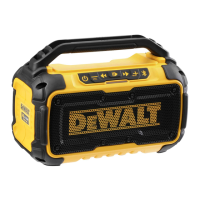
Description (Fig. A, B)
WARNING: Never modify the speaker or any part of it.
Damage or personal injury couldresult.
1
Power button
2
Volume up button
3
Volume down button
4
Bluetooth®** status indicator LED
5
Play/Pause button
6
Bluetooth®** button
7
Carry strap
8
USB charging cable
9
USB charger plug
10
USB charging plug
11
USB charging port cover
12
Charge indicator LED
Date Code Position (Fig.B)
The production date code
14
consists of a 4-digit year followed
by a 2-digit week and is extended by a 2-digit factorycode.
Markings on Tool
The following pictograms are shown on the tool:
Read instruction manual beforeuse.
Waste electrical and electronic equipment:
SeparateCollection.
Package Contents
The package contains:
1 Speaker
1 Charging cable
1 Instruction manual
• Check for damage to the speaker, parts or accessories which
may have occurred duringtransport.
• Take the time to thoroughly read and understand this manual
prior tooperation.
Charge Indicator LED Status
LEVEL OF
CHARGE
CHARGE INDICATOR
LEDCOLOR
UNIT ON
AND NOT
CHARGING
≥40% Green
20% - 40% Yellow
≤20%
Red and blinking.
If 3% or less of charge remains, the speaker
will say "Battery low, please recharge."
UNIT OFF AND
CHARGING
0% - 99% Red
100% No illumination
UNIT ON AND
CHARGING
0% - 99% Red
100% Green
Over Temperature Protection (Fig. A)
When over temperature protection is activated, the charge
indicator LED
12
will turn off.
NOTE: The unit can still be used during over the temperature
protectioncycle.
Checking State of Charge (Fig.A)
• When the speaker is powered ON, press the power
button
1
and the speaker will tell you the percentage of
charge remaining in thebattery.
NOTE: It does not indicate tool functionality and is subject
to variation based on product components, temperature
and end-userapplication.
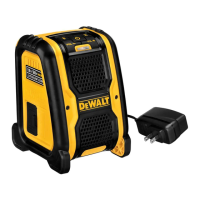
Charging Procedure (Fig. A, B)
1. Pull the USB charging port cover
11
away from thespeaker.
2. Insert the USB charging plug
10
into the charging port
13
.
3. Plug the USB charger plug
9
into any USB charging port
(such as on a computer or walladapter).
NOTE: Charging takes two hours depending on power
supply rating (5V,1A).
4. The charge indicator LED
12
color will be either red, yellow
or green and remain continuously ON whilecharging.
5. Charging is complete when the charge indicatorLED
12
color is green or turnsoff.
6. The battery can be left charging or the USB charging cable
can bedisconnnected.
7. Disconnect the charging cable and install the charging port
cover over the chargingport.
Hot/Cold Delay
When the speaker detects that the battery is too hot or too cold,
it automatically starts a hot/cold delay, suspending charging
until the battery has reached an appropriate temperature. The
speaker then automatically switches to charging mode. This
feature ensures maximum batterylife.
1. A cold battery may charge at a slower rate than a warmbattery.
2. During a hot/cold delay the charge indicator LED
12
will
not illuminate. Charging will not activate until the battery
temperature reaches between 4°C and 40°C (40°Fand104°F).
3. Once the battery has reached an appropriate temperature,
the charge indicator LED
12
will continuously blink, indicating
that the speaker has resumed the chargingprocedure.
Important Charging Notes
1. The speaker may become warm to the touch while
charging. This is a normal condition, and does not indicate
a problem. To facilitate the cooling of the speaker after use,
avoid placing the speaker in a warm environment such as in
a metal shed or an uninsulatedtrailer.
2. If the speaker does not charge properly, take the speaker
and USB cable to your local servicecenter.
3. You may charge a partially used battery whenever you
desire with no adverse effect on thespeaker
.