P35s
EN
10
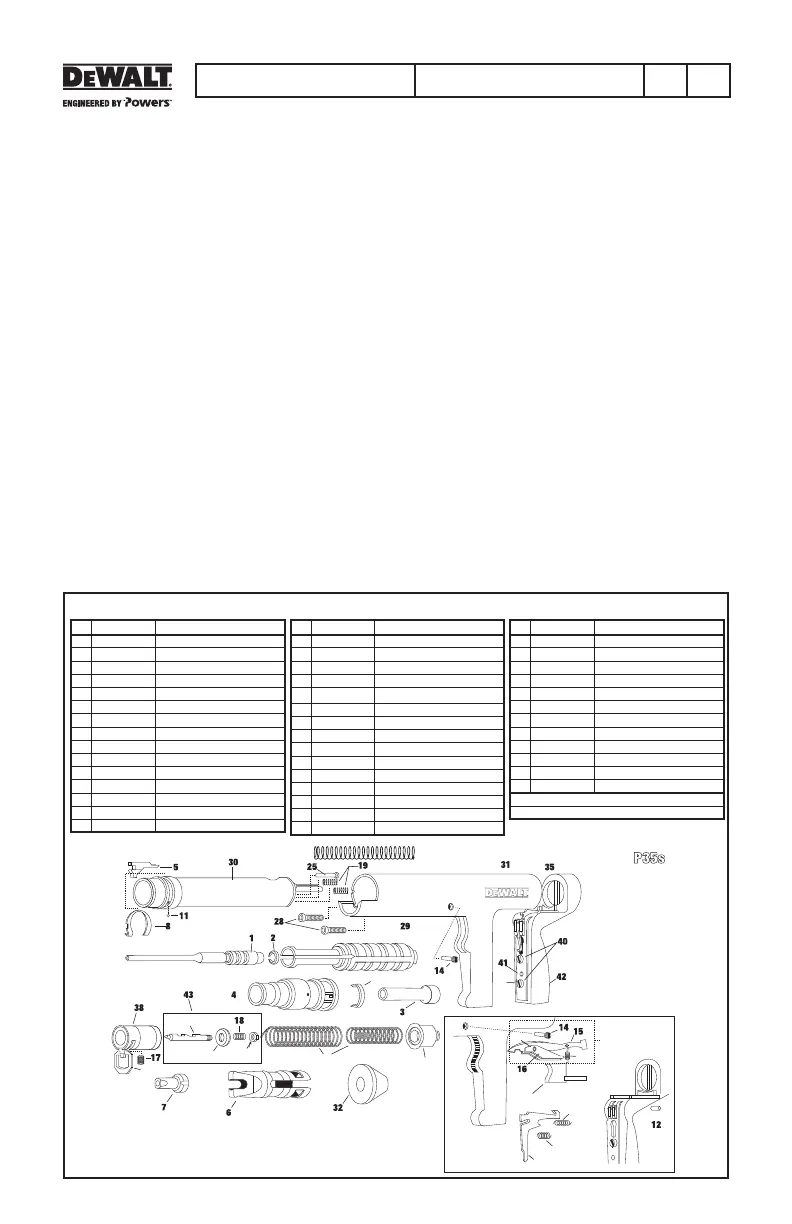
P35s SPARE PARTS LISTING
PROPER MAINTENANCE AND CLEANING
MAKE SURE THE TOOL IS NOT LOADED. BE SURE THE TOOL IS NOT HOT PRIOR TO ATTEMPTING
DISASSEMBLY OR CLEANING.
DAILY FUNCTION TEST
Check the functioning of the tool, without a powder load or fastener in the tool, by pushing down against
the work surface, pulling the trigger, and releasing the tool from the work surface. Function the unloaded
tool several times and insure that the breech parts and firing mechanism operate freely before fastening
with the tool.
Your DEWALT Authorized representative should be asked to assist the first time you disassemble and
clean your tool. If you ever have any trouble reassembling the tool, or have any doubt about worn parts, call
your DEWALT Authorized Powder Distributor.
CLEANING
AIl parts should be cleaned with detergent oil and the wire brushes supplied with your tool kit. Remove heavy
dirt build-up with the brush. After cleaning with oil, all parts should be wiped thoroughly dry. Excess oil will
tend to collect dirt and dust. Wear eye protection when cleaning the tool. The piston rod, barrel assembly,
and receiver should all be cleaned of excess dirt on a daily basis. Check the condition of the piston for
damage from wear and deformation.
To maintain this tool in good working condition, it is necessary to disas semble and clean the entire tool if
dirt is evident in the breech face, or if the tool appears to lose power. All parts should be cleaned with oil and
wire brushes. Remove heavy dirt. All parts should be wiped thoroughly dry after cleaning with oil.
General tool mainte nance should be performed at six month intervals or more frequently as required by the
frequency of tool use.
23
39
27
22
21
24
24
37
20
9
26
36
33
LEVER
GUIDE 13
KIT
33
# DESCRIPTION
1 52200-PWR Piston W/Ring 21/SDF-Standard
2 52106-PWR Piston Ring
3 52204-PWR Guide 21/F3-1Full Size
4 52206-PWR Baseplate 21/SI Full Size
5 52208-PWR Piston Stop
6 52210-PWR Baseplate 21/S2 Limited Access
7 52212-PWR Guide 21/F-2-1Limited Access
8 52214-PWR Annular Spring
9 52118-PWR Trigger
10 52120-PWR Shear Clip
11 52122-PWR Steel Annular Ball
12 52124-PWR Release Lever Pin
13 52126-PWR Lever Guide Kit
†
14 52128-PWR Threaded Pin
15 52130-PWR Advance Lever
# DESCRIPTION
16 52132-PWR Advance Lever Guide
17 52134-PWR Sear Spring
18 52138-PWR Firing Pin Return Spring
19 52140-PWR Strip Pressure Ball & Spring
20 52142-PWR
Advance Lever Spring
21 52144-PWR Rear Spring Kit
22 52146-PWR Sear
23 52148-PWR Firing Pin
24 52150-PWR End Cap
25 52152-PWR Pressure Pin
26 52154-PWR Compression Spring
27 52156-PWR Firing Pin Nut
28 52158-PWR Front Allen Cap Screw (2)
29 52216-PWR Piston Guide
30 52218-PWR Steel Liner Assembly
# DESCRIPTION
31 52220-PWR Trigger Return Spring
32 52222-PWR Housing
33 52168-PWR Support Strip Assembly
34 52170-PWR Release Lever
35 52172-PWR Retaining Ring
36 52174-PWR Trigger Return Spring
37 52176-PWR Advance Lever Bushing
39 52180-PWR Spring Detent (2)
40 52182-PWR Cheese Head Screw (2)
41 52184-PWR Handle Allen Screw
42 52186-PWR Rubber Grip
43 52181-PWR Firing Pin Assembly
*
* Firing Pin Assembly Includes Items #18, 23, 27 & 39
†
Lever Guide Kit Includes Items # 14, 15, 16, 20 & 39