14
ENGLISH
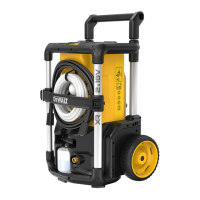
Installing and Removing the Battery Packs
(Fig.M, N)
This pressure washer is designed to operate on two battery
packs of equal capacity. The pressure washer will not operate
on a single battery pack, and If using different capacity battery
packs, the smaller capacity battery pack, when depleted, will
cause the unit to turn off
NOTE: For best results, make sure your battery packs are both
fullycharged.
To Install the Battery Packs
WARNING: Ensure speed selector switch is in the OFF,
centered position, before installing battery packs.
CAUTION: Unit stops running when the battery port
door is open. If the speed selector switch is in the HI or LO
position the unit will power ON when the battery port
door closes.
CAUTION: Do not hold the trigger when closing the
battery port door.
1. Unlock the battery port door
20
, rotate the battery port
door latch
21
counterclockwise and swing the battery
port door open to access the batteryport.
2. Align the battery packs
35
with the rails inside the battery
port and slide them in until the battery packs are firmly
seated in the tool and ensure that they will notdisengage.
3. Lock the battery port door
20
, close the battery port
door
20
so it seals to the pressurewasherunit
8
.
4. Rotate the battery port door latch
21
clockwise to lock
the battery port door. Ensure the battery port door is fully
latched into position before startingtool.
NOTE: The unit will not operate if the battery port door is
not fully closed and latched.
To Remove the Battery Packs
1. Rotate the battery port door latch
21
counterclockwise
and pull the battery port door open to access the battery
packs
35
.
2. Press the battery release buttons
36
on the battery
packs
35
and firmly pull the battery packs out oftool.
3. Insert the batteries into a charger as described in the
charger section of thismanual.
4. Close the battery port door
20
so it seals to the
pressurewasherunit
8
and lock it. Ensure the battery port
door is fully latched into position.
Fuel Gauge Battery Packs (Fig.B)
Some DeWALT battery packs include a fuel gauge, which
consists of three green LED lights that indicate the level of
charge remaining in the batterypack.
To actuate the fuel gauge, press and hold the fuel gauge
button
43
. A combination of the three green LED lights will
illuminate, designating the level of charge left. When the level
of charge in the battery is below the usable limit, the fuel gauge
will not illuminate and the battery will need to berecharged.
NOTE: The fuel gauge is only an indication of the charge left on
the battery pack. It does not indicate tool functionality and is
subject to variation based on product components, temperature
and end-userapplication.
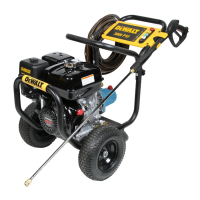
OPERATION
Instructions for Use
WARNING: Always observe the safety instructions and
applicableregulations.
WARNING: To reduce the risk of serious personal
injury, turn tool off and disconnect battery pack
before making any adjustments or removing/
installing attachments or accessories. An accidental
start-up can causeinjury.
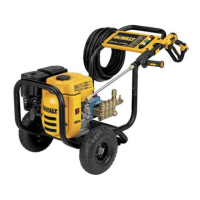
Attaching High Pressure FoamCannon (Fig. L)
1. To connect the high pressure foamcannon
26
to the
spray wand
2
, press the nozzle button
3
and insert the
soapbottle.
2. Release the
nozzle button
3
to lock the
high pressure
foamcannon
26
in place.
3. Give the high pressure foamcannon
26
a firm tug after to
ensure it is locked intoplace.
NOTE: The soap bottle should be positioned underneath the
spray wand. Do not position the high pressure foamcannon
above the spray wand as this will lead to soap dripping on the
spray wand. The spray tip on the high pressure foamcannon
26
rotates for vertical or horizontalapplication.
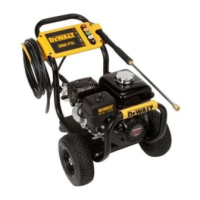
To Attach the Self Priming Suction Hose (Fig.K)
Use the self priming suction hose to pull water from a bucket or
other fresh watersource.
NOTICE: Do not use to suction soap, chemicals, dirty
or corrosive liquids, such as window cleaner, plant food,
fertilizers or bleach. Do not use with saltwater.
NOTE: Avoid cross threading when installing the self priming
suction hose
28
. Cross threading will causeleaks.
1. To connect the self priming suction hose
28
to the
pressurewasherunit
8
,thread the suction hose collar
31
onto the water intake
17
.
2. Securely tighten the suction hose collar
31
byhand.
NOTE: Always disconnect the suction hose afterusage.
3. Place other end of suction hose, with the filter
30
on it, into
a container of fresh water or a fresh water source.
4. Adjust the float ball
29
on the suction hose so the filter
30
stays covered in theliquid.
5. Select the correct nozzle to be used. Attaching Nozzles
6. After the job being performed is complete, place the suction
hose into a container of clean water and draw the clean
water through the system torinse.
NOTE: When using the self priming suction hose, it may
take a few minutes for the pressure washer to self prime.
Ensure the pressure washer is turned on and the trigger on
the spray wand it being pulled until primed.
• A wide fan pattern distributes the impact of the water over
a larger area, resulting in excellent cleaning action with a
reduced risk of surface damage. Large surface areas can be
cleaned more quickly using a wide fan pattern.
 Loading...