11
ENGLISH
2. Push and rotate bit until it locks in place. The bit will be
securelyheld.
3. To release bit, pull the sleeve
(
10
)
back and remove thebit.
OPERATION
Instructions for Use
WARNING: Always observe the safety instructions and
applicableregulations.
WARNING: To reduce the risk of serious personal
injury, turn tool off and disconnect battery pack
before making any adjustments or removing/
installing attachments or accessories. An accidental
start-up can causeinjury.
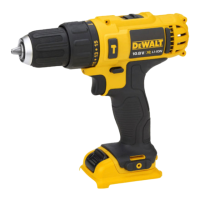
Proper Hand Position (Fig. E)
WARNING: To reduce the risk of serious personal injury,
ALWAYS use proper hand position asshown.
WARNING: To reduce the risk of serious personal
injury, ALWAYS hold securely in anticipation of a
suddenreaction.
Proper hand position requires one hand on the main handle
(
8
)
,
with the other hand on the side handle
(
5
)
.
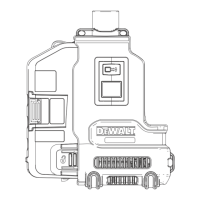
Operation Modes (Fig.A)
WARNING: Do not select the operating mode when the
tool isrunning.
Your tool is equipped with a mode selector dial
(
3
)
to selectthe
mode appropriate to desired operation.
Symbol Mode Application
Rotary Drilling
Screwdriving
Drilling into steel, wood
andplastics
Rotary
Hammering
Drilling into concrete and
masonry
Hammering
only
Lightchipping
To select an operating mode:
1. Depress the mode selector release button
(
4
)
.
2. Rotate the mode selector dial so that the arrow points to the
symbol corresponding with the desired mode.
NOTE: The mode selector
(
3
)
must be in rotary drilling, rotary
hammering or hammering only mode at all times. There are no
operable positions inbetween. It may be necessary to briefly
run the motor after having changed from 'hammering only' to
'rotary' modes in order to align thegears.
Performing an Application (Fig.A)
WARNING: TO REDUCE THE RISK OF PERSONAL
INJURY, ALWAYS ensure workpiece is anchored or
clamped firmly. If drilling thin material, use a wood “back-
up” block to prevent damage to thematerial.
WARNING: Always wait until the motor has come to
a complete standstill before changing the direction
ofrotation.
1. Choose and install the appropriate chuck, adapter, and/or
bit onto to the tool. Refer to Bit and Bit Holders.
2. Using the mode selector dial
(
3
)
, selectthe mode
appropriate to desired application. Refer to
OperationModes.
3. Adjust the side handle
(
5
)
asrequired.
4. Place the bit/chisel on the desired location.
5. Select the direction ofrotation using the forward/reverse
button
(
2
)
. When changing the position of the control
button, be sure the trigger isreleased.
- To select forward rotation, press the for ward/re verse
control button on the right side of thetool.
- To select reverse, press the forward/reverse control
button on the left side of thetool.
NOTE: The center position of the control button locks
the tool in the off position.
6. Depress the trigger switch
(
1
)
. The farther you depress
the trigger switch, the faster the tool will operate. For
maximum tool life, use variable speed only for starting holes
orfasteners.
NOTE: Depending on your tool, depressing the trigger
switch activates a worklight
(
13
)
designed to illuminate the
immediate work surface. Refer to Description. The worklight
will automatically turn off 20 seconds after the trigger
switch is released.
WARNING:
• Do not use this tool to mix or pump easily combustible
or explosive fluids (benzine, alcohol, etc.).
• Do not mix or stir inflammable liquids
labelledaccordingly.
MAINTENANCE
Your DeWALT power tool has been designed to operate
over a long period of time with a minimum of maintenance.
Continuous satisfactory operation depends upon proper tool
care and regularcleaning.
WARNING: To reduce the risk of serious personal
injury, turn tool off and disconnect battery pack
before making any adjustments or removing/
installing attachments or accessories. An accidental
start-up can causeinjury.
The charger and battery pack are notserviceable.
Lubrication
Your power tool requires no additionallubrication.
Cleaning
WARNING: Blow dirt and dust out of the main housing
with dry air as often as dirt is seen collecting in and around
 Loading...