EasyManua.ls Logo

DIGISYSTEM DSO-D Series - User Manual

DIGISYSTEM DSO-D Series
3 pages
Print Icon
To Next Page IconTo Next Page
Loading...
DIGISYSTEM LABORATORY INSTRUMENTS INC. www.digisystemlab.com REV.1-2017
Air vent
Controller
INSTRUCTION MANUAL FOR HOT AIR OVEN DSO-D & DSO-DF SERIES
Warnings:
* Make sure that the door is closed well to prevent heat loss and power drain.
* The surface is hot. Do not touch.
* Do not put any objects on the top of the instrument.
* Please keep the environment ventilated.
1. Connect with power supply. Please make sure the power voltage is the same as the voltage shown on the
label stuck on the back of machine.
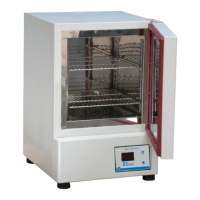
2. Put your sample in and close the door.
3. Press “ON/OFF Button”, then you will see the “Power indicator’ becomes green. Wait for about 5 seconds;
you can see that on the display screen, the top row is the present temperature value (PV) and the bottom
row is the setting temperature value (SV).
4. Set temperature: you will see . Press or to adjust SV value and then press to
enter the value.
5. Set time: Select time mode: Continouos mode or Timer mode .
5.1 Press to set Continuous mode. OUT2 indicator on display screen will disappear. The
setting is finished. Go to Step 6.
5.2 Press to set Timer mode. OUT2 indicator on screen will appear.
5.2.1 You will see or .
5.2.2 Use or key to select time unit (hour) or (minute). Press
to enter the value. Press to next setting.

Questions and Answers

Summary

Operating the Hot Air Oven

Safety Warnings and Precautions

Essential safety guidelines to prevent hazards during operation and ensure user safety.

Initial Setup and Power On

Steps for connecting power supply, loading samples, and initiating the oven's operation.

Setting Oven Temperature

Procedure for adjusting and setting the desired temperature for the oven chamber.

Selecting Time Mode

Guide to choosing between continuous operation and timed operation modes.

Oven Operation Details and Maintenance

Timer Mode Configuration

Details on setting and confirming time values for timer mode operation.

Concluding Operation and Remarks

Procedures for powering down the oven and understanding operational indicators.

Maintenance and Cleaning

Guidelines for keeping the oven clean and ensuring its longevity.

Circuit Diagram Overview

Visual representation of the oven's electrical components and connections.

Advanced Functions and Troubleshooting

Additional Oven Functions

Explains PV shift, alarm points, temperature units, and auto-tuning.

Restoring Default Settings

Instructions for resetting oven parameters to their factory default values.

Troubleshooting Common Issues

Identifies common problems, their causes, and recommended solutions for the oven.

Overview

The DIGISYSTEM HOT AIR OVEN DSO-D & DSO-DF SERIES is a laboratory instrument designed for various applications requiring precise temperature control, such as drying, sterilization, and heat treatment. This device ensures a stable and uniform temperature environment for samples.

Function Description:

The hot air oven operates by circulating heated air within its chamber to maintain a set temperature. The device features a digital controller that displays both the present temperature value (PV) and the setting temperature value (SV). It offers both continuous and timer-based operation modes, allowing for flexible experimental setups. An "ON/OFF Button" controls the power, with a green "Power indicator" signifying operation and a red indicator when turned off. The oven is equipped with an alarm system (ALM1) that activates if the PV exceeds the SV by a set point, indicating a potential over-temperature condition. An "OUT1" indicator on the display flashes when the instrument is actively heating. For temperature calibration, a "PV shift (offset) value" function is available. The device also includes "Upper-limit point for alarm" and "Lower-limit point for alarm" settings to define acceptable temperature ranges relative to the SV. A "Temperature unit" setting allows users to switch between Celsius and Fahrenheit. An "Auto-tuning function" (BERE) helps optimize temperature stability, indicated by a flashing "AT" indicator when active. The oven also features an "Air vent" on the back, which can be adjusted to balance the temperature if the PV value deviates significantly from the SV.

Important Technical Specifications:

While specific numerical values for temperature range, chamber volume, or power consumption are not provided in the manual, the device is designed for precise temperature control, as evidenced by its digital display and various adjustment functions. The circuit diagram indicates the use of an SSR (Solid State Relay) for heating control and a PT100Ω sensor for temperature measurement, which are standard components for accurate temperature regulation in laboratory ovens. The controller model appears to be a DTA330VA-0.

Usage Features:

  1. Power Connection: Ensure the power voltage matches the label on the back of the machine.
  2. Sample Placement: Place samples inside the chamber and securely close the door.
  3. Power On/Off: Press the "ON/OFF Button" to power on the device. The "Power indicator" will turn green. After approximately 5 seconds, the display will show the present temperature (PV) on the top row and the setting temperature (SV) on the bottom row.
  4. Setting Temperature (SV): Use the "SET" button to access the SV adjustment. Press the "up" or "down" keys to change the value, then press "SET" again to confirm.
  5. Setting Time Mode:
    • Continuous Mode: Press the "timer mode key" (represented by a square with an arrow) to select continuous mode. The "OUT2" indicator on the display will disappear.
    • Timer Mode: Press the "timer mode key" to select timer mode. The "OUT2" indicator will appear.
      • Time Unit Selection: In timer mode, the display will show "ECME" or "ETME". Use the "up" or "down" keys to select the time unit (HR for hours or MEN for minutes). Press "SET" to confirm and proceed to the next setting.
      • Time Value Adjustment: The display will show "ELME" followed by "999M". Use the "up" or "down" keys to adjust the time value. Press "SET" to confirm and move to the next setting.
      • Interrupting Timer Mode: To switch from timer mode to continuous mode, press the "timer mode key" (square with arrow).
  6. Alarm Management: If the "ALM1" indicator appears due to PV exceeding SV by 10℃, turn off the power, open the door for about 30 minutes, and then restart.
  7. Temperature Balance: If the PV is significantly higher or lower than the SV, adjust the "Air vent" on the back of the machine. Open the vent if PV is too high, close it if PV is too low.
  8. Other Functions (accessed in continuous mode):
    • PV Shift (Offset) Value (PVOF): Calibrate the PV using an external thermometer. Press "SET" to adjust the value using "up" or "down" keys.
    • Upper-limit Point for Alarm (ALIK): Set the upper temperature difference from SV that triggers ALM1.
    • Lower-limit Point for Alarm (AUAL): Set the lower temperature difference from SV that triggers ALM1.
    • Temperature Unit (EPUN): Switch between Celsius (C) and Fahrenheit (F).
    • Auto-tuning Function (BERE): Optimize temperature control. The "AT" indicator flashes when active.
  9. Restore Default Values: Press and hold the "timer mode key" for more than 3 seconds until "dEV" appears, then press the "timer mode key" again until "d5o" flashes. Press "SET" to restore defaults.

Maintenance Features:

  1. Cleaning: Keep the machine clean at all times. Routine maintenance is not required. Clean the exterior with a damp cloth.
  2. Solvent Avoidance: Do not use solvents for cleaning, as they may damage the product housing and inner chamber.
  3. Troubleshooting: The manual provides a troubleshooting guide for common issues such as instrument inoperation, controller malfunction, unstable temperature, and incorrect PV values. It recommends checking power connections, fuses, and contacting a distributor for repairs if electronic components are broken. For temperature stability issues, it suggests executing the auto-tuning function. For PV inaccuracies, it advises using the PV shift (offset) value function.
  4. Safety: Always disconnect the power cord before troubleshooting or performing any maintenance. Ensure the door is closed well during operation to prevent heat loss and power drain. Avoid touching the hot surface of the instrument. Do not place objects on top of the instrument and ensure the environment is well-ventilated.

DIGISYSTEM DSO-D Series Specifications

General IconGeneral
BrandDIGISYSTEM
ModelDSO-D Series
CategoryLaboratory Equipment
LanguageEnglish