Energy Related Product Directive
This product complies with Lot20 of the Energy Eciency Directive (2015/1188)
General Information
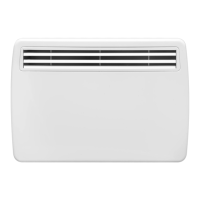
The heater is designed for wall mounting using the wall bracket supplied. It should only be operated when in the upright position as shown - see
Fig. 1. All models are splash proof to IP24. Before connecting the heater check that the supply voltage is the same as that stated on the heater.
Wall Mounting
IMPORTANT The wall bracket supplied with the heater must be used and the heater must be installed in the correct orientation. The xings
should be used to secure the bracket to the particular wall on which the heater will be installed. The heater should be positioned observing
the minimum clearances stated around the heater - see Fig. 1.
This guide is for quick reference only
To view the full manual, please scan this QR code using your smarphone or visit the product page at www.dimplex.co.uk
Model Identier(s): PLX050E PLX075E PLX100E PLX125E PLX150E PLX200E PLXC300E
Heat Output
Nominal heat output Pnom 0.50kW 0.75kW 1.00kW 1.25kW 1.50kW 2.00kW 3.00kW
Minimum heat output
(indicative)
Pmin N.A N.A N.A N.A N.A N.A N.A
Maximum heat output Pmax,c 0.50kW 0.75kW 1.00kW 1.25kW 1.50kW 2.00kW 3.00kW
Auxiliary electricity consumption
At nominal heat output elmax 0.00 0.00 0.00 0.00 0.00 0.00 0.00
At minimum heat output elmin
0.00 0.00 0.00 0.00 0.00 0.00 0.00
In standby mode elSB <0.0005 <0.0005 <0.0005 <0.0005 <0.0005 <0.0005 <0.0005
Type of heat output / room temperature control
Electronic heat charge control with room
and / or outdoor temperature feedback
Yes
Other control options
Room temperature control, with open
window detection
Yes
With adaptive start control Yes
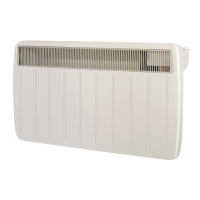
To mount the heater to the wall:
1. Remove wall mounting bracket from the back of the heater by depressing the spring latch at the side of each bracket - see Fig. 2.
2. Fix the wall bracket securely to the wall through the four screw holes.
3. Present the heater to the wall bracket and engage bottom slots in the back with bracket hooks.
4. Press heater into locked position and ensure the clips on the top are engaged.
5. Remove protective lm from the user interface.
‘D’
‘E’
255
310
Minimum mounting clearance
WARNING:
This product is heavy and care should be taken in installation
Fig. 2