Preparatory work
Getting to know the appliance
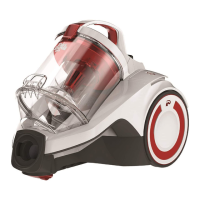
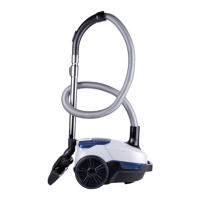
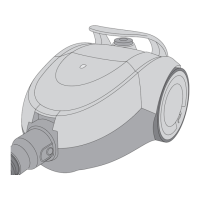
Fig.
1
:
1
Dust bin cover release;
2
dust bin;
3
hose release;
4
dust bin cover;
5
dust bin han-
dle;
6
dust bin release;
7
cord rewind button;
8
parking bracket;
9
exhaust lter cover;
10
con-
nection cord;
11
ON/OFF button;
12
suction hose
with accessory bracket;
13,
handle;
14
bypass vent;
15
telescopic tube;
16
suction hose port;
17
tele-
scopic tube release catch;
18
switchable oor nozzle;
19
carpet nozzle;
20
3-in-1 combi nozzle
Accessories (optional):
A
parquet nozzle;
B
mini turbo nozzle
Unpacking and assembling
1
Check that the unpackaged contents are com-
plete. If you notice any transport damage or if an-
ything is missing, contact your dealer immediate-
ly.
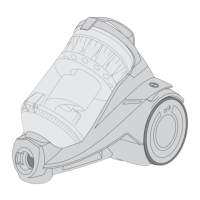
2
Connect suction hose and appliance (Fig.
2
).
3
Connect the suction hose with the telescopic tube
and adjust the length of the telescopic tube (Fig.
3
).
4
Connect telescopic tube and switchable oor noz-
zle (Fig.
4
).
5
Ensure that the bypass vent (Fig.
1
/
15
)
is completely closed.
Using the accessories
CAUTION!
For hard oors, only use the switchable oor
nozzle (Fig.
1
/
19
) with the brush (Fig.
10
) ex-
tended, as the hard oor may otherwise become
damaged.
CAUTION!
If using the turbo nozzle (Fig.
1
/B), make sure
that the surface can withstand the rotating brush
without becoming damaged.
NOTE:
The carpet nozzle (g.
1
/
19
) is a nozzle devel-
oped specially for carpets and cleans deep down.
As a result of its design it may adhere rmly to the
carpet. This adhesion can be reduced using the
bypass vent (g.
1
/
14
).
Do not use the carpet nozzle for hard oors as
the hard oors will otherwise become damaged.
NOTE:
You can also use the suction nozzles without the
telescopic tube as necessary. To do so, connect
the required accessories directly to the handle
(Fig.
9
).
1
Connect the required accessory to the handle or
the telescopic tube (Fig.
9
).
2
Make sure that the
accessory is securely connected. ➔ The appliance
can be connected.
Connecting the appliance
CAUTION!
If the red marking is visible (Fig.
6
/
1
), retract
the connection cord by pressing the cord rewind
button to pull in the cord up to the yellow mark
(Fig.
6
/
2
) (Fig.
7
). Otherwise, the connection
cord might be damaged.
1
Pull the cable out of the appliance (Fig.
5
).
2
In-
sert the plug into a mains socket.
Vacuum cleaning
Flexible vacuum-cleaning
1
Connect the required accessories >”Using the ac-
cessories” on page 17.
2
Connect the appliance
>”Connecting the appliance” on page 17.
3
To switch
on the appliance, press the ON/OFF button (Fig.
8
).
➔ The appliance vacuums at full suction power.
4
4
Set the desired suction power on the power con-
troller (g.
11
) and vacuum-clean.
5
To switch o
the appliance, press the ON/OFF button again
(Fig.
8
). ➔ The appliance switches o.
6
Close the
bypass vent (Fig.
1
/
15
) so that the appliance oper-
ates with full suction power when vacuum-cleaning
the next time.
Regulating the suction power
1
To reduce the suction power, turn the power con-
troller down (g.
11
).
2
To increase the suction pow-
er, turn the power controller up (g.
11
).
Storing the appliance
NOTE:
If necessary, use the holding clip on the suction
hose (g.
1
/
13
) to attach accessories.
1
Switch o the appliance and pull the plug from the
socket.
2
Push the cord rewind button (Fig.
1
/
6
)
until the cord has been fully rewound (Fig.
7
).
3
Hang the telescopic oor nozzle or parquet nozzle
(connected to the telescopic tube or handle) in the
parking bracket (Fig.
1
/
8
) (Fig.
12
).
EN
17