The following in particular is prohibited:
Vacuuming:
– People, animals, plants or items of
clothing on the body
➔ High risk of injury!
– Hot ash, burning cigarettes, matches
and highly ammable substances
➔ Risk of re!
– Water and other liquids
➔ Risk of short circuit!
– Toner (for laser printers, copying
machines, etc.)
➔ Risk of re and explosion!
Use
– in the vicinity of explosive or highly
ammable substances
➔ Risk of re and explosion!
– outdoors
➔ Risk of damage due to rain and dirt!
– of non-original accessories. This can
impair appliance safety.
– on long-pile carpets and on damp
oors.
Carrying out repairs yourself
➔ Risk of injury and loss of entitlement
to free replacement!
Preparatory work
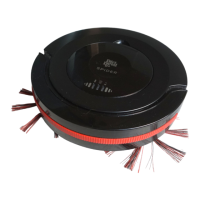
Getting to know the appliance
Fig.
1
:
1
Charging indicator light;
2
Cleaning in-
dicator;
3
Battery indicator;
4
Recessed grip to re-
lease dust bin compartment cover;
5
Mains adapt-
er;
6
Mains adapter cord;
7
Mains adapter plug;
8
Battery compartment cover;
9
Battery pack;
10
Battery compartment;
11
Rubber-coated drive
wheels;
12
Slide controller to set sensitivity of anti-
fall sensors;
13
Round brooms;
14
Mount for round
brooms;
15
Suction inlet;
16
Charging socket on ap-
pliance;
17
ON/OFF switch
Fig.
7
:
1
Dust bin compartment cover;
2
Dust
bin cover;
3
Filter;
4
Dust bin;
5
Recessed grip
to release dust bin compartment cover;
6
Dust bin
compartment
Introducing displays
Fig.
1
:
1
Charging indicator light
• Flashes blue, when the battery pack is charging
• Lights up with constant blue light when the bat-
tery pack is fully charged
• Flashes alternately with battery indicator during
operation
2
Cleaning indicator
• Lights up red when dust bin must be emptied
3
Battery indicator
• Lights up red when battery pack must be charged
or appliance has no contact to oor
• Flashes alternately with charging indicator light
during operation
Unpacking and preparing
1
Check that the unpackaged contents are com-
plete (Fig.
1
). If you notice any transport damage or
if anything is missing, contact your dealer immedi-
ately.
2
When using the appliance on hard oors, at-
tach the round brooms one after the other as shown
(Fig.
1
/
13
).
NOTE:
If you want to remove the round brooms, grab
the bristles and pull the round brooms away from
the appliance (Fig.
13
/
B
).