2
1
2 3 4
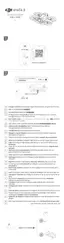
Battery Port USB-C Port Function Button Status LED
电池接口 USB-C 接口 功能按键 状态指示灯
電池連接埠 USB-C 連接埠 功能按鍵 狀態指示燈
バッテリーポート USB-C ポート 機能ボタン ステータス LED
배터리 포트 USB-C 포트 기능 버튼 상태 LED
Akkuschacht USB-C-Anschluss Funktionstaste Status-LED
Puerto de la batería Puerto USB-C Botón de función Led de estado
Port de batterie Port USB-C Bouton fonction LED d’état
Vano batteria Porta USB-C Tasto funzione LED di stato
Batterijpoort USB-C-poort Functieknop Statusled
Porta da bateria Porta USB-C Botão de função LED de estado
Entrada da bateria Entrada USB-C Botão Função LED de status
Порт для аккумулятора Порт USB-C Кнопка функций Светодиодный индикатор состояния
10%
10%
30%
2
1
1
2
3
4
A1
A2
C
B
Click
2
1
100%
EN
Warnings
1. When using the DJI AVATA
TM
2 Two-Way Charging Hub (hereinafter referred to as “charging hub”) to
charge DJI Avata 2 Intelligent Flight Batteries, it is recommended to use the DJI 65W Portable Charger
or a USB Power Delivery charger.
2. The charging hub is only compatible with the BWX520-2150-14.76 Intelligent Flight Battery. DO NOT
use the charging hub with other battery models.
3. Place the charging hub on a flat, stable surface with good ventilation when charging an external
device or accumulating power. Make sure the device is properly insulated to prevent fire hazards.
4. DO NOT attempt to touch the metal terminals on the battery ports. Clean the metal terminals with a
dry cloth if there is any noticeable buildup.
5. Make sure to charge batteries with low battery power in time. It is recommended to store the
batteries in the charging hub.
Introduction
The DJI Avata 2 Two-Way Charging Hub is designed to charge up to three DJI Avata 2 Intelligent Flight
Batteries. After the Intelligent Flight Batteries are inserted, the charging hub can supply power to
external devices via the USB-C port, such as a remote controller or a mobile phone. The charging
hub can also use the power accumulation function to transfer the remaining power of multiple low-
power batteries into the battery with the highest remaining power.
Usage
Charging Intelligent Flight Batteries
1. Insert the batteries into the charging hub until they click into place. (Figure A1)
2. Connect the charging hub to a power outlet using a USB-C charger. The Intelligent Flight Battery
with the highest power level will be charged first. The status LED indicates the battery level during
charging. Refer to the Status LED Descriptions for more information about the blinking patterns.
3. The battery can be stored in the charging hub after charging. Remove the battery from the charging
hub for use. (Figure A2)
Using the Charging Hub as a Power Bank
1. Insert an Intelligent Flight Battery into the charging hub. Connect an external device via the USB-C
port, such as a mobile phone or remote controller. (Figure B)
2. The battery with the lowest power level will be discharged first, followed by the remaining batteries to
be discharged sequentially. To stop charging the external device, disconnect the external device from
the charging hub.
•
If the remaining charge of a battery is lower than 7%, the battery cannot charge the external
device.
•
Press the function button to activate charging if charging does not start automatically.
Power Accumulation
1. Insert more than one battery into the charging hub, and press and hold the function button until
the status LED turns green. The status LED of the charging hub pulses green, and the charge is
transferred from the battery with the lowest power level to the battery with the highest power level.
(Figure C)
2. To stop accumulating power, press and hold the function button until the status LED turns yellow.
After stopping power accumulation, press the function button to check the power level of the
batteries.
 Loading...