Do you have a question about the DMC AF8 and is the answer not in the manual?
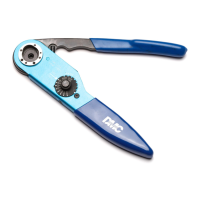
Designation AF8 (M22520/1-01) for basic tool; wire crimp range 26 to 12 AWG.
Tool features a double-action ratchet that requires cycle completion to open.
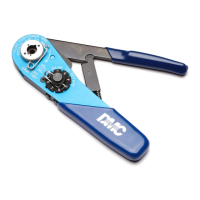
Guide for placing, securing, and setting the positioner based on color code and wire size.
Instructions for inserting contact/wire and squeezing handles until the ratchet releases.
Procedure to release the turret and loosen screws for positioner removal.
Caution: Tool must be in open position during installation/removal to prevent damage.
Instructions for using Go and No-Go gages to verify crimp quality.
Table showing inspection gage dimensions for different selector settings.
Advice on cleaning indenter tips and avoiding immersion or lubrication.
Information on refurbishing, recalibrating, and custom tool kit services.
Statement on manufacturer's liability for consequential or special damages.
Details of the 90-day warranty for defects in material and workmanship.
The Daniels Manufacturing Corporation (DMC) AF8 (M22520/1-01) is an adjustable hand crimp tool designed for precision crimping of electrical contacts. This datasheet provides comprehensive information regarding its function, technical specifications, usage, and maintenance.
The AF8 tool is a basic hand crimp tool without a positioner, meaning a separate positioner attachment is required for specific crimping applications. Its primary function is to securely crimp electrical contacts onto wires within a specified gauge range. The tool features a double-action ratchet mechanism, which ensures that the crimping cycle is completed once initiated, preventing partial crimps and enhancing reliability. This design means the tool cannot be opened until the full cycle is finished.
When a positioner is installed, the tool facilitates precise crimping by allowing the user to select the appropriate setting based on the contact's part number and wire size. The positioner guides the contact and wire into the indenter opening, ensuring consistent and accurate crimps. The tool's operation involves inserting the contact and prepared wire, then squeezing the handles until the ratchet releases, at which point the handles will return to the open position.
The AF8 tool is designed for minimal maintenance. It is considered a precision hand crimp tool and should be handled with care.
DMC emphasizes that this tool is a precision instrument, and improper handling or unauthorized repairs can compromise its accuracy and longevity. DMC also engineers and manufactures complete tool kits for various customer requirements, including total aircraft support, general shop maintenance, production, and on-board ship and vehicle service.
DMC warrants new products to be free from defects in material and workmanship for 90 days after delivery to the first user. The warranty is limited to free correction or refund of the purchase price, provided the product is returned prepaid and found defective upon DMC's inspection. The warranty does not cover damage from normal wear, misuse, improper operation, tampering, neglect, or accident. DMC is not liable for consequential or special damages resulting from the use or misuse of its products. Users are responsible for instructing employees on the proper and safe use of DMC products.
| Brand | DMC |
|---|---|
| Model | AF8 |
| Category | Crimp tool |
| Language | English |