XTLtouch LAB GUIDE
Instructor-Led Training
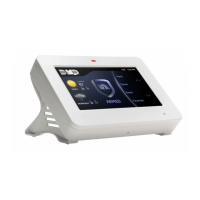
IDENTIFY PANEL COMPONENTS
1. Identify the following panel components using your
panel or the on-screen photo:
ê Reset button
ê Programming
header
ê DC Power Terminals
ê Cellular Connector
ê USB Connector
ê Wi-Fi Radio
ê Wi-Fi LED
ê 1100 Series Wireless
LEDs
POWER UP THE CONTROL PANEL
1. DC power: Connect to terminals on the XTLtouch PCB
ê Transformer type: 12 VDC at 500 mA
2. USB: Connect to USB terminal on back of XTLtouch
ENTER PANEL PROGRAMMER
1. Reset the panel using the RESET BUTTON
2. Enter 6653 (PROG) at the keypad
3. Press CMD to navigate the panel Programmer menu:
ê Initialization
ê Fast Program
ê Communication
ê Network Options
ê Messaging Setup
ê Device Setup
ê Remote Options
ê System Reports
ê System Options
ê Bell Options
ê Output Options
ê Output Setup
ê Area Information
ê Zone Information
ê Stop
ê Set Lockout Code
ADJUST COMMUNICATION TYPE
4. Navigate to COMMUNICATION and press a top-row
select area
5. Press a top-row select area to clear the default
account number
6. Enter in a new account number
7. Press CMD until COMM TYPE displays
8. Press a top-row select area to display the
communication types
9. Select WI-FI
10. Press CMD to exit COMMUNICATION
ADD PANEL TO A WIRELESS NETWORK
1. Navigate to NETWORK OPTIONS and press a top-row
select area
2. WPS will start the WPS process
ê The reset button will also begin the WPS process
3. LIST will show all nearby wireless network (SSID)
4. MANUAL will allow manual SSID entry
CONFIGURE SYSTEM OPTIONS
1. Navigate to SYSTEM OPTIONS and press a top-row
select area
2. Press CMD to navigate to ENTRY DELAY 1
3. Press a top-row select area and enter a time from 30
to 250 seconds
4. Repeat this process for ENTRY DELAY 2
5. Press CMD to navigate to EXIT DELAY
6. Press a top-row select area and enter a time from 45
to 250 seconds
7. Press CMD to navigate to HOURS FROM GMT
8. Press a top-row select, enter in the appropriate hours
from GMT for your location and press CMD
9. Using CMD, navigate to ENTER WEATHER ZIP CODE
10. Press a top-row select area and enter a LOCAL ZIP
CODE to display weather alerts at the keypad
ADD A WIRELESS ZONE
1. Navigate to ZONE INFORMATION and press a top-
row select area
2. Add a zone called ‘Oce Door’
3. Enter a ZONE NUMBER and press CMD
4. Press a top-row select area and enter a ZONE NAME
5. Press a top-row select area and select a ZONE TYPE
6. Press a top-row select area to display a list of
available areas and select the appropriate area
7. Enter an 8-DIGIT SERIAL NUMBER and press CMD to
navigate to the NEXT ZONE? prompt
8. After configuring all zone settings, navigate to STOP
to save changes and exit the Programmer
WIRELESS WALK TEST
1. At the keypad, enter 8144 (WALK) to enter the WALK
TEST menu
2. Select WLS to begin the wireless check-in test
PIR WALK TEST
1. At the keypad, enter 8144 (WALK) to enter the WALK
TEST menu
2. Select PIR to begin the PIR walk test
DIAGNOSTIC MENU
1. At the keypad, enter 2313 (DIAG) to enter the
DIAGNOSTIC MENU
2. When the keypad displays CELL STATUS, press a top-
row select area to begin the CELL STATUS test
3. Press CMD to navigate to CELL SIGNAL and press a
top-row select area to begin the CELL SIGNAL test
4. Press CMD, select STOP to exit DIAGNOSTIC MENU
ADD A USER CODE WITH PIN
1. At the keypad, press CMD until the USER MENU?
prompt displays
2. Select YES and enter 99+CMD to enter the USER
MENU
3. Using CMD, navigate to USER CODES? and press a
top-row select area
4. Select ADD
5. Select the USER NUMBER and press CMD
6. Enter in a 4-digit user code and press CMD