EasyManua.ls Logo

Do-All Outdoors Fowl Play User Manual

Default Icon
2 pages
To Next Page IconTo Next Page
Page #1 background imageLoading...
Page #1 background image
Carefully Remove Trap From Box.
WARNING: PLEASE READ BEFORE USE
OPERATION:
Always remove Safety Pin before Firing Trap!!
Load Clay Pigeons Into Stacking Poles
Connect The Foot Pedal
Before Connecting To Battery, Read All Safety Guidelines
Connect Electrical Clamps To 12V Deep Cycle Marine Battery
Turn Operating Switch To “On. The Trap Will Cock At This
Time. The Trap Is Now Live And Ready For Operation And
Extreme Caution Must Be Used
Depress Foot Pedal To Throw Clay
While Not In Use, Always “DISARM” The Trap By Moving
Toggle Switch To The DISARM position And Depressing The
Foot Pedal. The Disarm Feature Will Move The Arm To The
12'oclock Position. Never Let The Trap Sit Unattended While
Cocked.
Insert Safety Pin And Remove Clamps From Battery
SAFETY WARNINGS:
Fowl Play Auto Trap
Assembly Instructions
:
REMOVE SAFETY PIN BEFORE LIVE FIRING!!!
IF THE MAIN SPRING IS ATTACHED, THIS UNIT IS CONSID-
ERED ARMED AND EXTREME CAUTION MUST BE USED.
TO “DISARM” THE UNIT FOR WHEN THE UNIT IS NOT IN
USE, OR WHEN ADJUSTMENTS NEED TO BE MADE, FLIP THE
SWITCH TO DISARM AND DEPRESS FOOT PEDAL. THIS WILL
SET THE ARM TO THE 12 O’CLOCK POSITION.
ALWAYS STAND BEHIND UNIT WHEN IN OPERATION.
ALWAYS HAVE THE SAFETY PIN INSERTED, THE UNIT IN
THE DISARM MODE AND DISCONNECTED FROM THE
BATTERY WHEN NOT IN USE. FAILURE TO INSERT SAFETY
PIN COULD RESULT IN BODILY INJURY.
BEFORE UNIT IS USED, INSTALL THE ORANGE SAFETY RING.
THE SAFETY RING IS A VISUAL INDICATOR ONLY FOR THE
PATH OF THE THROWING ARM. DO NOT PENETRATE THIS
AREA WHEN UNIT IS ARMED.
NEVER ATTEMPT TO WORK ON OR ALTER THE UNIT WHEN
IN THE COCKED POSITION OR CONNECTED TO THE BAT-
TERY.
DO-ALL TRAPS, LLC DBA DO ALL OUTDOORS, LLC DOES NOT
ACCEPT ANY RESPONSIBILITY FOR DAMAGES AND/OR
INJURY SUSTAINED FROM THE USE OR MISUSE OF THIS
PRODUCT.
Customer Service:
1-866-SHOT-DOC
Email:
customerservice@doalloutdoors.com
Register your product at www.doalloutdoors.com
A) Bolt Legs To Base.
B) Bolt Base To Trap Body.
A)
A)
B)
A)
Fowl Play Auto Trap
FP25
DO-ALL OUTDOORS, LLC.
1207 16TH AVENUE, SOUTH • NASHVILLE, TN 37212
Question and Answer IconNeed help?

Do you have a question about the Do-All Outdoors Fowl Play and is the answer not in the manual?

Do-All Outdoors Fowl Play Specifications

General IconGeneral
BrandDo-All Outdoors
ModelFowl Play
CategorySports & Outdoors
LanguageEnglish

Summary

Fowl Play Auto Trap Assembly Instructions

Prepare Trap From Box

Carefully remove the Fowl Play Auto Trap from its packaging.

Attach Legs to Base

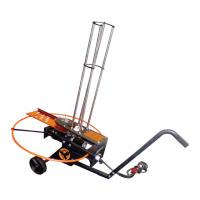
Bolt the legs to the base of the trap assembly.

Secure Base to Trap Body

Bolt the base to the main trap body.

Fowl Play Auto Trap Operation

Core Operation Steps

Steps for loading clays, connecting power, cocking, and firing the trap.

Disarming and Safety Pin Usage

Procedure to disarm the trap and use the safety pin when not in use.

Safety Warnings and Precautions

General Safety Guidelines

Essential safety guidelines including removing the safety pin before firing and extreme caution.

Arming, Disarming, and Adjustments

Instructions on how to safely arm, disarm, and adjust the trap unit.

Safety Ring and Operational Area

Proper installation of the orange safety ring and avoiding the throwing arm's path.

Maintenance and Battery Precautions

Warnings against working on the unit when cocked or connected to battery.

Manufacturer Disclaimer

Statement of no responsibility for damages or injury from product use or misuse.

Product Support and Contact

Customer Service and Registration

Contact details for customer service and product registration website.

Detailed Assembly and Adjustment Steps

Install Safety Ring

Screw safety ring into front of trap body and thread through arms and posts.

Position Throwing Arm

Move the throwing arm to the twelve o'clock position.

Adjust Vertical Angle

Loosen back bolts to adjust vertical angle and tighten when desired.

Install Stacker Poles and Rings

Install stacker poles, horseshoe ring, and safety ring holders.

Install Main Spring

Insert main spring bolt and hook spring sides to eyelets.

Related product manuals