Carefully Remove Trap From Box.
WARNING: PLEASE READ BEFORE USE
OPERATION:
•
Make Sure Toggle Switch Is Set To O
•
Insert Safety Pin
•
Load Clay Pigeons Into Stacking Poles
•
Connect e Foot Pedal
•
Before Connecting To Battery, Read All Safety Guidelines
•
Conntect Electrical Clamps To 12V Deep Cycle Marine Bat
tery
•
Turn Operating Switch To “On”. e Trap Will Cock At is
Time. e Trap Is Now Live And Ready For Operation And
Extreme Caution Must Be Used
•
Remove Safety Pin Before Firing
•
Depress Foot Pedal To row Clay
•
While Not In Use, Always “Release” e Trap By Flipping e
Release Switch. e Release Feature Will Fire e Arm And
A Live Bird If Loaded. e Arm Should Now Be In e Eight
O’clock Relased Position. Never Let e Trap Sit Unattended
While Cocked.
•
Insert Safety Pin And Remove Clamps From Battery
SAFETY WARNINGS:
•
If e Main Spring Is Attached, e Unit Is Considered
Armed And Extreme Caution Must Be Used.
•
Stand Only Behind Unit. Not To Either Side.
•
To “Release” e Unit For When e Unit Is Not In Use, Flip
e Release Button. e Release Switch Will Fire e Arm
And e Arm Will en Set e Arm To e Eight O’clock
“Released” Position.
•
Always Have e Safety Pin Inserted When Not In Use. Fail-
ure To Insert Safety Pin Could Result In Bodily Injury.
•
Before Unit Is Used, Install e Orange Safety Ring. e
Safety Ring Is A Visual Indicator Only For e Path Of e
rowing Arm. Do Not Penetrate is Area When Unit Is
Armed.
•
Never Attempt To Work On Or Alter e Unit When Main
Spring Is Attached, Unit Is In e Cocked Position, Or Unit Is
Connected To Battery.
•
Always Disconnect Unit From Battery When Not In Use.
•
Never Place Any Part Of Body Near e rowing Arm Or
Inside e Safety Ring When e Unit Is Cocked Or Con-
nected To e Battery.
•
Never Let e Trap Sit Unattended While Cocked.
•
Once e Knob For e Main Spring Bolt Is Installed, Never
Back It All e Way O Of e Bolt. e Spring Is Under
Constant Pressure.
If Unit Is Not Operating Properly, Please Contact
1-866-SHOTDOC For Assistance
DO-ALL TRAPS, LLC DBA DO ALL OUTDOORS, LLC
DOES NOT ACCEPT ANY RESPONSIBILITY FOR DAM-
AGES AND/OR INJURY SUSTAINED FROM THE USE OR
MISUSE OF THIS PRODUCT.
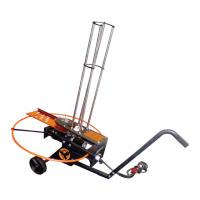
The Raven Auto Trap
Assembly Instructions:
A) Bolt Axle Onto Base.
B) Install Wheels On Axle.
Insert Washer, Wheel, And
Clamps Onto Axle.
A) Bolt On First Section On
Pull Handle Underneath
e Base.
B) Bolt On Handle Section
Of Pull Handle.
A)
A)
A)
B)
B)
B)
RAV1
Customer Service:
1-866-SHOT-DOC
Email:
customerservice@doalloutdoors.com