EasyManua.ls Logo

DogWatch SmartCollar - User Manual

DogWatch SmartCollar
6 pages
Print Icon
To Next Page IconTo Next Page
Loading...
Your DogWatch Dealer will start the training on the appropriate level according to
your dog’s personality and traits. As training continues and your dog adjusts to the
Hidden Fence, the settings may need to be adjusted.
If you need to change the training level on the receiver, hold the magnet on your
Multi-Tool to the training level adjustment location on the side of the receiver (see
right). Hold the magnet steady and you will hear a series of beeps that indicate the
current training level. The training level will begin to advance while the magnet is
held in position. When you reach the desired setting, pull the magnet away from
the receiver.
Audible Only” = 1 long beep
Level 1 = one short beep
Level 2 = two short beeps
Level 3 = three short beeps, etc.
When the magnet activates the receiver, the number of
beeps indicates the current training level.
As long as
the magnet is held in place, it will advance through the
receiver training level settings in the order shown in the
chart on the next page.
Note: Any magnet will activate the receiver.
The SmartCollar Receiver has
7    plus Audible Only.
Resetting the Low Battery Light
1. Remove the old battery.
2. Before inserting a new battery, let the SmartCollar
sit for five minutes with no battery. (If you forget
to wait prior to inserting a new battery, the “low
battery” light will continue to blink red until it
automatically resets itself after 24 hours.)
3. After five minutes, insert the new battery.
Battery Insertion Instructions
The SmartCollar is powered by a 3.6 volt lithium
battery with a battery life of up to 1 year.
The positive end of the battery must be inserted down.
IMPORTANT: The use of any battery other than a battery authorized by DogWatch Inc.
can cause erratic operation of the SmartCollar and could cause permanent damage.
The use of any unauthorized battery will void the warranty on the SmartCollar.
Batteries
Setting the Receiver Levels
Insert battery POSITIVE end
down.
Use the magnet to set the
training level on the Receiver.
Multi-Tool
SmartCollar
®
Features & Settings
Example: If the receiver is on Level 1 and the transmitter is on Rate 1, your dog will
receive the lowest level of correction and the least number of pulses per second.
Please, remember that if your Receiver Level is set to 1, 2, or 3 and you switch
the Training Mode to QuickAlert (Mode B), your training setting may change. For
example, if the receiver is set to Level 3 and the transmitter is set to Rate 1, your
dog will receive a slow correction. If you switch your Training Mode to QuickAlert,
your dog will now receive a fast correction.
PROGRAMMING TIPS
Recommended Settings: The majority of dogs respond well to Transmitter Rate
Setting 2 or 3 and a Receiver Training Level 3, 4 or 5. Sensitive or small dogs that
train easily respond best to lower rate settings and lower training levels. If your
dog is not responding to training, your DogWatch Dealer will adjust your system
to a higher training level.
If Your Dog Is Hard To Train: Training Levels 5, 6 and 7 are specifically designed
to meet the needs of hard to train or stubborn dogs. These settings will provide
the extra correction that some dogs need as part of their training.
Multiple Dogs: Our receivers allow you to select individual settings for each dog.
This means that one SmartCollar can be set to Audible Only* during training
while another dog is still protected with the correction feature enabled. It is
recommended that the Audible Only* setting be used only during supervised
training sessions.
Audible Only*
(extra low) 1
(low) 2
(low medium) 3
(medium) 4
(medium high) 5
(high) 6
(extra high) 7
Receiver
Training
Levels
TRANSMITTER MODE AND RATE SETTINGS
Mode A
Rate 1
Slow Medium
Fast Slow
Slow Medium
Fast
Medium
Transmitter Rate Fixed at Medium
Slow Medium
Fast Fast
Fast
Fast
X-FastX-Fast
XX-Fast
AutoMemory®
will deliver
a correction
equivalent to
the next level
upon re-entry.
XX-Fast
A
udible* and XXX Fast Correction are Simultaneous
Mode A
Rate 2
Mode A
Rate 3
Mode B
QuickAlert
}
Transmitter and Training Level Settings
***Important***
Never change the Receiver settings when your dog is wearing the SmartCollar.
295089 Rev C.1
06-21
Operating Instructions
SmartCollar
®
©2021 DogWatch Inc. All rights reserved.
Additional Troubleshooting Tips are available here:
www.dogwatch com/customer-resources
Question and Answer IconNeed help?

Do you have a question about the DogWatch SmartCollar and is the answer not in the manual?

Overview

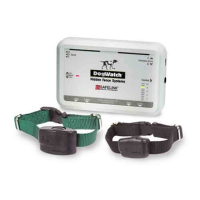
The DogWatch SmartCollar is a lightweight radio receiver designed to identify the radio signal from a hidden boundary wire, creating an invisible fence to keep your dog within a designated area. This device is engineered to provide stimulation if the dog approaches too close to the boundary.

Key Features and Specifications:

  • Battery: The SmartFence battery life is approximately one year. It's a 3.6 Volt lithium battery. The battery cap is waterproof and protects the battery from the elements.
  • Status Light: A multi-color LED light provides information about the battery status and the current training level.
  • Training Level Adjustment: The receiver offers eight training levels:
    • Audible Only
    • Level 1 (extra low)
    • Level 2 (low)
    • Level 3 (low medium)
    • Level 4 (medium)
    • Level 5 (medium high)
    • Level 6 (high)
    • Level 7 (extra high) When the receiver is first shipped, it's set to Training Level 2 (low). The training level can be adjusted using a magnet on the multi-tool.
  • Magnet: The magnet on the multi-tool is used to adjust the Training Level.
  • Collar Bone: The collar bone is a nylon collar component that fastens the receiver to the collar. It is designed to be used with GentleFit posts.
  • Contact Posts: The receiver comes with a set of stainless steel contact posts. Conductive plastic 'GentleFit' contact posts can be purchased separately and are recommended by your DogWatch Dealer. Care should be taken to tighten the contact posts appropriately to avoid damage to the receiver.
  • Antenna: The omni-directional antenna ensures optimal reception from the signal field.
  • SafeLink™ Digital FM Design: This patented FM design allows the SmartCollar to recognize and activate only to its unique radio signal, protecting your pet from unintentional correction caused by stray radio signals or other electronic devices.
  • AutoMemory™: This feature automatically adjusts the correction after your pet challenges the boundary. If your pet challenges the boundary with the receiver set to level 4, 5, or 6, AutoMemory will be initiated. For the next 24 hours, the correction will be equivalent to the next level if the dog attempts to re-enter the signal field. For example, if AutoMemory is triggered with the receiver set at level 4, the correction will be equivalent to level 5 for the next 24 hours. After 24 hours with no boundary challenges, the correction returns to the original setting.
  • FastReact™ Time: The device reacts and corrects within 1/8 of a second (125 sec) when the dog strolls, runs, or sprints into the Avoidance Zone.
  • Automatic Shutdown: The DogWatch SmartFence is designed to protect your dog from over-correction. In the unlikely event that your dog gets caught in the signal field, if your dog does not exit the signal field, the receiver will automatically stop correcting after 15 seconds, protecting your dog from over-correction. The receiver will automatically reset after the dog leaves the signal field.
  • Activity & TattleTale Tracking: The SmartCollar collects and reports activity data, allowing you to monitor your pet's Daily, Monthly, and Weekly behavior. It also reports when your pet has entered the avoidance zone with the "TattleTale" feature.

Fitting the Receiver Collar:

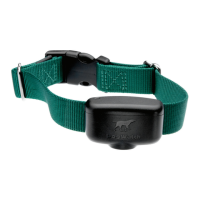
The receiver is attached to an adjustable nylon collar. The collar should be positioned about the dog's regular collar. Adjust the collar to ensure the contact posts touch the skin on the dog's neck. Check the fit frequently to ensure the collar is not too tight, which can prevent skin irritation. Your DogWatch dealer will help select the correct size and type of contact posts based on your dog's neck shape, coat, and skin sensitivity. When tightening the contact posts, use pliers or similar tools carefully to avoid damaging the receiver.

Status Light Indications:

The status light on your SmartCollar provides several indications:

  • Start-Up: When you first insert the battery, the status light will flash red and green. Once started, it will continue to flash green every 40 seconds, indicating normal operation. If the light does not flash, check the battery.
  • Training Level Indicator: When programming the training level, the status light will flash green in conjunction with audible beeps. The number of flashes/beeps equals the training level chosen.
  • Signal Field Indicator: When testing the receiver in the signal field, the status light will flash green when the SmartCollar is in the audible zone and will flash red and green when in the correction zone.
  • Correction Alert (TattleTale™): If your pet has tested the boundary, the status light will double flash green every 40 seconds during the 24-hour period after the dog has entered the boundary area.
  • Battery Indicator: This feature monitors the voltage level of the battery. Once the SmartCollar detects that the battery has reached a low voltage level, the status light will change from blinking green every 40 seconds to blinking red every 10 seconds. This indicates that your battery is close to the end of its useful life and you should change the battery within the next 3-4 days.

Adding a Collar to the SmartFence:

  • Adding an additional pet:
    1. Open your SmartFence Web App.
    2. Press the 'Settings' icon.
    3. Select 'Pets'.
    4. Add the pet's info.
    5. Follow prompts for adding a new collar.
  • Adding a collar for a pet who already has a Web App profile:
    1. Open your SmartFence Web App.
    2. Press the 'Settings' icon.
    3. Select 'Collars'.
    4. Select 'Add Collar'.
    5. Follow prompts for adding a new collar.

Batteries:

  • Resetting the Low Battery Light:
    1. Remove the old battery.
    2. Before inserting a new battery, let the SmartCollar sit for five minutes with no battery.
    3. To wait prior to inserting a new battery, the "low battery" light will continue to blink red until it automatically resets itself after 24 hours.
    4. After five minutes, insert the new battery.
  • Battery Insertion Instructions: The SmartCollar is powered by a 3.6 volt lithium battery with a battery life of up to 1 year. The positive end of the battery must be inserted down.
  • Important: Using any battery other than a battery authorized by DogWatch Inc. can cause erratic operation of the SmartCollar and could cause permanent damage. Unauthorized battery use will void the warranty.

Setting the Receiver Levels:

The SmartCollar receiver has 7 LEVELS OF CORRECTION plus Audible Only. Your DogWatch Dealer will help train your dog according to its personality and traits. Training continues, and your dog adjusts to the Hidden Fence, with settings adjusted as needed.

To change the training level on the receiver, hold the magnet on your Multi-Tool to the training level adjustment location on the side of the receiver. Hold the magnet steady, and you will hear a series of beeps that indicate the current training level. The training level will begin to advance while the magnet is held in position. When you reach the desired setting, pull the magnet away from the receiver.

  • "Audible Only" = 1 long beep
  • Level 1 = one short beep
  • Level 2 = two short beeps
  • Level 3 = three short beeps, etc.

When the magnet activates the receiver, the number of beeps indicates the current training level. As long as the magnet is held in place, it will advance through the receiver training level settings in the order shown in the chart. The magnet will activate the receiver.

Transmitter and Training Level Settings:

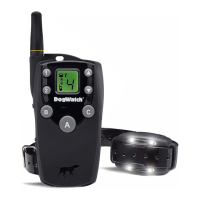
The SmartCollar offers various transmitter modes and rate settings:

  • Mode A Rate 1: Slow, Medium, Fast, Slow
  • Mode A Rate 2: Slow, Medium, Fast, Medium
  • Mode A Rate 3: Slow, Medium, Fast, Fast
  • Mode B QuickAlert™: Slow, Medium, Fast, Fast, X-Fast, XX-Fast, Audible* and XXX Fast Correction are Simultaneous

If the receiver is on Level 1 and the transmitter is on Rate 1, your dog will receive the lowest level of correction and the least number of pulses per second.

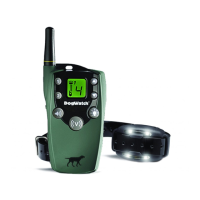
To switch the receiver to Level 1, 2, or 3 and switch the Training Mode to QuickAlert (Mode B), your training setting may change. For example, if the receiver is set to Level 3 and the transmitter is set to Rate 1, your dog will receive a slow correction. If you switch your Training Mode to QuickAlert, your dog will now receive a fast correction.

  • Most dogs respond well to Transmitter Rate Setting 2 or 3 and a Receiver Training Level 3, 4, or 5. Sensitive or small dogs may respond best to lower rate settings and lower training levels. If your dog is not responding to training, your DogWatch Dealer will adjust your system to a higher training level.
  • If Your Dog Is Hard To Train: Training Levels 5, 6, and 7 are specifically designed to meet the needs of hard-to-train or stubborn dogs. These settings will provide the extra correction that some dogs need as part of their training.
  • Multiple Dogs: Our receivers allow you to select individual settings for each dog. This means that one SmartCollar can be set to Audible Only during training while another dog is still protected with the correction feature enabled. It is recommended that the Audible Only setting be used only during supervised training sessions.

Important: Never change the Receiver settings when your dog is wearing the SmartCollar. Additional troubleshooting tips are available on the DogWatch website.

DogWatch SmartCollar Specifications

General IconGeneral
BrandDogWatch
ModelSmartCollar
CategoryPet Care Product
LanguageEnglish

Related product manuals