EasyManua.ls Logo

Dogwidgets DW-1 - User Manual

Dogwidgets DW-1
3 pages
Print Icon
To Next Page IconTo Next Page
Loading...
Dogwidgets DW-1 2 dog training shock collars user's manual
Preparation:
1) Check the 9-volt battery of the remote control and see if it's properly installed. The +/- side of the battery
should touch against the 2 springs of the remote control. Follow the diagram inside the battery compartment on
where to put the +/- side of the 9-volt battery.
2) Charge the collars for 8 hours straight for the first charge and 4 to 6 hours after. The red led light of the collar
will flash, meaning the collars are charging. Red led light of the collars will go solid after a full charge.
3) Power on the collar by holding the power button for 3 seconds. Install the rubber prongs if you have a
small/medium size dog or the metal prongs if you have a medium/large dog.
4) Test the shock of the collars by using the wire shock tester. Wrap the wires around the 2 metal posts of the
collar then press the shock button. The bulb will light up if the collar is giving a shock.
5) Install the strap to the collar by inserting them through the 2 brackets on the collar. Adjust the length and snug
fit the collar to your dog's neck.
Question and Answer IconNeed help?

Do you have a question about the Dogwidgets DW-1 and is the answer not in the manual?

Summary

Preparation

Battery Installation

Check 9-volt battery installation in the remote control for proper connection.

Collar Charging

Charge collars for initial 8 hours, then 4-6 hours; red LED indicates charging status.

Collar Power On and Prong Installation

Power on collar for 3 seconds; install rubber or metal prongs based on dog size.

Shock Functionality Test

Test collar shock using a tester; bulb lights up if shock is delivered.

Strap Installation and Fit

Install strap through brackets, adjust for a snug fit on the dog's neck.

Training Tips

Familiarization and Safety Check

Familiarize with collars and remote; check for proper, safe function before use.

Correction Method Progression

Start with vibration correction; most dogs respond well to it.

Positive Reinforcement

Always praise your dog after any punishment or training session.

Troubleshooting and Reset

Charging Issues

Address collar not holding charge; try USB port charging if wall charger fails.

Response and Reset Procedure

If collar has power but no response, reset by powering on and pressing button 3 times.

Remote Pairing for Reset

After collar reset, press and hold remote 'V' button until collar vibrates to pair.

Important Safety Information

Aggressive Dog Warning

Collar not for aggressive dogs; consult vet/trainer if unsure about suitability.

Skin Damage Precautions

Avoid prolonged/tight fit; check for redness/sores; reposition collar regularly.

On-Leash Training Safety

Ensure safety during training; use strong leash, keep dog away from hazards.

Terms of Use and Liability

Product usage implies acceptance of terms; limits liability for misuse.

Overview

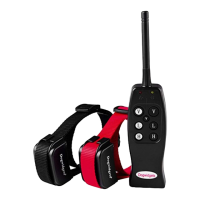
The Dogwidgets DW-1 2-dog training shock collar system is a comprehensive training aid designed to help pet owners manage and train up to two dogs simultaneously using a combination of vibration and static correction. This user manual provides detailed instructions for setup, operation, troubleshooting, and maintenance, ensuring safe and effective use.

Function Description

The primary function of the Dogwidgets DW-1 system is to provide remote training capabilities for dogs. It consists of a remote control and two collar receivers, each designed to deliver either vibration or static (shock) correction. The system aims to help owners correct undesirable behaviors and reinforce positive ones. The vibration mode is recommended as a primary correction method, with static correction used when vibration is insufficient. The remote control allows for independent control of each collar, as well as simultaneous control for both.

Important Technical Specifications

  • Battery Type (Remote): Requires a 9-volt battery. The manual specifies proper installation, noting that the +/- sides of the battery should align with the springs in the compartment.
  • Battery Type (Collars): Built-in Lithium-Ion rechargeable batteries.
  • Charging Time (Collars):
    • First charge: 8 hours.
    • Subsequent charges: 4 to 6 hours.
  • Charging Indicator (Collars): A red LED light flashes during charging and becomes solid upon full charge.
  • Prong Types:
    • Rubber prongs: Recommended for small/medium size dogs.
    • Metal prongs: Recommended for medium/large size dogs.
  • Correction Modes: Vibration and static (shock).
  • Multi-Dog Capability: Designed to train two dogs simultaneously with individual or combined control.
  • Warranty: 6 months warranty covering technical support, replacement parts, and replacement warranty.

Usage Features

  • Initial Setup:
    1. Remote Battery Installation: Ensure the 9-volt battery is correctly installed in the remote, aligning the +/- terminals with the springs as per the diagram inside the compartment.
    2. Collar Charging: Charge both collars for 8 hours initially, then 4-6 hours for subsequent charges. The red LED indicates charging (flashing) and full charge (solid).
    3. Powering On Collars: Hold the power button on each collar for 3 seconds to turn it on.
    4. Prong Selection: Install the appropriate prongs (rubber for small/medium, metal for medium/large) based on your dog's size.
    5. Shock Test: Use the provided wire shock tester by wrapping its wires around the two metal posts of the collar. Press the shock button on the remote; the bulb on the tester should light up, indicating the shock function is working.
    6. Strap Installation: Insert the strap through the two brackets on the collar and adjust for a snug fit on your dog's neck.
  • Training Tips:
    1. Familiarization: Before use, familiarize yourself with the collars and remote, ensuring they function properly and safely.
    2. Start with Vibration: Begin training with vibration correction, as most dogs respond to it.
    3. Positive Reinforcement: Always praise your dog after a punishment or successful training session.
  • Remote Control Operations: The remote features distinct buttons for controlling each dog's collar and for selecting correction types (Vibration, Low Shock, High Shock).
    • "V" button: Activates vibration.
    • "L" button: Activates low shock.
    • "H" button: Activates high shock.
    • Separate "V" buttons are available for controlling Dog 1, Dog 2, or both dogs simultaneously.
  • Safety During On-Leash Training: When using the collar during on-leash training, ensure your dog is on a strong leash that is long enough for some freedom but short enough to prevent access to unsafe areas. The owner must be physically capable of restraining the dog.

Maintenance Features

  • Collar Charging: Regular charging is required for the Lithium-Ion batteries. The manual specifies initial and subsequent charging times.
  • Troubleshooting Charging Issues: If a collar doesn't hold a charge with the wall charger, try charging it via a computer's USB port. If it charges via USB, the wall charger may need replacement.
  • Collar Reset Procedure: If a collar has power but doesn't respond to the remote or works intermittently, it needs to be reset.
    1. Power on the collar.
    2. Press the power button 3 consecutive times; the red light will flash.
    3. Immediately after the red light starts flashing, press and hold the corresponding "V" button on the remote until the collar vibrates.
    4. Repeat this procedure for the second collar using its respective "V" button on the remote.
  • Hygiene and Skin Care:
    • Avoid leaving the collar on the dog for more than 12 hours a day.
    • Reposition the collar on the dog's neck every 1 to 2 hours.
    • Check the fit to prevent excessive pressure.
    • Never connect a lead to the receiver, as this causes excessive pressure on the prongs.
    • If using a separate collar for a lead, ensure it doesn't put pressure on the receiver.
    • Wash the dog's neck area and the receiver prongs weekly with a damp cloth.
    • Examine the contact area daily for signs of rash or sores. If symptoms persist beyond 48 hours, consult a veterinarian.
    • Discontinue use if redness or sores are found until the skin fully heals.
  • Warranty Support: For technical support, replacement parts, or warranty claims, contact sales@dogwidgets.com.

Important Safety Information

  • Warning (Aggressive Dogs): This collar is not for use with aggressive dogs or dogs prone to aggressive behavior, as it can cause severe injury or death. Consult a veterinarian or certified trainer if unsure about suitability.
  • Caution (Skin Damage): Improper fit or prolonged wear can cause skin damage, including redness and pressure ulcers (bed sores). Follow all maintenance and hygiene recommendations to prevent this.
  • Limitation of Liability: The product is offered "as is," and usage implies acceptance of all terms and conditions. Dog Widgets For Less, Inc. is not liable for any direct, indirect, punitive, incidental, special, or consequential damages arising from the use or misuse of the product. Buyer assumes all risks and liability.
  • Proper Use: Designed for pet training only. Not intended to harm, injure, or provoke. Using the product in unintended ways may violate Federal, State, or local laws. Consult a veterinarian or certified trainer if unsure if the product is appropriate for your pet's temperament.

Dogwidgets DW-1 Specifications

General IconGeneral
BrandDogwidgets
ModelDW-1
CategoryPet Care Product
LanguageEnglish

Related product manuals