Do you have a question about the Dogwidgets DW-6 and is the answer not in the manual?
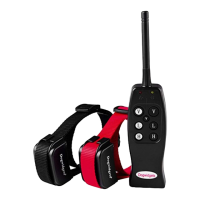
Verify the 9-volt battery is correctly installed in the remote control, ensuring +/- sides touch the springs.
Charge the collar for 8 hours initially, then 4-6 hours. Monitor the red LED light for charging status.
Install rubber prongs for small/medium dogs or metal prongs for medium/large dogs as needed.
Test the collar's shock function using a wire shock tester; the bulb lights up if a shock is delivered.
Attach the strap to the collar via the brackets and adjust for a snug fit on your dog's neck.
Turn the collar on or off by holding the power button for 3 seconds; the red light indicates status.
The collar is water-resistant, not waterproof. Avoid submerging it in water.
Buttons 1-6 control shock duration and type, with levels 5 and 6 offering double and triple shocks.
Familiarize, test, start with vibration, remove after use, and always use positive reinforcement.
Address battery charging, remote response, and remote battery indicator problems.
Reset the collar by pressing the power button three times, then holding the 'V' button until it vibrates.
Details on remote button functions for short shock, vibration, and timed shocks.
Do not use with aggressive dogs. Consult a professional if unsure about suitability for your dog.
Prevent skin damage by ensuring proper fit, limiting wear time, and checking the contact area daily.
Prioritize safety during on-leash training with appropriate leash length and physical restraint.
Usage implies acceptance of all terms, conditions, and notices provided with the product.
Designed for pet training; consult professionals if your pet is aggressive or temperament is unknown.
Product is for pet training only and must not be used to harm, injure, or provoke.
Dog Widgets For Less, Inc. is not liable for damages arising from product use or misuse.
The seller reserves the right to change the terms, conditions, and notices for the product.
| Brand | Dogwidgets |
|---|---|
| Model | DW-6 |
| Category | Pet Care Product |
| Language | English |