10411 80th Avenue Pleasant Prairie, WI 53158|Orders and Customer Care: 1-800-574-7665|Fax: 1-800-323-5932|Doheny.com
CHAPTER 3: FILTER MAINTENANCE
Filtering
1.
Filtration starts as soon as ow is steady through the
lter. As the lter cartridge removes dirt from the pool
water, the accumulated dirt causes a resistance to
ow. As a result, the gauge pressure will rise and the
ow will decrease.
2. Clean or replace the cartridge lter element when the
pressure rises 7-10psi above the starting pressure,
or when ow decreases below desired rate.
Remove/Reinstall Cartridge Filter Element
1. Removing Cartridge Filter Element: Shut the
pump off.
2. If lter is located below water level, close valves to
prevent backow of water from the pool.
3. Open air relief valve by turning it counter-clockwise
until loose.
4. Loose drain plug so water will drain.
5. Open locking ring counter-clockwise and remove
the lter element.
6. Lift out the cartridge lter element and clean or
replace if needed.
1. Reinstalling Cartridge Filter Element: Clean any
collected debris from the bottom of lter body.
2. Carefully place the cartridge lter element over
the tie rod and into lter body ensuring that the
cartridge sits evenly on the collector hub in bottom
of lter body.
3. Tighten locking ring by turning it clockwise. (Hand
tighten only.)
4. Now go back to the Starting the Filter section and
follow the remaining steps.
Cleaning Cartridge Filter Element
1. The cartridge lter element can be cleaned by
pressure washing with a garden hose. You can also
use attachments such as a Filter Flosser Cartridge
Cleaner (item #6304) or a Magic Filter Cleaning
Wand (item #1734). Note: The cartridge is easier
to clean when dry.
2. Allow the cartridge lter element to fully dry and
carefully brush pleated surface areas to remove
the ne dirt and particles.
3. Algae, suntan oil and body oils can form a coating
on the cartridge lter element pleats which may
not be thoroughly removed by hosing. To remove
such materials, use Doheny’s Cartridge Cleaner
(item #4848) solution to soak the cartridge
lter element in. Follow the PRECAUTIONARY
STATEMENTS and the DIRECTIONS FOR USE
on the back label of the cleaning solution.
5. Note: Having a spare cartridge lter element on hand
ensures that your lter will always be ready to
operate at peak efciency.
Winterizing the Filter
1. The lter should be drained and/or removed
from its operating location and stored in a cool, dry
place where temperatures are expected to fall
below freezing.
2. Remove and clean the cartridge lter element by
following the Remove/Install and Cleaning sections
of this manual. Reinstall cartridge lter element in
the lter tank.
3. Tighten locking ring by turning clockwise by hand.
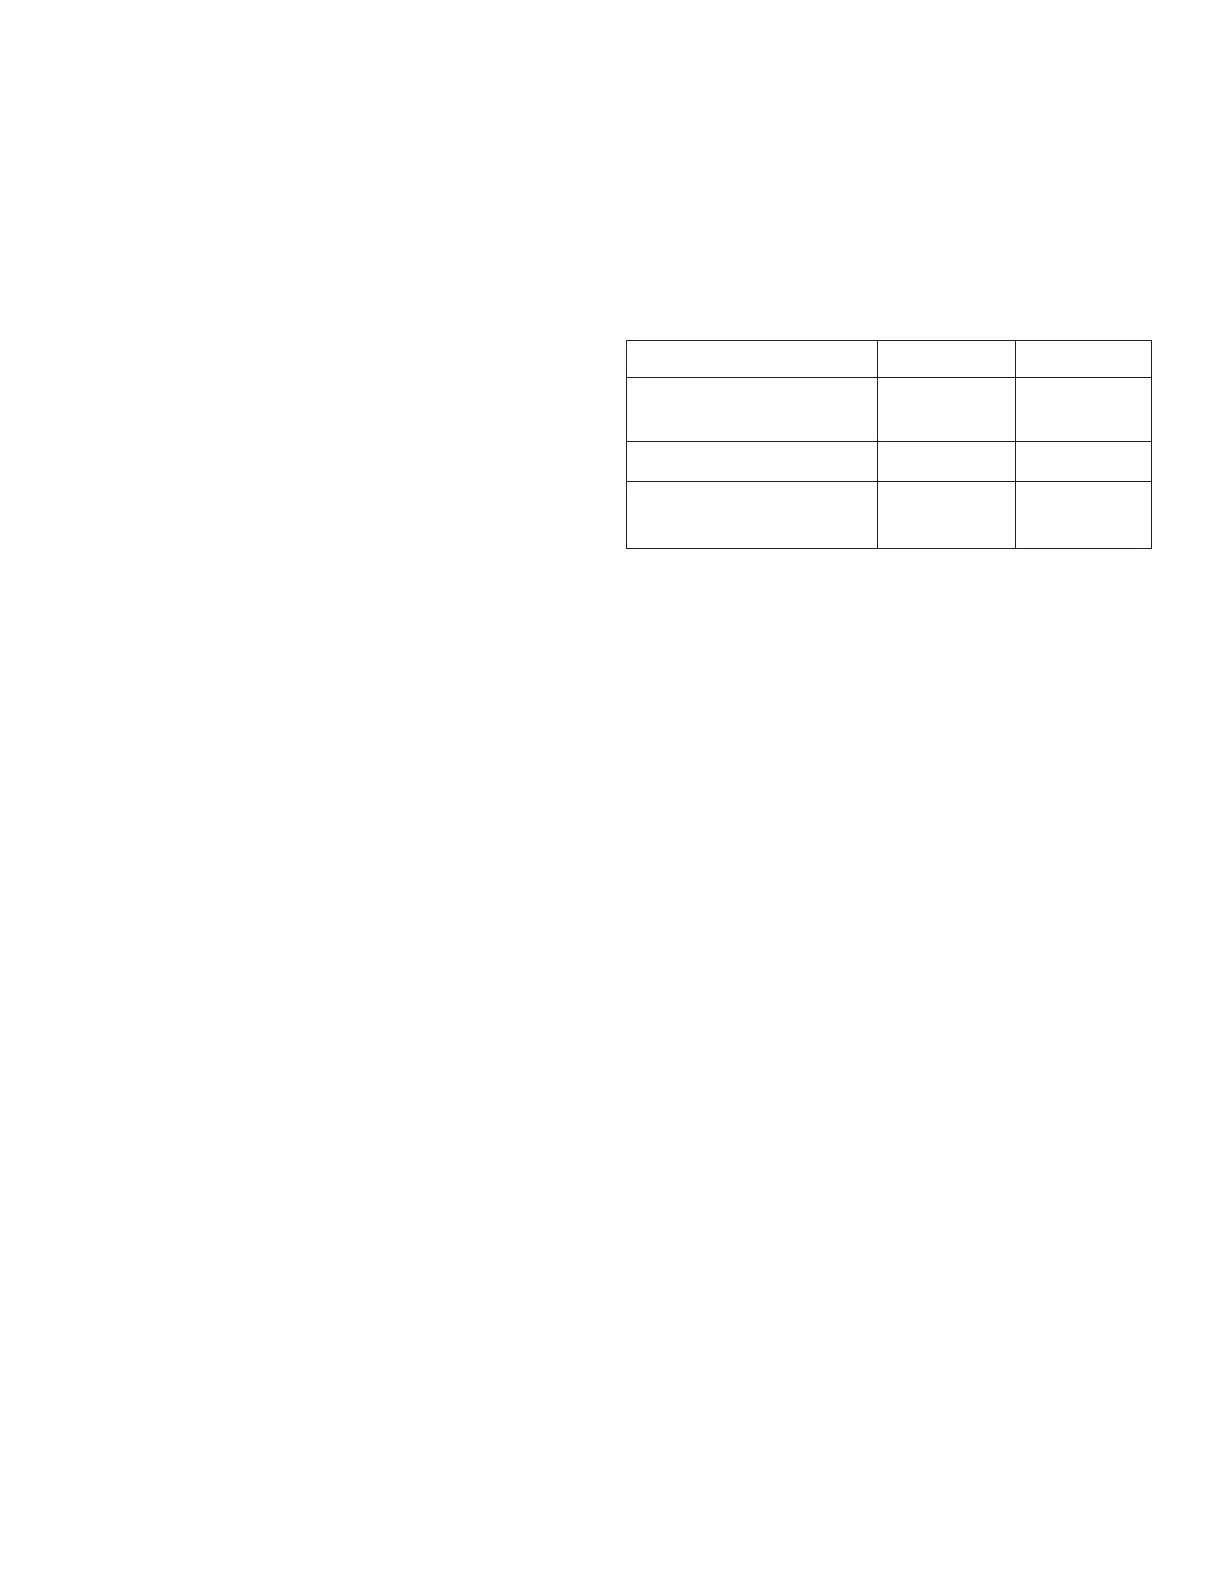
Filter Specications
MODEL NO. 5166 5215
EFFECTIVE
FILTRATION AREA 150FT
2
200FT
2
DESIGN-FLOW RATE 130GPM 150GPM
MAXIMUM WORKING 50PSI 50PSI
PRESSURE 3.5BAR 3.5BAR
 Loading...