Dometic FlyTec FT200 Installing the flyscreen
13
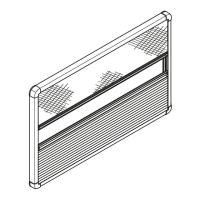
5.4 Securing the flyscreen in the vehicle
A
Securing the skirting board and upper guide rail
➤ Align the position of the cassette profile perpendicular to the skirting board and
the upper guide rail.
➤ Secure the skirting board to the bottom plate (fig. 6, page 5) with five counter-
sunk screws (Ø 4 mm).
➤ Secure the upper guide rail to the vehicle (fig. 7, page 5) with four countersunk
screws (Ø 4 mm).
5.5 Completing installation
Riveting the cassette profile with the cover profile for the C pillar (fig. 8,
page 6)
➤ Put all the blind rivets (4 x 8 mm with stainless steel mandrel) through the drill
holes and rivet the components using a hand riveter.
Tensioning the guide cables
➤ Tension the guide cables on the deflection screws on the skirting board and the
top guide rail (fig. 9, page 6).
The tension of the cables affects the guidance and smooth running of the handle
strip. By changing the tension of the upper and lower cable, you can adjust the
parallel orientation of the handle strip to the right door edge.
➤ Secure the safety clips onto the deflection screws each with a screw
(M2.5 x 6 mm) (fig. 9 1 and 2, page 6).
NOTICE!
•
Choose suitable screws depending on the floor and roof
construction.
•
Make sure that you do not drill through the floor and roof.
FT200-IO-16s.book Seite 13 Montag, 15. Januar 2018 2:19 14