'98
12/06
TIS FAX 46 141 258393
MO
12 Volts DC Connection
All
refrigerator
models require a continuous 12
volt
DC
supply
(even though
2-way
models are designed to
operate on 120 volts AC and gas, a 12
volt
DC control
is required to maintain the automatic energy system).
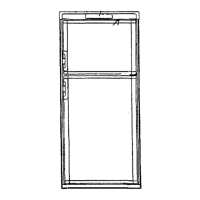
The DC lead connections are at terminals located at the
rear of the refrigerator. (see FIG. 1). One lead is marked
positive (+) and
the other negative
(-).
Correct polarity
must be observed when connecting to the DC supply.
Do not use the chassis or vehicle frame
as
one of the
conductors. Connect two
wires
at the refrigerator and
route to the DC supply.
12
Volts
DC Connection
3-way
models
The distance the current must travel from the battery to
the refrigerator dictates the AWG wire
size
to be used.
Should the wire be too small for the distance, a voltage
drop will result.
The voltage drop
affects
the wattage output of the 12 volt
cartridge
heater and resultant refrigerator performance.
Recommended wire sires are shown below.
Maximum
total
conductor wire length in feet and meters.
RM
3663,
RM3862
RM3663, RM3863
2-way
3-way
min.
wire
min. wire
size size
17 ft.
14 AWG
10 AWG
5 m
27
ft.
12 AWG 8 AWG
8m
The wires from the battery to the refrigerator must
be
of
large
enough
size
to
handle
the toad. The
connections
must be clean, tight and free from corrosion. If not, a
resulting voltage drop will
cause
a decreased cooling
capacity.
INSTALLING REFRIGERATOR IN
ENCLOSURE
NOTE:
DO NOT install
the appliance directly on
carpeting.
Carpeting must be removed or
protected by
a
metal or
wood
panel be-
neath the appflanoe whloh extends at least
full width
and depth of the
appliance.
NOTE: A wood strip must be
in
place across the upper
opening of the
enclosure.
The top frame of the
refrigera-
tor
will
be anchored to the wood
strip
with
screws,
see
FIG. 10.
The refrigerator must be installed in a substantial enclo-
sure and must be level. When
installing
the refrigerator
in
the
enclosure
,
all
areas
within the recess in which the
refrigerator is installed must be sealed.
Make sure that there
is
a complete
seal
between the
front frame of the refrigerator and the top, sides and
bottom of the enclosure. A length of sealing
strip
is
applied to the rear
surface
of the front frame for this
purpose, see FIG. 4.
The seating should provide a complete isolation of the
appliance’s combustion system from the vehicle interior.
NOTE:
Be
careful not to damage the seating strip when
the refrigerator Is put in place.
Securing the Refrigerator
After the refrigerator Is put
in
place,
(ensuring a combus-
tion seal at the front frame), the refrigerator is to be
secured in the enclosure with
six
screws. The screws
have to be installed in the
following
order:
STEP1:Two screws installed through the front base,
which includes the lower front
strip
installation.
The refrigerator is provided with a tower front strip (ship
ped as a loose
part). The
front strip is to be attached after
the refrigerator is set into the cut-out opening.
1.
Install the lower front
strip
by sliding it under the
bottom hinge plate, as shown in FIG. 5. The hinge
plate can be on
the right or
left
side depending on
the
door swing.