This document provides operation instructions for the DCZC04-24, ADZC04-24, and KDZC04-24 rotary hammers. It covers safety warnings, technical data, general descriptions, and detailed operating and maintenance procedures.
Function Description
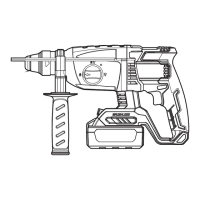
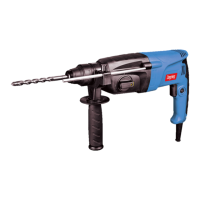
The device is a rotary hammer designed for drilling in concrete, brick, rock, wood, metal, ceramics, and plastics. It features multiple operating modes:
- Electric Drill Mode: For drilling in wood, metal, or plastic.
- Electric Hammer Mode: For drilling in concrete and stone.
- Hammering Mode: For chiseling, demolition, and other similar operations.
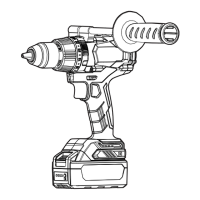
The tool is equipped with a brushless motor, providing efficient and powerful performance. It includes an auxiliary handle for better control and safety during operation. The device is powered by a 20V battery pack, making it cordless and portable. An LED light is integrated to illuminate the work area, enhancing visibility in low-light conditions.
Important Technical Specifications
The following specifications are common across the DCZC04-24, ADZC04-24, and KDZC04-24 models:
- Rated Voltage: 20V⎓MAX
- No-Load Speed: 0-1000 r/min
- Blows per Minute: 0-4500 /min
- Max. Drilling Capacity:
- Steel: Ø13mm
- Wood: Ø28mm
- Concrete: Ø24mm
- Net Weight (Without battery): 2.4kg
Noise Information:
- A-weighted sound pressure level (LpA): 87 dB(A), KpA = 3 dB(A)
- A-weighted sound power level (LwA): 98 dB(A), KwA = 3 dB(A)
- Wear hearing protection during operation.
Vibration Information (Total value triax vector sum):
- Hammer drilling into concrete (ah,HD): 12.5 m/s², uncertainty K= 1.5 m/s²
- Chiseling (ah,Cheq): 9.5 m/s², uncertainty K= 1.5 m/s²
The declared vibration total value and noise emission value are measured in accordance with a standard test method and may be used for comparing one tool with another. These values are also used in a preliminary assessment of exposure.
Usage Features
Battery Pack Installation and Removal:
- To install, align the battery pack with the slot in the machine and push it in until it clicks.
- To remove, press the battery pack button and pull out the battery pack.
Battery Charging:
- The charger is designed for 20V lithium-ion battery packs.
- Plug the charger into an AC power source; the charging indicator light will turn green, then enter standby mode.
- Insert the battery pack into the charger; the indicator light will show the charging status.
- A red light indicates charging, while a green light indicates a full charge.
- The battery status can be checked via four red LED lights on the battery pack, indicating charge levels from 10-25% to 75-100%.
Switch Operation:
- To start the machine, press the switch button. The speed increases with greater pressure on the switch.
- To stop, release the switch button.
- Caution: Always check the direction of rotation before operation. Operate the reversing switch only after the tool comes to a complete stop. Changing the direction of rotation before the tool stops may damage the tool.
Installing and Removing Tools:
- Apply a small amount of grease to the drill shank before installation.
- Insert the drill bit into the machine, rotate it, and push it in until it engages.
- To remove, pull down the sleeve and pull out the drill bit.
Auxiliary Handle:
- For safety, use the auxiliary handle during operation. Position and tighten it clockwise before use. Adjust the angle by loosening it counter-clockwise.
Operating Mode Settings:
- Electric Drill Mode: Rotate the function knob to the drill icon. Suitable for drilling in wood, metal, or plastic.
- Electric Hammer Mode: Rotate the function knob to the hammer drill icon. Suitable for drilling in concrete or stone.
- Hammering Mode: Rotate the function knob to the hammer icon. Suitable for chiseling, demolition, and similar operations.
- Demolition Mode (Chisel Angle Adjustment): When in hammering mode, press the lock button and rotate the function knob to the desired angle for chiseling.
Drilling Operation:
- Impact Drilling: Set the function knob to the hammer drill mode. Apply appropriate pressure; excessive force does not increase drilling speed and can damage the drill bit.
- Drilling in Steel or Wood: Use a plastic or SDS-plus twist drill bit. Insert the connecting rod, tighten the screws, and then insert the connecting rod into the machine.
Depth Gauge:
- Install the depth gauge by loosening the wing bolt, inserting the gauge into the fixing plate hole, and adjusting to the desired depth before tightening the wing bolt.
Maintenance Features
General Power Tool Safety Warnings:
- Work Area Safety: Keep the work area clean and well-lit. Cluttered or dark areas invite accidents.
- Electrical Safety: Power tool plugs must match the outlet. Avoid body contact with earthed surfaces. Do not expose power tools to rain or wet conditions.
- Personal Safety: Stay alert, watch what you are doing, and use common sense. Wear eye protection, dust masks, and hearing protection. Avoid unintentional starting. Remove adjusting keys or wrenches before turning on the power tool.
- Power Tool Use and Care: Do not force the power tool. Use the correct power tool for your application. Ensure the switch is in the off-position before connecting to power source or battery pack. Maintain power tools. Keep cutting tools sharp and clean.
Battery Tool Use and Care:
- Recharge only with the charger specified by the manufacturer.
- Use power tools only with specifically designated battery packs.
- When battery pack is not in use, keep it away from other metal objects that could short the terminals.
- Under abusive conditions, liquid may be ejected from the battery; avoid contact. If contact occurs, flush with water. If liquid contacts eyes, seek medical help.
- Do not dismantle, open, or shred secondary cells or batteries.
- Keep batteries out of reach of children.
- Do not expose cells or batteries to heat or fire. Avoid storage in direct sunlight.
- Do not short-circuit a cell or battery.
- Do not store cells or batteries haphazardly in a box or drawer where they may short-circuit each other or by other metal objects.
- Do not subject cells or batteries to mechanical shock.
- In the event of a cell leaking, do not allow the liquid to come in contact with the skin or eyes.
- Do not use any charger other than that specifically provided for use with the equipment.
- Do not use any cell or battery which is not designed for use with the equipment.
- Do not mix cells of different manufacture, capacity, size, or type within a device.
- Always purchase the battery recommended by the device manufacturer.
- Keep cells and batteries clean and dry.
- Wipe the cell or battery terminals with a clean dry cloth if they become dirty.
- Secondary cells and batteries need to be charged before use.
- Do not leave a battery on prolonged charge when not in use.
- After extended periods of storage, it may be necessary to charge and discharge the cells or batteries several times to obtain maximum performance.
- Retain the original product literature for future reference.
- Use the cell or battery only in the application for which it was intended.
- When possible, remove the battery from the equipment when not in use.
- Keep the cell or battery away from microwaves and high pressure.
- Dispose of properly.
Maintenance:
- The machine must be carried out by a maintenance unit approved by the original production unit.
- The user and the maintenance department shall not modify the original design parameters of the machine at will.
- Do not use substitute materials that are lower than the performance of raw materials and spare parts.
- Regular inspection: The inspection "Qualified" sticker should be pasted on the appropriate part of the machine. The "Qualified" mark should be distinct, clear, and correct and at least include: machine number, name or mark of inspection unit, name or mark of inspection personnel, date of validity.
For Battery Tools:
- Ambient temperature range during operation and storage: 0°C - 45°C.
- Recommended ambient temperature range during charging: 5°C - 40°C.