Do you have a question about the Doro 730X and is the answer not in the manual?
Guidance on charging the device before first use and low battery indicators.
Instructions for SOS/112 calls and creating In Case of Emergency (ICE) entries.
Details on the Assistance button and Response by Doro safety services.
Covers small parts, network costs, operating environment, and medical device interference.
Guidance on using the phone near explosion risks and with implanted medical devices.
Warnings about Li-ion battery, hearing protection, and vehicle use precautions.
Information on emergency call reliability and user-programmed functions.
Information on hearing aid compatibility and Specific Absorption Rate (SAR) guidelines.
This document provides a quick start guide for the Doro 730X phone, covering its functions, usage features, and maintenance.
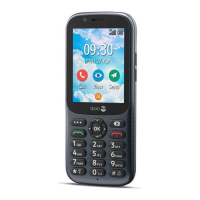
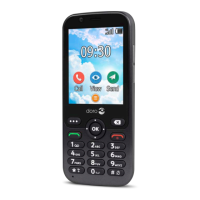
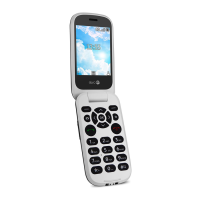
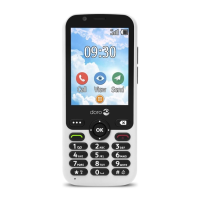
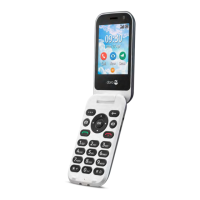
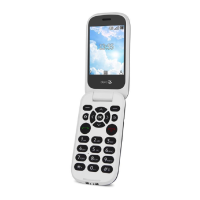
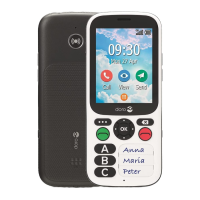
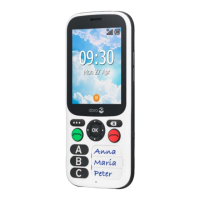
The Doro 730X is a mobile phone designed for ease of use, featuring a clear display and tactile buttons. It includes a front camera, speaker, menu button, four-way navigation keys, call button, voicemail, keypad lock/international prefix/symbols button, microphone, headset socket, charging socket, volume keys, clear button, end call/back/power on/off button, OK-button, and input method/silent mode button. On the back, it has a second microphone, an assistance button, a main camera with flash and flashlight, and a loudspeaker.
Before using the phone, remove the plastic screen protector. Unbox the phone and familiarize yourself with its components and basic functions. The items supplied with the device may vary by region or service provider and are designed exclusively for this device. Additional accessories can be purchased from a Doro retailer.
To install the battery, SIM card, and memory card, first turn off the phone and disconnect the charger. Carefully remove the battery cover, taking care not to damage your fingernails or bend/twist the cover excessively.
Insert the micro SIM or USIM card provided by your mobile service provider into the designated slot. You can insert a second micro SIM or USIM card to have two phone numbers or service providers on one device, though data transfer speeds might be slower with two SIMs. Note that this device only accepts micro SIM/USIM cards (3FF); incompatible SIM cards may cause damage or data corruption. If using only one SIM, it is recommended to use SIM1.
Optionally, install a memory card (MicroSD, MicroSDHC, MicroSDXC) to expand storage for files, pictures, and videos. Ensure the memory card's contacts face downwards. Incompatible cards may damage the card, device, or corrupt data.
Insert the battery by sliding it into the compartment with the contacts facing downwards to the left. Then, replace the battery cover.
While the phone may have some charge out of the box, it's recommended to fully charge it before first use. Only use batteries, chargers, and accessories approved for this model to avoid danger and invalidating the warranty. When the battery is low, a warning signal will sound, and a battery icon will appear. Connect the mains adapter to a wall socket and then to the charging socket on the phone. To save energy, disconnect the charger from the device and unplug it from the wall socket once the battery is fully charged.
To turn the phone on or off, press and hold the red end call/power button. If your SIM card is protected by a PIN code, "Enter SIM PIN" will appear. Enter the PIN code and press the center OK key. Use the clear button to delete mistyped numbers. If PIN and PUK codes were not provided with your SIM card, contact your service provider. PIN and PUK codes may differ between SIM1 and SIM2 if you use multiple SIM cards. If the PIN is blocked after too many attempts, "PIN blocked" will appear, and you'll need to unlock it with the PUK code. Enter the PUK code, confirm with OK, then enter and re-enter a new PIN code, confirming each time with OK.
When starting the phone for the first time, a Start-up wizard will guide you through basic settings. Select the settings you wish to change, then scroll to the end and press "Finish."
Descriptions in this document are based on the phone's default setup. Instructions typically start from the home screen; press the red end call/power button to return to the home screen. An arrow (→) indicates the next action in step-by-step instructions.
To make or answer a call, or enter the call log, press the green call button. To end calls, return to the previous screen, or power the phone on/off, press the red end call/power button. A long press on this button will power the device on or off.
The menu/options button (three dots) allows you to view notifications from the Home screen or see more options available in other menus.
Doro's "Easy mode" menu is action-based, allowing you to navigate by asking "What do I want to do?". Select available actions as shortcuts.
Use the volume keys (+ and -) on the side of the device to adjust the sound volume. During a phone call, this adjusts the earpiece volume.
The default language is determined by the SIM card. To change it, go to Settings → System → Languages & input → Language. The time and date can be set automatically; access this through Settings → System → Date & time.
To enter text, press the button corresponding to the desired letter until it appears. Press the star key for a list of special characters, then use the four-way navigation key and OK to select. Use the four-way navigation key to move the cursor. Press the clear button to erase characters. Press the hash key to cycle between upper case, lower case, numerals, and predictive text. To change the writing language, press and hold the hash key, select a language with the four-way navigation key, and press OK. For predictive text, press the hash key while texting to select the input method.
To enter phone numbers, always use '+' before the country code for international calls (press the star key twice for '+'). You can dial or save numbers with pauses for automated systems by pressing and holding the star key repeatedly until ',' (pause) or ';' (wait for user activation) appears.
To make a call, enter the number and press the green call button. Press the red end call button to end the call. Note that there is no dial tone; the phone is ready for use when turned on.
To call from the contacts list, press the menu button, select "Contacts," use the four-way navigation key or search function to find the contact, select it with OK, and then press the green call button.
To receive a call, press the green call button to answer. To silence an incoming call, long-press the volume keys.
Received, missed, and dialed calls are saved in the call log. To retrieve and dial from the call log, press the green call button, then use the four-way navigation key to scroll through the log. Icons indicate incoming, outgoing, or missed calls. Press the green call button to dial the highlighted number.
To create a contact, press the menu button, select "Contacts," then "Create new contact." Enter the relevant information. When done, press the menu button and select "Save." The types of information you can save may vary based on the selected storage location. Press the menu button to see more options for the contact.
First responders can access medical information from the phone in an emergency. This information is crucial for survival. All fields are optional, but more information is better. To create an ICE entry, press the menu button, select "Contacts," then "ICE." Press the menu button, select "Edit," and fill in as much information as possible. Add ICE contacts from your contact list. When done, press the menu button and select "Save."
An SOS call can always be placed when the phone is switched on by entering the local emergency number (e.g., 112) followed by the green call button. Some networks allow emergency calls without a valid SIM card. Contact your service provider for more information. Note that emergency calls may sometimes be unavailable due to network, environment, or interference issues.
The assistance button on the back of the phone provides easy access to predefined help contacts in an emergency. Ensure the assistance function is activated before use. The assistance button can be used in basic assistance mode or with the Response by Doro service. With Response by Doro, relatives/helpers can receive assistance alarms via the smartphone app Response by Doro. In some markets, you can subscribe to Response Premium by Doro for enhanced personal safety. To access assistance settings, go to Settings → Assistance.
Response by Doro is an app that allows a relative (Responder) to receive emergency alarms from the Doro phone user and manage basic phone settings for the Senior user. This feature uses Internet data services, so check your mobile data rates. The app is available on Play Store for Android and App Store for iOS. The first person to set up an account and invite the Senior user becomes the admin for the Responder group. The group can consist of one or many Responders.
Response Premium by Doro is an easy-to-use service providing extra security for seniors and their relatives. Pressing the assistance button on the Doro phone calls for help. The alarm first contacts relatives, and if no one responds, it's automatically transferred to Doro's Alarm Receiving Centres, where trained operators assist 24/7. Relatives can use any iOS or Android smartphone. This service is available in some markets/countries.
To take sharp photos, wipe the lens clean with a dry cloth. Press the camera icon, then press OK to take a photo.
To create, edit, and read messages: Press the menu button, select "Messaging," then "New conversation." Enter the recipient's phone number in the "To" field, or select the plus icon to choose recipients from your contacts. Scroll down and type your message. Press the menu button for further options. When done, press the menu button and select "Send" or the send icon. Note that sending to multiple contacts will incur charges for each. Some features use Internet data services, which can be costly; check your data service rates.
An Internet connection is needed for Internet and e-mail features. To reduce data traffic costs, use Wi-Fi connections when available instead of mobile data. Contact your service provider for subscription costs. Wi-Fi is often available at home, workplaces, coffee shops, hotels, trains, and libraries. Connecting to Wi-Fi generally doesn't incur additional data traffic costs unless you pay for the network.
To connect to Wi-Fi: Press the menu button, select "Settings," then "Network & Internet," and "Wi-Fi." Select "On." Choose the available network you want to connect to. If the network is secured, enter the password and select "Connect." The Wi-Fi icon in the status bar indicates a connection. The phone remembers connected Wi-Fi networks and automatically connects when in range. Some open networks require logging into a webpage before access.
Use the web browser to access the Internet. Press the menu button, select "Browser." Select an available site or navigate to "Search or type URL."
E-mail accounts like Gmail and Yahoo may require modifying account settings to access them on your Doro phone. To avoid sign-in issues, you might need to log into your Gmail/Yahoo account from a computer first. Press the menu button, then select "E-mail."
For Gmail/Yahoo Mail: Use a computer/tablet web browser to log into your account. Click your name (top right corner) → My Account. Under the security section, click "Connected apps & sites" → "Account security" → "Allow less secure apps" and set the switch to ON. Then, try logging in with your phone again.
Silence the ring tone: Press and hold the hash key to activate/deactivate silent mode. During an incoming call, long-press the volume keys to silence the ring tone.
Configure the audio setup: Press the menu button, select "Settings," then "Sound," and "Audio setup."
Bluetooth technology allows hands-free use and wireless connection to other compatible devices like headsets. To connect: Press the menu button, select "Settings," then "Connected devices," and "Bluetooth." Select "On." Select "Pair new device," then OK. Choose an available device that must be in pairing mode. Select "Connect." You may need to enter a password or confirm a shared pairing code when connecting.
Set alarms for important timings.
WhatsApp is a cross-platform messaging and Voice over IP (VoIP) service. It allows sending and receiving text messages, voice calls, video calls, images, other media, documents, and user location. It requires your mobile number. For more information, visit www.whatsapp.com.
Use Facebook to check your social network. For more information, visit www.facebook.com.
From the home screen, press the menu button, then select "Organizer."
Perform basic math operations.
Enter your upcoming tasks and events.
Access and manage various files stored in the phone or memory card.
Create notes and reminders.
From the home screen, press the menu button, then select "Media."
Gallery: View photos taken with the camera and other saved or downloaded images.
Music: Use the music player to listen to music or other audio files.
FM Radio: Listen to FM radio (87.5 to 108.0 MHz). A compatible headset is needed as an antenna.
Sound Recorder: Record and store voice recordings.
Videos: View recorded, other saved, or downloaded videos.
Use the torch for extra lighting. Note that the torch drains the battery quickly, so remember to switch it off after use.
For help:
WARNING: The unit and accessories contain small parts; keep them out of reach of small children. The mains adapter is the disconnect device; the socket outlet must be close and accessible.
Network services and costs: The device is approved for WCDMA 900/2100 MHz, GSM 900/1800/1900 MHz networks. A service provider subscription is required. Network services may incur traffic costs, and some features require network support or subscriptions.
Operating environment: Follow all rules and laws. Turn off the unit where prohibited or where it may cause interference/hazards. Use the unit in its normal position. Parts of the unit are magnetic and can attract metal objects; do not keep credit cards or other magnetic media near it, as stored information may be erased.
Medical units: Radio signals from mobile phones can interfere with insufficiently protected medical equipment. Consult a doctor or equipment manufacturer to determine adequate protection. Comply with notices to turn off the unit in healthcare facilities.
Implanted medical devices: To avoid interference, maintain a minimum separation of 15 cm between a wireless device and implanted medical devices. If you have such a device:
Areas with explosion risk: Always turn off the unit in areas with explosion risk. Follow all signs and instructions. This includes places where you are normally asked to turn off your car engine, as sparks can cause explosions or fires. Turn off the unit at filling stations and auto repair facilities. Follow restrictions near fuel storage, chemical factories, and blasting sites. Areas with explosion risk are often marked. This also applies to below decks on ships, chemical transport/storage, vehicles using liquid fuel (propane/butane), and areas with chemicals or particles (grain, dust, metal powder) in the air.
Li-ion battery: This product contains a Li-ion battery. There is a risk of fire and burns if handled improperly. WARNING: Danger of explosion if battery is incorrectly replaced. To reduce risk of fire or burns, do not disassemble, crush, puncture, short external contacts, expose to temperatures above 60°C (140°F), or dispose of in fire or water. Recycle or dispose of used batteries according to local regulations or the product's reference guide.
WARNING: Excessive exposure to loud sounds can cause hearing damage. Exposure to loud sounds while driving can distract you and cause an accident. Listen to a headset at a moderate level, and do not hold the device near your ear when the loudspeaker is in use.
Important! Mobile phones use radio signals, the mobile phone network, the terrestrial network, and user-programmed functions. Connection cannot be guaranteed in all circumstances. Never rely solely on a mobile phone for very important calls like medical emergencies.
Vehicles: Radio signals can affect electronic systems in motor vehicles (e.g., fuel injection, ABS brakes, cruise control, airbags) that are incorrectly installed or inadequately protected. Contact the manufacturer for more information. Do not keep or transport flammable liquids, gases, or explosives with the unit or its accessories. For vehicles with airbags, remember they inflate with considerable force. Do not place objects, including fixed or portable radio equipment, in the area above the airbag or where it might expand, as serious injuries may result if the airbag inflates. Using the unit in flight is prohibited; turn it off before boarding a plane, as wireless telecom units can pose risks to air safety and interfere with telecommunications, and it may be illegal.
Your unit is a technically advanced product and should be treated with the greatest care. Negligence may void the warranty.
These guidelines apply to the unit, battery, power adapter, and other accessories. If the phone is not working as it should, contact the place of purchase for service and retain your receipt or invoice.
This product is guaranteed for 24 months, and original accessories (battery, charger, charging cradle, handsfree kit) for 12 months, from the date of purchase. In case of a fault, contact the place of purchase with proof of purchase. This guarantee does not cover faults caused by accident, damage, liquid ingress, negligence, abnormal usage, non-maintenance, or other user-related circumstances. It also does not cover faults caused by thunderstorms or voltage fluctuations; disconnect the charger during a thunderstorm as a precaution. This is a voluntary manufacturer's warranty and does not affect statutory rights. This guarantee does not apply if non-DORO original batteries are used.
©2019 Doro AB. All rights reserved. Bluetooth® is a registered trademark of Bluetooth SIG, Inc. vCard is a trademark of the Internet Mail Consortium. microSD is a trademark of SD Card Association.
The contents of this document are provided "as is," without warranties of any kind regarding accuracy or reliability. Doro reserves the right to revise or withdraw this document. Other product and company names are trademarks of their respective owners. Doro is not responsible for data loss, income loss, or any special, incidental, consequential, or indirect damages. Doro does not provide a warranty or take responsibility for the functionality, content, or end-user support of third-party apps. By using an app, you acknowledge it is provided "as is."
Unauthorized copying of copyrighted materials is contrary to copyright laws. This device is for copying non-copyrighted materials, materials you own, or materials you are authorized to copy. If uncertain about your right to copy material, contact your legal advisor.
This device should work with most hearing aid equipment, though full compatibility cannot be promised.
This device meets international safety requirements for exposure to radio waves. It is a radio transmitter and receiver designed not to exceed the limits for exposure to radio frequency electromagnetic fields recommended by ICNIRP. The SAR limit for mobile devices is 2 W/kg averaged over 10 grams of tissue, with a safety margin. Tests are conducted with the device transmitting at its highest certified power level. The highest SAR values for this device model are: Head SAR: 0.791 W/kg, Body SAR: 1.565 W/kg. During normal use, SAR values are usually below stated values because output power is automatically decreased when full power is not needed.
The device meets RF exposure guidelines when used against the head or at least 0.5 cm away from the body. For body-worn operation, a carry case, belt clip, or device holder should not contain metal and should provide at least the stated separation distance. The World Health Organization (WHO) states that current scientific information does not indicate a need for special precautions when using mobile devices. To reduce exposure, they recommend reducing usage or using a hands-free accessory.
The crossed-out wheeled bin symbol on the product, accessories, or manual indicates that they should not be disposed of with other household waste. To prevent environmental harm and promote sustainable reuse, separate these items from other waste types and recycle them responsibly. Household users should contact their retailer or local government office for details on environmentally safe recycling. Business users should contact their supplier and check purchase contract terms. This product and its electronic accessories should not be mixed with other commercial wastes for disposal. This product is RoHS compliant.
The battery, manual, or packaging marking indicates that the battery should not be disposed of with other household waste. Chemical symbols (Hg, Cd, Pb) indicate mercury, cadmium, or lead above EC Directive 2006/66 reference levels. Improper disposal can harm human health and the environment. To protect natural resources and promote material reuse, separate batteries from other waste types and recycle them through your local, free battery return system.
Doro declares that radio equipment type DFB-0320 (Doro 730X) complies with Directives: 2014/53/EU and 2011/65/EU, including delegated Directive (EU) 2015/863 amending Annex II. The full text of the EU declaration is available at www.doro.com/dofc.
Doro declares that the external power supply for this device complies with Commission Regulation (EU) 2019/1782 regarding ecodesign requirements for external power supplies pursuant to Directive 2009/125/EC. Full information is available at www.doro.com/ecodesign.
| Display diagonal | - \ |
|---|---|
| Display resolution | 320 x 240 pixels |
| Flash card support | Yes |
| Compatible memory cards | MicroSD (TransFlash) |
| Internal storage capacity | 1.3 GB |
| Rear camera resolution (numeric) | 3 MP |
| Front camera resolution (numeric) | 2 MP |
| Data network | HSPA+, LTE, UMTS |
| SIM card type | MicroSIM |
| Wi-Fi standards | 802.11b, 802.11g, Wi-Fi 4 (802.11n) |
| 3G bands supported | 900, 1900, 2100 MHz |
| SIM card capability | Dual SIM |
| Mobile network generation | 4G |
| Bluetooth version | 4.2 |
| USB port | - |
| Headphone connectivity | 3.5 mm |
| Multimedia Messaging Service (MMS) | Multimedia Messaging Service (MMS) is a standard way to send messages that include multimedia content to and from a mobile phone over a cellular network |
| Ringer type | Polyphonic |
| Polyphonic rings quantity | 22 |
| Talk time (2G) | 8 h |
| Battery voltage | 3.7 V |
| Battery capacity | 1600 mAh |
| Standby time (2G) | 330 h |
| Type | Feature phone |
| Product color | Gray |
| International Protection (IP) code | IP54 |
| Form factor | Bar |
| Phonebook capacity | 500 entries |
| Personal info management (PIM) | Calculator, Calendar, Notes |
| Keyboard layout | Alphanumeric keypad |
| Storage temperature (T-T) | -20 - 60 °C |
| Operating temperature (T-T) | 0 - 40 °C |
| Body SAR (EU) | 1.565 W/kg |
| Head SAR (EU) | 0.791 W/kg |
| Extremities SAR (EU) | 2.536 W/kg |
| Depth | 13 mm |
|---|---|
| Width | 60 mm |
| Height | 138 mm |
| Weight | 119 g |