1514
5. How to use device
5.1 Device description
5.2 Start-up device
For operation take out the instrument from the packaging, remove the
display foil. Before switching on the instrument connect the probe/s to
theinstrumentandcheckthebatteries(2x1,5VAAsize)whetherthey
are inserted. The devices type 4005 and 4015 have two probe sockets
(channel1ontherightbottomandchannel2ontheleftbottom).
By operating the ON/OFF-
button
the instrument switched on or off. After
switching on the instrument shows for one second all display segments,
then it starts operating in measurement mode.
The instrument has a built-in Mini-USB-Port. Through our optional
DE-GraphWindowsSoftware(OrderCode5090-0081)itispossibleto
transferthemeasurementtoaPC(onlinedocumentation).ByaUSB
connection the instrument will be power supplied, too. This product is
exclusivelyintendedfortheeldofapplicationdescribedabove.
It should only be used as described within these instructions.
Unauthorizedrepairs,modicationsorchangestotheproductare
prohibited and void any warranty!
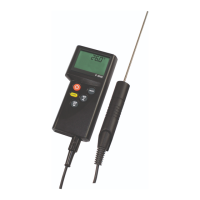
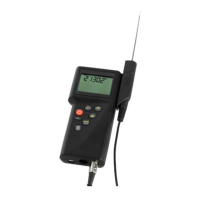
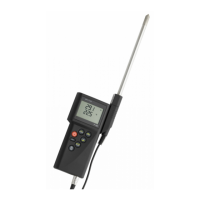
Fig. A (seepage2)
1. LCD-Display see Fig. D
2. USB-connector see Fig. B
3. ON/OFF-button
4. CLEAR-button
5. Ports
5.aChannel1(Pt100)
5.bChannel2(Pt100)
5.cChannell1(typeK)
5.dChannel2(typeK)
6. MEMOUT-button
7. MEMIN-button
8. MODE-button
9. Battery case see Fig. C
Fig. D (seepage3)
1. Measurement result
line 1 / channel 1
2. Measurement result
line 2 / channel 2
3. Display differential
temperature(T1-T2)
4. Status line
HOLD = keep the last
measurement result
on the display
5.3 Factory presets
•TemperatureunitindegreeCelsius°C
•Power-SaveMode:on(Theinstrumentswitchesoffautomatically
afterappr.15minutes)
5.4 Functions
5.4.1 Measuring unit switching °C Celsius and °F Fahrenheit
To change the measuring unit hold the ON/OFF-button and
MEMOUT-button together during switching on procedure until a
measurement appears.
5.4.2 Calibration
Theinstrumentoffersaneasycalibrationfunctiontoadjustthe
temperature at one point – to compensate sensor tolerances.
Push once the MODE-button. On the bottom of the display you will
see HOLD and the displayed measurement value is “frozen”.
By using now the MEMIN-button the instrument switch to
CAL-mode. On the instrument appears 00.0
Therst0isblinking.ByusingtheMEMIN-buttonyouincreasethe
blinkinggureandbyusingtheMEMOUT-buttonyoudecreasethe
measurement value. By using the MODE-button you will switch to
thenextgureoryouwillendtheadjustment.
Note: Thementionedoffsetwilladdorsubtract(negativevalue)
from the measurement.
AVG = average value,
MAX=maximumvalue
MIN = minimum value,
5. Battery indication
6. Adjustmentfunctionactive
7. Unit
 Loading...