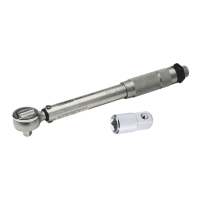
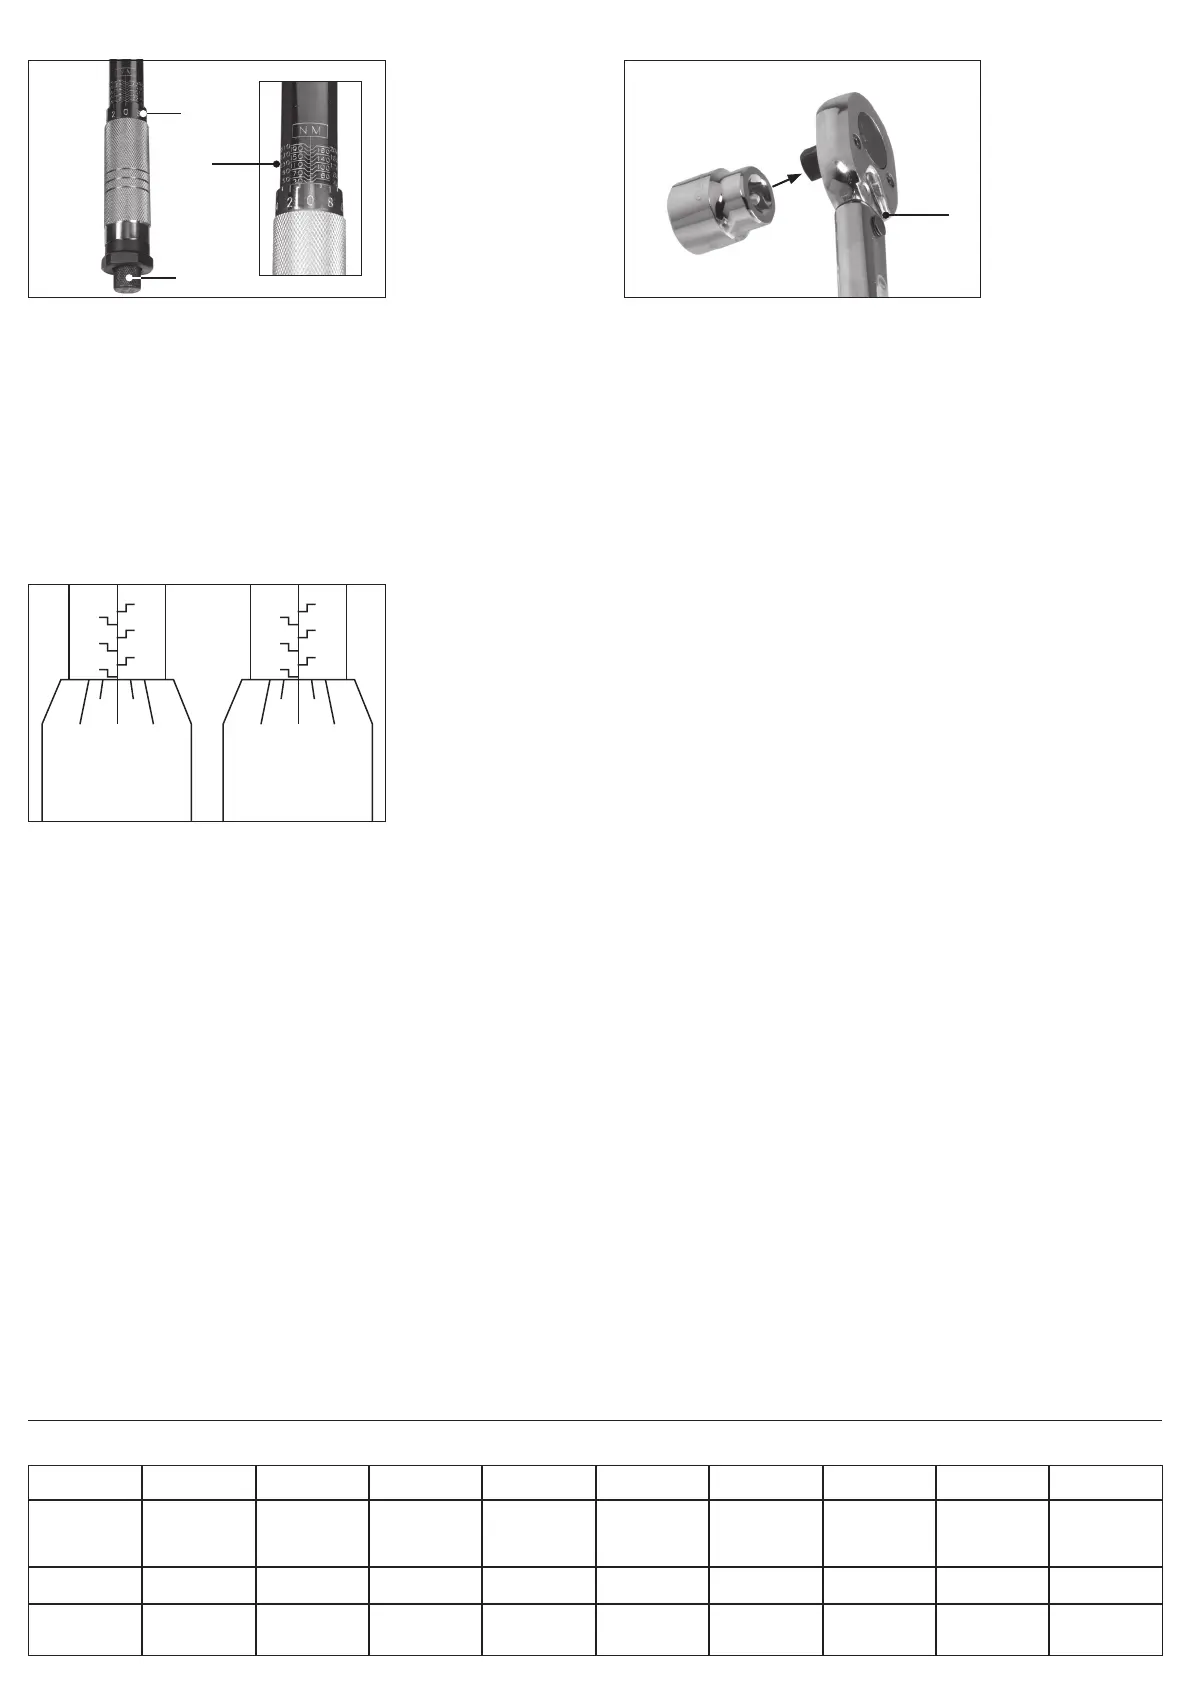
4. ReadingtheMicrometer
The micrometer features two scales for selecting the correct torque for
the wrench:
• Primary scale (1): The numbers listed vertically along the wrench shaft.
− Each value can be read where its numbered horizontal line meets the
vertical centre line.
• Secondary scale (2): The numbers listed horizontally around the upper edge
of the handle.
− Read each value when it aligns with the vertical centre line of the
primary scale.
The primary scale is shown in newton-metres (Nm) on the back of the handle
shaft and in pound-feet (lb-ft) on the front.
To set the torque of the wrench (example 96Nm):
1. Rotate the locking screw (3) at the base of the wrench anticlockwise to unlock
the handle.
2. Rotate the handle until its upper edge aligns with the 90Nm value line of the
primary scale and 0.0 on the secondary scale aligns with the centre line.
− To increase the torque, twist the handle clockwise.
− To decrease the torque, twist the handle anticlockwise.
3. Rotate the handle clockwise until 6.0 on the secondary scale is aligned with
the primary scale’s centre line.
4. If an incorrect torque value is set, rotate the handle anticlockwise to a value
lower than the target torque, then adjust the torque upwards; this delivers a
more accurate result.
5. Rotate the locking screw clockwise to secure the handle in place.
7. ConversionChart
mN/m
millinewton-metre
cN/m
centinewton-metre
N/m
newton-metre
daN/m
decanewton-metre
cm/kg
centimetre-kg
m/kg
metre-kg
in-oz
inch-ounce
in/lb
inch-pound
ft-lb
foot-pound
1mN/m
1cN/m
1N/m
1daN/m
1
10
1000
10000
0.1
1
100
1000
0.001
0.01
1
10
0.0001
0.001
0.1
1
0.0102
0.102
10.2
102
0.000102
0.00102
0.102
1.02
0.1416
1.416
141.6
1416
0.00885
0.0885
8.85
88.5
0.000738
0.00738
0.738
7.38
1cm/kg
1m/kg
98
9810
9.8
981
0.098
9.81
0.0098
0.98
1
100
0.01
1
13.9
1390
0.868
86.8
0.0723
7.23
1in-oz
1in-lb
1ft-lb
7.06
112.9
1355
0.706
11.29
35
0.00706
0.1129
1.355
0.0007
0.01129
0.1135
0.072
1.152
13.8
0.00072
0.0115
0.138
1
0.063
0.0052
16
1
0.083
192
12
1
(1)
(3)
(2)
130
140
120
100
2 0 8
110
90
130
140
120
100
8 6 4
110
90
Fig. 1 –
Torque setting:
30Nm (30 + 0)
Fig. 2
5. Operation
1. Select the required socket or bit and adaptors as appropriate and install them
onto the square drive.
2. Set the rotation direction by positioning the switch (4) on the back of the
wrench head:
− To rotate the ratchet head clockwise, move the switch to the right position.
− To rotate the ratchet head anticlockwise, move the switch to the left position.
3. Set the wrench torque; see 4 Reading the Micrometer.
4. Place the bit or socket onto the xing and crank the wrench smoothly and
evenly in the chosen direction.
− On the forward stroke, the wrench will turn the bolt or screw.
− On the backward stroke, the wrench can be repositioned without aecting
the position of the bolt or screw.
5. When the congured torque has been reached, the tool will exhibit an audible,
tangible and visual response; see 3 Notes on Use.
Important: DO NOT crank the torque wrench any further after this has
occurred. Responses may be less perceptible at lower torques.
6. Carefully remove the wrench from the xing.
6. MaintenanceandDisposal
Important: A torque wrench is a precision tool. Failure to calibrate your tool
regularly or to store the correctly will constitute misuse and invalidate your warranty.
• Keep the product free from grease, chemicals and other substances to prevent
damage from corrosion.
− Penetrating oils may be used to keep moving parts clean and prevent binding.
− Wipe the wrench with a dry cloth only; do not use solvents or chemicals
that may interfere with the internal lubrication.
• Store this product in a clean and dry location, out of direct sunlight and out of
reach of children.
• ALWAYS return the torque wrench to its lowest micrometer reading before storage.
− Failure to do this will weaken the internal springs and distort the
calibration of the tool.
• Have the torque wrench calibrated at least once a year by a certied
calibration centre.
− Frequently used tools should be calibrated more often.
• NEVER attempt to repair or adjust this product.
− Servicing, repairs and calibration must be carried out ONLY by qualied
and authorised service agents.
If the torque wrench fails to function correctly for any of the following reasons,
return the tool to an authorised Draper Tools agent:
• The ratchet fails to function.
• The handle lock fails to function.
• The handle lock nut comes loose.
• The wrench does not “click” at the set torque.
• The handle does not break away at the set torque.
At the end of its working life, dispose of the product responsibly and in line with
local regulations; recycle where possible.
(4)
Fig. 3
 Loading...