EasyManua.ls Logo

Draper 78639 - User Manual

Draper 78639
5 pages
Print Icon
To Next Page IconTo Next Page
Loading...
78639, 78641, 78642
EN
Original Instructions
Version 2 – April 2023
TORQUE
WRENCH
1. Scope
This tool has been designed to tighten screws, bolts and other xings to the
required torque. Any other application beyond the conditions established for use
will be considered misuse. Draper Tools accepts no responsibility for improper
use of this product.
Important: This torque wrench is a precision tool. It must NOT be used to pry or
loosen nuts, bolts or xings; to separate materials; as a substitute for ratchet
spanners; or as a breaker bar. Use in such a way will invalidate your warranty.
DO NOT use these tools to torque left-handed threads.
Part of our core range, this product is suitable for use by enthusiasts and
tradespersons alike.
Read this manual in full before attempting to use this product and retain it for
later use. Always use the latest version of the manual.
2. Specication
Stock No. 78639 78641 78642
Part No. BTW BTW BTW
Drive size: 1/4" 3/8” 1/2”
Torque range: 5–25Nm 20–110Nm 30–210Nm
3. NotesonUse
Important: Read this section in full BEFORE attempting to use this tool.
Failure to follow these instructions may result in damage to the tool or cause it to
require recalibration.
Important: ALWAYS read the manufacturer’s instructions for the recommended
torque settings. Incorrect torque settings can result in serious damage or injury
when the workpiece is used.
• Before rst use, or after extended periods of disuse, ensure that the torque
wrench is correctly lubricated:
Set the micrometer to its maximum torque settings and then slowly reduce
it to its minimum setting.
Operate the wrench several times at a low torque setting.
• Before rst use, test the torque wrench on non-critical xings to familiarise
yourself with the responses that indicate the congured torque is reached.
Important: Some responses may be less noticeable at lower torques.
• ALWAYS select the correct size and type of socket for use with the fastening.
• NEVER set the micrometer beyond its maximum or minimum settings as this
may damage the internal spring and distort the calibration.
• ALWAYS return the torque wrenches to their minimum settings when not
in use.
Failure to do this will weaken the internal spring and distort the calibration
of the tool.
Damage caused to the tool in this way is not covered by your warranty.
• Observe all standard safety precautions and good practices when in a
workshop environment.
• Inspect the product before every use for cracked, corroded or broken parts.
WARNING! DO NOT use this product if it is damaged in any way.
Contact Draper Tools for repair and replacement options.
• Use this product only for its intended purpose and do not modify it in any way.
Reaching the Set Torque
The torque wrench exhibits the following responses when the correct torque has
been reached:
• Audible: The tool will click”.
• Tangible: The handle will break awayfrom the xing.
• Visible: The handle will be seen to break awayfrom the xing.
Important: These responses may be less perceptible at lower torques.
CAUTION! Once this has occurred, DO NOT continue to rotate the
torque wrench as this will deliver an incorrect torque and may damage
thexing.
8. Warranty
Should the tool develop a fault, return the complete tool to your nearest
distributor or contact Draper Tools directly. Proof of purchase must be provided.
If, upon inspection, it is found that the fault occurring is due to defective
materials or workmanship, repairs will be carried out free of charge. This warranty
covers parts and labour for the lifetime of the product. However, if the tools are
hired out, the warranty period is 90 days from the date of purchase.
This warranty does not apply to any consumable parts, batteries or normal wear
and tear, nor does it cover any damage caused by misuse, careless or unsafe
handling, alterations, accidents, or repairs attempted or made by any personnel
other than the authorised Draper Tools repair agent.
Visit drapertools.com/warranty for full details.
9. ExplanationofSymbols
Read the instruction manual
30
Nm
MIN
Minimum Nm
Please visit drapertools.com/manuals for the latest version for this manual.
210Nm
MAX
Maximum Nm
1/2"
SQ DR
Square Drive
Delta International
Delta International BV
Oude Graaf 8
6002 NL
Weert
Netherlands
Draper Tools
Draper Tools Limited
Hursley Road, Chandler’s Ford
Eastleigh, Hampshire, SO53 1YF UK
Website: drapertools.com
Email: sales@drapertools.com
Product Helpline: +44 (0) 23 8049 4344
Telephone Sales Desk: +44 (0) 23 8049 4333
General Enquiries: +44 (0) 23 8026 6355
GeneralFax: +44 (0) 23 8026 0784
© Published by Draper Tools Limited
Question and Answer IconNeed help?

Do you have a question about the Draper 78639 and is the answer not in the manual?

Summary

Scope

Specification

Notes on Use

Lubrication and Initial Testing

Ensure the torque wrench is lubricated before first use or after disuse, and test on non-critical fixings.

Reaching the Set Torque

The torque wrench indicates reaching torque via audible, tangible, and visual responses.

Reading the Micrometer

Primary and Secondary Scales

Describes the primary vertical scale and secondary horizontal scale for setting torque.

Setting the Torque

Step-by-step guide to setting the torque using the micrometer scales.

Operation

Maintenance and Disposal

Cleaning and Protection

Keep the product free from grease and chemicals to prevent corrosion.

Storage Guidelines

Store the torque wrench in a clean, dry location away from direct sunlight.

Calibration and Servicing

Calibrate annually by a certified centre; do not attempt repairs yourself.

Warranty

Explanation of Symbols

Overview

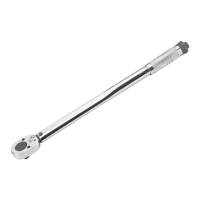
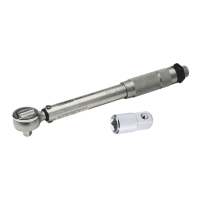
This document describes the Draper Torque Wrench, models 78639, 78641, and 78642, which are precision tools designed for tightening screws, bolts, and other fixings to a specified torque. These wrenches are part of Draper Tools' core range and are suitable for use by both enthusiasts and tradespersons.

Function Description:

The primary function of this torque wrench is to apply a precise amount of rotational force (torque) to fasteners. This ensures that fixings are tightened to the manufacturer's recommended specifications, which is crucial for safety and preventing damage to the workpiece or the fixing itself. The wrench provides audible, tangible, and visible feedback ("click," "break away" from the fixing) when the set torque is reached, indicating that no further rotation should be applied.

Important Technical Specifications:

The manual details three specific models with varying drive sizes and torque ranges:

  • Stock No. 78639:
    • Part No.: BTW
    • Drive size: 1/4"
    • Torque range: 5-25Nm (Minimum 5Nm, Maximum 25Nm)
  • Stock No. 78641:
    • Part No.: BTW
    • Drive size: 3/8"
    • Torque range: 20-110Nm (Minimum 20Nm, Maximum 110Nm)
  • Stock No. 78642:
    • Part No.: BTW
    • Drive size: 1/2"
    • Torque range: 30-210Nm (Minimum 30Nm, Maximum 210Nm)

The wrench features a micrometer with two scales for setting the torque: a primary scale (vertical numbers on the shaft) and a secondary scale (horizontal numbers on the handle's upper edge). The primary scale is in Newton-metres (Nm) on the back of the handle shaft and pound-feet (lb-ft) on the front. The rotation direction of the ratchet head can be set using a switch on the back of the wrench head for clockwise or anticlockwise operation.

Usage Features:

Before using the torque wrench, it is crucial to read the manufacturer's instructions for recommended torque settings, as incorrect settings can lead to serious damage or injury. The wrench should not be used for prying, loosening fasteners, separating materials, or as a substitute for ratchet spanners or breaker bars, as this will invalidate the warranty. It is also explicitly stated not to use these tools for left-handed threads.

To set the torque:

  1. Unlock the handle by rotating the locking screw anticlockwise.
  2. Rotate the handle to align its upper edge with the desired Nm value on the primary scale and 0.0 on the secondary scale with the centre line. Rotate clockwise to increase torque and anticlockwise to decrease it.
  3. Fine-tune the setting by rotating the handle clockwise until the desired secondary scale value aligns with the primary scale's centre line.
  4. If an incorrect torque value is set, rotate the handle anticlockwise to a value lower than the target torque, then adjust upwards for a more accurate result.
  5. Secure the handle by rotating the locking screw clockwise.

When using the wrench:

  1. Select and install the appropriate socket or bit and adaptors onto the square drive.
  2. Set the desired rotation direction (clockwise or anticlockwise) using the switch on the wrench head.
  3. Set the wrench torque as described above.
  4. Place the bit or socket onto the fixing and crank the wrench smoothly and evenly in the chosen direction. The wrench will turn the bolt or screw on the forward stroke, and it can be repositioned on the backward stroke.
  5. Stop immediately once the audible "click," tangible "break away," or visible "break away" from the fixing occurs. Continuing to rotate after this point will deliver an incorrect torque and may damage the fixing.
  6. Carefully remove the wrench from the fixing.

Maintenance Features:

Proper maintenance is essential for the longevity and accuracy of this precision tool. Failure to calibrate regularly or store it correctly will constitute misuse and invalidate the warranty.

  • Lubrication (Before first use or after extended disuse):
    • Set the micrometer to its maximum torque setting, then slowly reduce it to the minimum setting.
    • Operate the wrench several times at a low torque setting.
  • Storage:
    • ALWAYS return the torque wrench to its minimum micrometer reading before storage. This prevents weakening of the internal springs and distortion of the calibration.
    • Store the product in a clean, dry location, out of direct sunlight, and out of reach of children.
  • Cleaning:
    • Keep the product free from grease, chemicals, and other substances to prevent corrosion.
    • Penetrating oils may be used to keep moving parts clean and prevent binding.
    • Wipe the wrench with a dry cloth only; do not use solvents or chemicals that may interfere with internal lubrication.
  • Calibration:
    • The torque wrench should be calibrated at least once a year by a certified calibration centre. Frequently used tools should be calibrated more often.
  • Inspection:
    • Inspect the product before every use for cracked, corroded, or broken parts. Do not use the product if it is damaged in any way; contact Draper Tools for repair or replacement options.
  • General:
    • Never set the micrometer beyond its maximum or minimum settings, as this can damage the internal spring and distort calibration.
    • Never attempt to repair or adjust the product yourself. Servicing, repairs, and calibration must be carried out ONLY by qualified and authorised service agents.
    • If the ratchet fails, the handle lock fails, the handle lock nut comes loose, or the wrench does not "click" or "break away" at the set torque, return the tool to an authorised Draper Tools agent.

The product is covered by a warranty that covers defective materials or workmanship for the lifetime of the product, provided proof of purchase is supplied. However, if the tools are hired out, the warranty period is 90 days. The warranty does not cover consumable parts, batteries, normal wear and tear, or damage caused by misuse, careless handling, alterations, accidents, or repairs by unauthorised personnel. At the end of its working life, the product should be disposed of responsibly and in line with local regulations, recycling where possible.

Draper 78639 Specifications

General IconGeneral
BrandDraper
Model78639
CategoryPower Tool
LanguageEnglish

Related product manuals