Do you have a question about the DREAMS DRIFT TV BED and is the answer not in the manual?
Advice on identifying and laying out parts before building the bed.
Recommendation to build the bed in the desired room to avoid moving damage.
Importance of keeping children and animals away from assembly areas and small components.
Contact information for customer support regarding product issues or missing parts.
Guidance on environmentally friendly disposal of packaging and keeping instructions.
Ensure mattress is on the frame before operating the lift mechanism to prevent injury.
Keep hands clear, avoid entrapment, ensure full opening before access.
Do not exceed the maximum weight as specified in the table.
Use caution, adults only, keep children/pets away from moving parts and storage area.
Details on configuring the bed for left or right side opening and media tray fitting.
Comprehensive list of all bed components with quantities.
Specifies hardware for attaching side rails to headboard and footboard.
Lists hardware required for assembling and fitting the media tray to the side rail.
Details hardware for fitting cushion blocks to metal slat supports.
Specifies hardware for TV installation from the accessory box.
Lists hardware for fitting gas-lift mechanisms to headboard and footboard.
Specifies hardware for assembling and fitting the cable guard to the base of the footboard.
Lists necessary tools like tape measure and cross-head screwdriver.
Unzip access compartments and release USB cables from wings.
Position the first wing close to the headboard.
Route USB cable through headboard and align wing edges.
Use bolt sets to fit the wing to the headboard using pre-tapped holes.
Connect two USB cables to the main 'Y' cable for power distribution.
Install gas-lift mechanisms to the right side of headboard and footboard.
Fit brackets K, L, and M using specified bolt sets, tightening to 90%.
Ensure bolts are placed in the centre of long holes aligning with blue labels.
Install gas-lift mechanisms to the right side of headboard and footboard.
Fit brackets K, L, and M using specified bolt sets, tightening to 90%.
Ensure bolts are placed in the centre of long holes aligning with red labels.
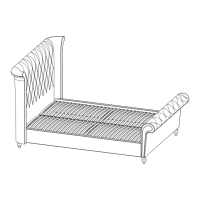
Stand headboard and choose RH side rail (E or F) for fitting.
Carefully pull out the LED strip situated at the headboard end.
Use bolt sets to attach the side rail to the headboard, tightening bolts to 90%.
Connect the LED cable at the headboard end.
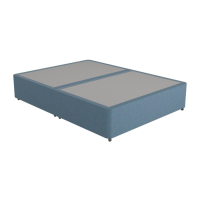
Position baseboards into the corner between RH side rail and headboard.
Attach the footboard to the RH side rail using the specified bolt sets.
Carefully pull out LED cable tails at the LH side rail end.
Attach LH side rail to headboard and footboard using bolt sets, tightening to 90%.
Ensure the bed is squared up and check side rail bolts are in keyhole slots.
Tighten all bolt sets to 100% after ensuring they are seated correctly.
Connect the USB interconnecting cable (AE) between headboard and footboard.
Connect the black LED connections at each end of the side rail.
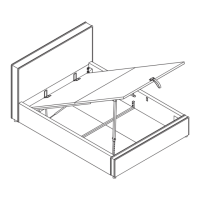
Pay attention to the off-center hole position on the slat support rails.
Ensure small distance X (10mm) is inside the bed, large distance Y (15mm) is next to the side rail.
Attach slat support rails using specified bolt sets, do not tighten fully yet.
Attach the four cushion pads to the metal frame.
Install the two central supports (P) using specified hardware.
Route the power, aerial, and USB leads from footboard to headboard.
Pass aerial cable and 3-pin plug through the headboard hole and out via zipper.
Securely fix the routed cables to the velcro tabs on the headboard and footboard.
Connect the mains power lead (W) to an earthed wall socket or extension lead.
Connect the aerial lead (X) to the appropriate socket.
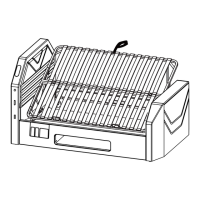
Press the "UP" button on the remote to raise the TV lift mechanism.
Route cables (Y, X, AE) through ducts, selecting best side based on TV ports.
Secure cables to the back of the TV using clips (Z) to prevent snagging.
Slide upper base board into position, ensuring cables are not trapped.
Measure TV height, add 5mm, and adjust column accordingly.
Loosen column bolts, adjust curved lid lifter, then re-tighten bolts.
Adjust upper supports (o) to hold the front of the TV in place.
Choose suitable fixing bolts, using TV-supplied ones if available; leave a gap.
Position TV vertically, setting sliders (o) to touch the front bezel.
Gently push down on TV and tighten Vesa bolts in the centre of long holes.
Keep wires tight, peel off cover, and adhere clips to the back of the TV.
Details for optical connection, including removing dust caps and socket alignment.
Use 90° adapter (AF) if HDMI socket is on TV's back to prevent cable damage.
Assemble media tray panels using screws (m) and bolts (n).
Mount the assembled media tray onto the bed frame.
Assemble the cable guard components using screws (m) and bolts (n).
Install the assembled cable guard onto the bed frame using specified hardware.
Attach metal connection plates (v) to the slat frame and tighten bolts.
Attach the metal slat frame to the support bars, do not tighten yet.
Carefully lay the frame down, ensuring an even gap of about 8mm on each side.
Hold frame firmly and tighten all six bolt sets to 100%.
Slide gas-lift piston stems (X) onto axles (Y) and tighten lock-nuts (t).
Attach fabric hand strap and mattress stoppers.
Steps to turn the amplifier on and off using the remote control.
Operate the TV lift mechanism using the remote control buttons.
Choose between Optical and Bluetooth modes for audio input.
Adjust audio settings using the remote control and observe LED indicators.
Switch on or off LED arrays on the head end and under the bed.
Use the mute button to turn the sound off and on.
Tips for cleaning the bed using a damp cloth or vacuum cleaner, avoiding harsh chemicals.
Periodically check screws, lift bed for moving, avoid dragging to prevent damage.
Notes on natural wood variations and potential fading due to light exposure.
Explanation of how lighting and exposure can affect fabric shade.
Advice to gently dust metal furniture and keep it dry for maintenance.
Precautions regarding liquids, heat, moving parts, cleaning, and battery disposal.
Essential advice on earthed sockets, accessible power, and avoiding overloaded circuits.
Detailed steps for raising the TV lift, connecting leads, and mounting the TV.
Guidance for common issues like loss of remote connection and power checks.
Simple instructions to re-pair the remote control if the connection is lost.
A coloring page to keep children entertained during assembly.
| Type | TV Bed |
|---|---|
| Assembly Required | Yes |
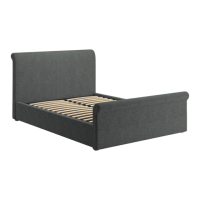
| Material | Fabric |
| Sizes Available | King |
| Color | Black, White, Gray |