EasyManua.ls Logo

DREAMS Angel User Manual

DREAMS Angel
4 pages
To Next Page IconTo Next Page
Page #1 background imageLoading...
Page #1 background image
1
3
3
3
construction of this unit. These loose items should be kept
Only supplied if upgraded sprung system chosen
6
7
14
ANGEL BEDSTEAD
Parts Identification
PLEASEREAD
this sheet prior to assembly to familiarise
yourself with the various stages of construction. Carefully
open the pack supplied and check the contents against the
parts and fittings check list.
Do not destroy any of the packaging until you are certain
that you have all the necessary parts for the assembly.
Please ensure that the packaging is disposed of in a
safe environmentally friendly way.
CAUTIONThere are small components used in the
away from young children whilst assembling your unit to
avoid the danger of choking hazards
Qty
1
2
3
4
6
7
Headboard
Footboard
Leg
Right Side Rail
1
1
4
1
Wooden Slats
Metal Sprung Slat System*
1 Set
1 Frame
PartsChecklist
Ref Description
Note
Standard wooden slat frame (part 6)
Upgraded sprung slat frame (part 7)
Page 1 of 4
3
5
4
2
5 Left Side Rail 1
Question and Answer IconNeed help?

Do you have a question about the DREAMS Angel and is the answer not in the manual?

DREAMS Angel Specifications

General IconGeneral
BrandDREAMS
ModelAngel
CategoryIndoor Furnishing
LanguageEnglish

Summary

Parts Identification and Checklist

Fittings and Maintenance Information

Fittings Checklist

Lists all required bolts, washers, and tools for assembly, including specific quantities.

Care and Maintenance

Provides instructions for contacting customer service for missing parts and general bed cleaning advice.

Bed Assembly Steps

Stage 1: Leg Attachment

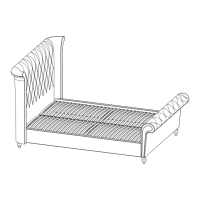
Fix the legs (3) in the marked positions on the underside of the headboard (1) and footboard (2).

Stage 2: Frame Assembly

Attach side rails (4 & 5) to headboard (1) and footboard (2) using bolts, washers, and nuts, leaving 10mm slack.

Stage 2: Bed Slat Fixing

Lay and secure the wooden slats (6) onto the support rails using bolts (E), washers (G), and sleeve nuts (F).

Stage 2a: Upgrade Sprung Slat System

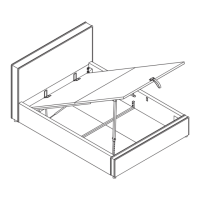
Fit support legs (L & M) and position the sprung slat frame (7) onto the rails, securing with bolts (E), washers (G), and nuts (F).

Related product manuals