collet and collet nut will provide a more precise accessory
holding solution especially in more precise applications such
as engraving in glass or etching in wood.
•
If you nd the accessory
slipping in the chuck, use the included wrench to tighten the
chuck around the bit.
•
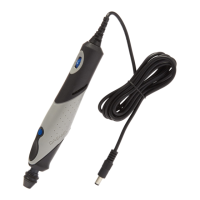
PICTURE 2
A. Shaft Lock Button
B. Dremel Chuck
To reset the jaws, apply the following procedure:
!
WARNING
ALWAYS WEAR SAFETY GOGGLES
WHEN CLEANING TOOLS WITH
COMPRESSED AIR.
8. With the shaft lock engaged, tighten the chuck using the
wrench to secure the accessory.
!
WARNING
DO NOT USE ROUTER BIT WITH THE
DREMEL CHUCK. BIT MAY BECOME A
PROJECTILE AND CAUSE SERIOUS INJURY.
BALANCING ACCESSORIES
For precision work, it is important that all accessories be in
good balance (much the same as the tires on your automobile).
To true up or balance an accessory, slightly loosen chuck or
collet nut and give the accessory or collet a 1/4 turn. Re tighten
the chuck or collet nut and run the Rotary Tool. You should be
able to tell by the sound and feel if your accessory is running in
balance. Continue adjusting in this fashion until best balance is
achieved. To maintain balance on abrasive wheel points, before
each use, with the wheel point secured in the collet, turn on the
Rotary Tool and run the 415 Dressing Stone lightly against the
revolving wheel point. This removes high spots and trues up the
wheel point for good balance.
COLLETS
Four different size collets (see PICTURE 3), to accommodate
different shank sizes, are available for your Rotary Tool. To
install a different collet, remove the collet nut and remove the
old collet. Insert the unslotted end of the collet in the hole in the
end of the tool shaft. Replace collet nut on the shaft.
WARNING
ALWAYS USE THE COLLET WHICH
MATCHES THE SHANK SIZE OF THE
ACCESSORY YOU PLAN TO USE. NEVER
FORCE A LARGER DIAMETER SHANK INTO A COLLET.
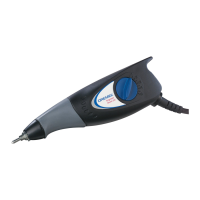
PICTURE 3
A. Collet Nut
B. 480 3.2mm Collet
C. Shaft
D. Identication Rings
E. 483 0.8mm Collet
F. 482 1.6mm Collet
G. 481 2.4mm Collet
Note: Most rotary tool kits do not include all four collet sizes.
COLLET IDENTIFICATION CHART
Collet sizes can be identied by the rings on the back end of
collet.
0.8mm Collet has one (1) ring.
1.6mm Collet has two (2) rings.
2.4mm Collet has three (3) rings.
3.2mm Collet has no rings. (Included in most tool kits on the tool).
FIXING STUCK COLLETS
It is possible for a collet to get stuck within the collet nut
especially if a collet nut is tightened onto the tool without a bit
in place. If this happens, the collet can be removed from the
collet nut by pushing the shank of an accessory into the hole
in the collet nut. This should cause the collet to pop out of the
collet nut.
COLLET NUT
To loosen, rst press shaft lock button and rotate the shaft
by hand until the lock engages the shaft preventing further
rotation. Your Dremel 2050 is equipped with a quick shaft lock
mechanism.
!
WARNING
DO NOT ENGAGE LOCK WHILE THE
ROTARY TOOL IS RUNNING.
With the shaft lock engaged use the collet wrench to loosen
the collet nut if necessary. The collet nut must be loosely
threaded on when inserting an accessory. Change accessories
by inserting the new one into the collet as far as possible to
minimize runout and unbalance.
With the shaft lock engaged, use collet wrench to securely
tighten the collet nut (PICTURE 4). Avoid excessive tightening
of the collet nut when there is no bit inserted.
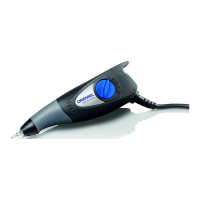
PICTURE 4
A. Collet Wrench
B. Shaft Lock Button
C. Collet Nut
D. To Tighten
E. To Loosen
USE
GETTING STARTED
The rst step in using the multitool is to get the “feel” of it. Hold
it in your hand and feel its weight and balance. Feel the taper
of the housing. This taper permits the tool to be grasped much
like a pen or pencil.
Always hold the tool away from your face. Accessories can be
damaged during handling and can fly apart as they come up
to speed.
When holding tool, do not cover the ventilation openings with
your hand. Blocking the ventilation openings could cause the
motor to overheat.
IMPORTANT! Practice on scrap material rst to see how the
tool’s high-speed action performs. Keep in mind that your
multitool will perform best by allowing the speed, along with
the correct Dremel accessory and attachment, to do the work
for you. Do not put pressure on the tool during use, if possible.
Instead, lower the spinning accessory lightly to the work surface
and allow it to touch the point at which you want to begin.
Concentrate on guiding the tool over the work using very little
pressure from your hand. Allow the accessory to do the work.
Usually it is better to make a series of passes with the tool
rather than to do the entire job with one pass. A gentle touch
gives the best control and reduces the chance of error.
9
 Loading...