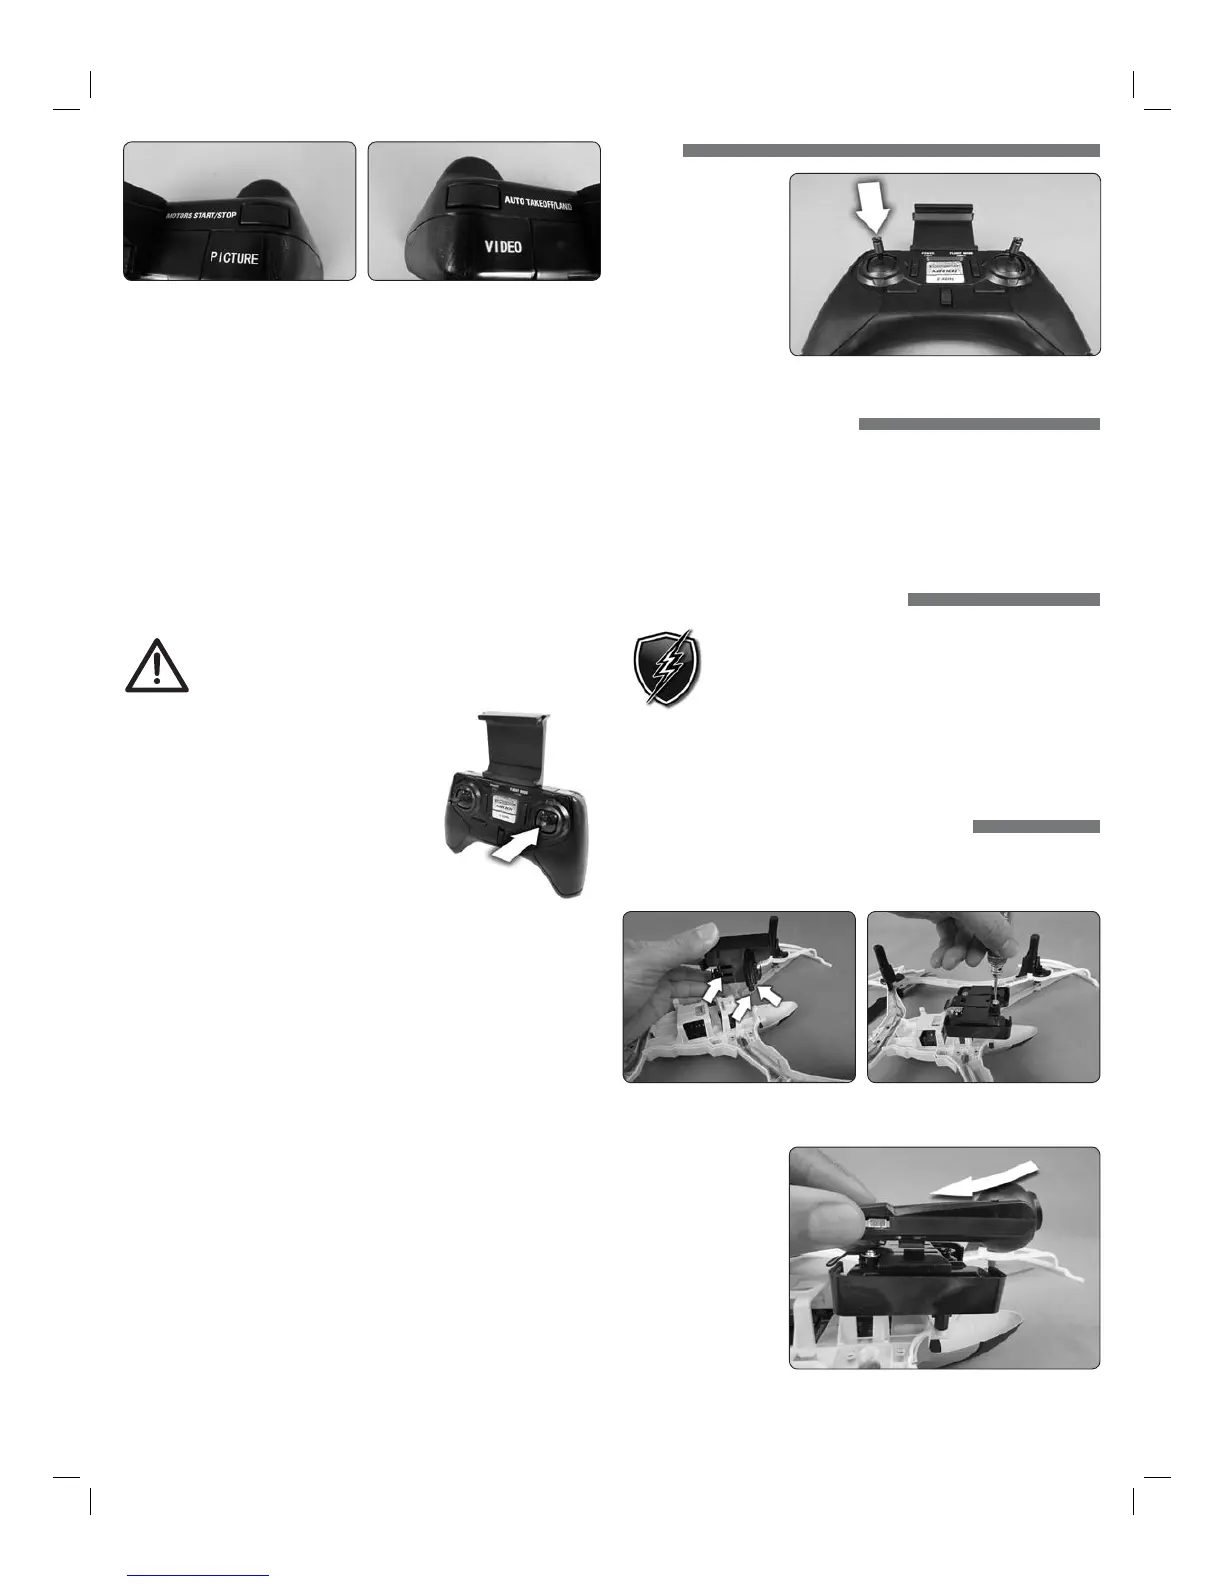
2. Start the motors by holding the MOTORS START/STOP button for 1.5 seconds.
Props will automatically spin slowly.
3. Press the AUTO TAKEOFF/LAND button and the Dromida XL will climb to
an altitude about eye level. The quad will attempt to maintain this altitude
as long as the left stick is not moved up or down.
NOTE: You can also take off by moving the left stick up.
4. Move the left stick up or down to increase or decrease altitude.
5. Use the right stick to move left, right, forward, or backward.
6. Use the left stick (left/right direction) to rotate the Dromida XL.
7. Press the AUTO TAKEOFF/LAND button during flight and the Dromida XL
will decrease in altitude until it detects landing. After landing the motors
will stop.
NOTE: You can also land by holding the left stick down until the Dromida XL
contacts the ground. Continue holding down until the motors stop.
TO PREVENT MOTOR DAMAGE ALWAYS BE SURE THE
THROTTLE IS OFF WHEN THE BLADES ARE OBSTRUCTED
OR CONTROL IS LOST. PUSH THE BUTTON!
DUAL RATES
Control sensitivity can be changed by pushing
down and releasing the right stick on the controller.
The default is low rate when the flight mode LED
is blue. The controller will make a beep and the
flight mode LED will change to orange indicating
high rate. This mode should be used when more
agility is desired. Pushing down on the right stick
again will return the controller to low rate indicated
by a beep and the flight mode LED changing back to blue. This mode should be
used when learning to fly or smoother video is desired (if equipped with a camera).
The overall controls can be adjusted independently by rate mode:
1. Hold down the right stick until the controller beeps once.
2. Continue to hold down the right stick and advance the throttle to the desired
setting.
3. Release the right stick and return the throttle to 0%.
The default setting for low rate mode is when the throttle stick is at
50% (midstick).
ALTITUDE HOLD
The Dromida XL has a barometer built in to the flight control board that detects
the surrounding air pressure which enables the quad to maintain a set altitude
automatically. After auto-takeoff, the Dromida XL will climb to a height of about
1.5m above its position at takeoff and then will attempt to maintain that altitude.
Move the throttle stick up or down to change the set altitude position. When
the stick is released back to center, the quad’s current height will be the new
set altitude.
NOTE: It is normal to see slight deviations from the set altitude. Windy
conditions or sensors that are out of calibration may increase the deviation
from the set altitude. Recalibrate the sensors if the quad is flying erratically
or does not appear to be maintaining altitude.
FLIPS
Your Dromida XL can
perform a flip when
the left stick is pressed
inward and released,
followed by moving the
right stick in the desired
ip direction. This stunt
needs lots of room and
should be done outside
free of obstacles.
NOTE: When the battery voltage is low ( ashing LEDs) the ip function is disabled.
LOW BATTERY INDICATOR
The LEDs on the Dromida XL will ash slowly when the LiPo battery voltage is
low. Thirty seconds after the lights begin to flash the Dromida XL will begin the
auto-land procedure. Always unplug the battery after ight. The battery
needs to be charged before the quadcopter is stored.
The controller will make five quick beeps when the AAA batteries need to
be charged.
MOTOR OVERLOAD PROTECTION
The Dromida XL is equipped with motor overload protection circuitry
that shuts down the motors in the event the propellers become
blocked by an obstruction and throttle is applied. In order to reset
the overload protection you will need to free the Dromida XL from
the obstruction and cycle the power to the transmitter and the
quad. If the overload protection is triggered repeatedly or late into a ight then it
may prematurely cause the low battery indicator to ash the LEDs. Disconnect
the battery and wait several seconds before reconnecting it. If the LEDs continue
to ash then you must recharge the battery.
UPGRADING a DROMIDA XL UAV to FPV
Follow these instructions if you purchased the camera and mount separately to
convert your Dromida XL UAV to FPV. Part numbers for the camera and mount
can be found in the parts list at the end of this manual.
1. Install the camera mount onto the underside of the frame using the three
screws included with the mount. Do not over-tighten these screws.
2. Align the rails on
the camera with the
slots in the camera
mounting plate and
slide the camera
back until it clicks
into place. Con rm
that the camera is
secured.
3
 Loading...