MC • Edition 2022.08 • Nr. 223 869 Rev. -0
8 … 12
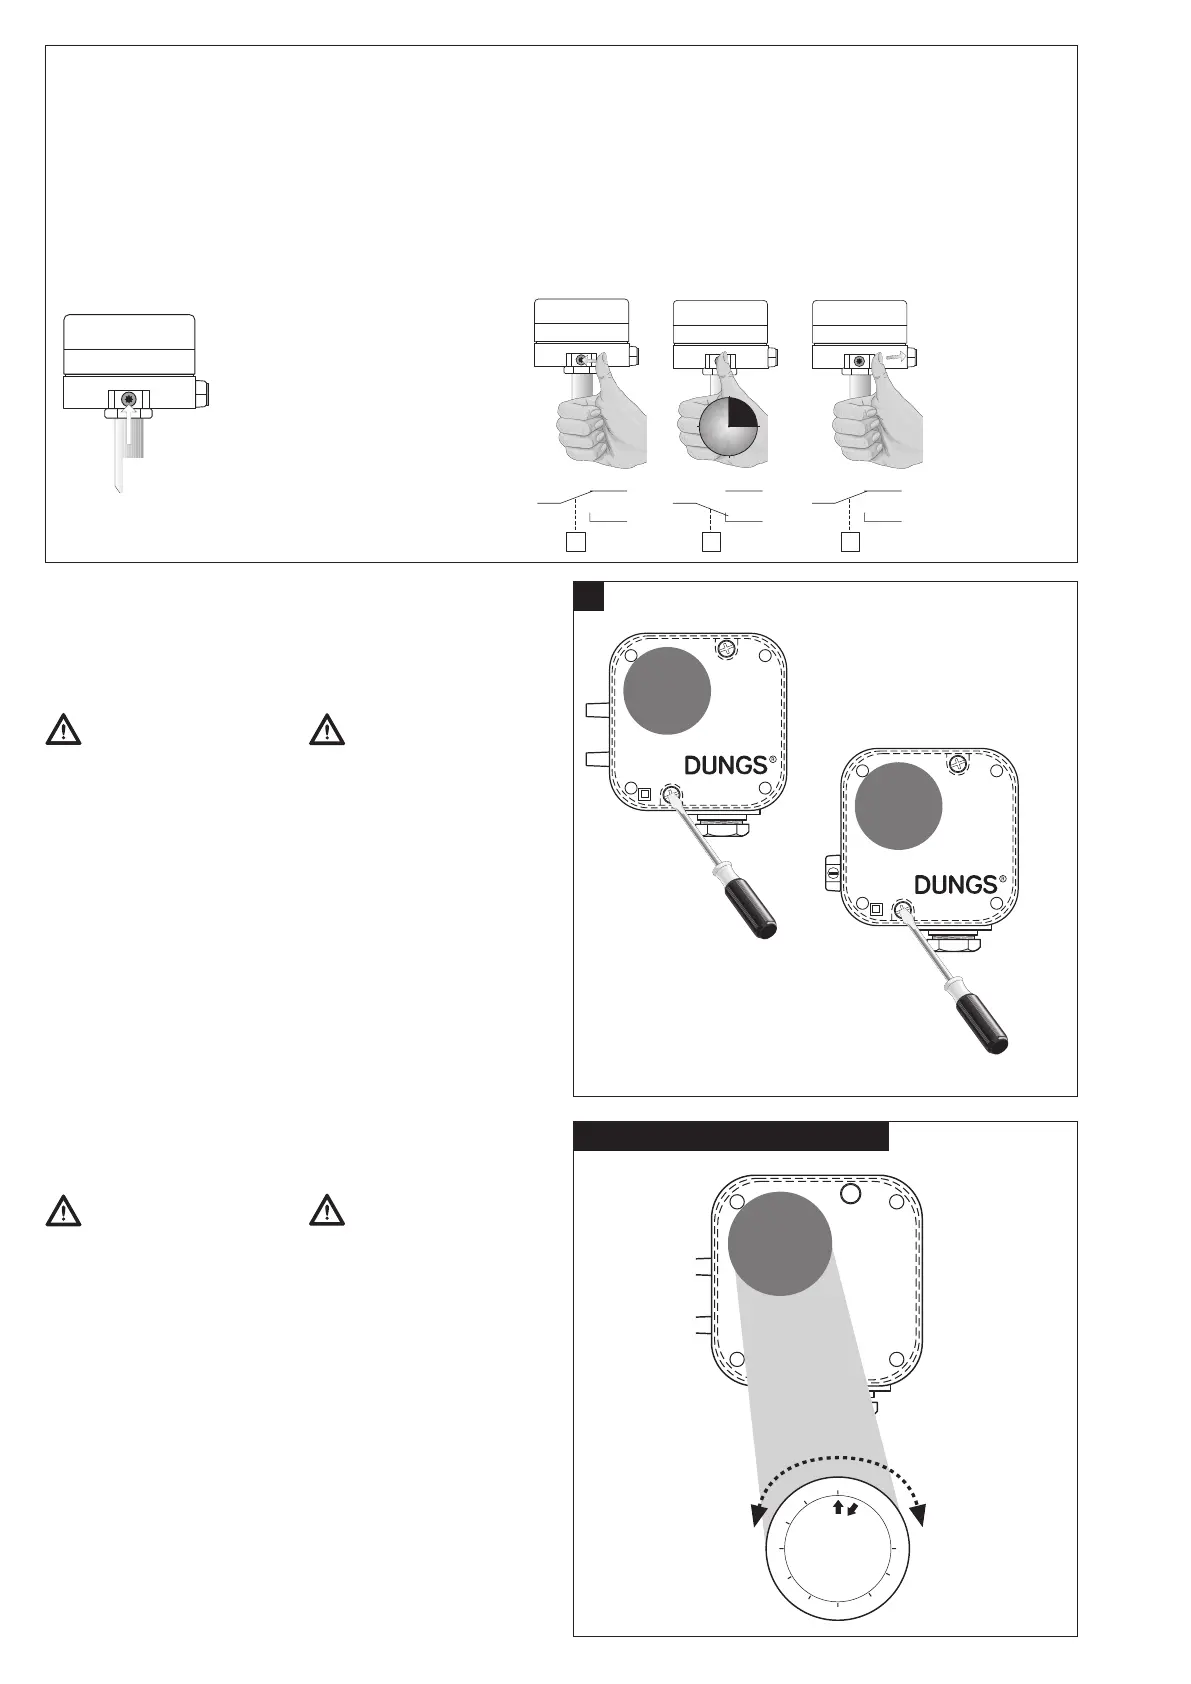
Setting the pressure switch
Dismount the hood using a suitable
tool, e.g. screwdriver no. 3 or PZ2,
Fig. 1. Remove hood.
There is no protection
against accidental contact.
Contact with live parts is pos-
sible.
Setting
Set the pressure switch at the setting
wheel
▌
to the specied pressure
setpoint using the scale, Fig. 2.
Follow the instructions of the
burner manufacturer!
Pressure switch switches as pres-
sure increases: Setting Ç.
Pressure switch switches as pres-
sure reduces: Setting È.
Remount hood!
Regolazione del pressostato
Smontare la calotta con un attrezzo
adeguato, ossia cacciavite nr. 3 -
rispettiv, PZ 2, gura 1
Togliere la calotta.
Non é sostanzialmente
garantita la protezione da
scariche, é possibile il contatto
con conduttori di tensione.
Regolazione
Tarare il pressostato, come in gura
2, sul valore di pressione nominale
prescritto, agendo sulla rotella della
scala graduata ▌.
Prestare attenzione alle prescri-
zioni del produttore del bruciatore!
Il pressostato scatta con pressione
in salita: regolazione Ç. Il pressosta-
to scatta con pressione in discesa:
regolazione È.
Rimontare la calotta!
Einstellung des Druckwächters
Haube mit geeignetem Werkzeug
demontieren, Schraubendreher No.
3 bzw. PZ 2, Bild 1.
Haube abnehmen.
Berührschutz ist nicht
grundsätzlich gewährt,
Kontakt mit spannungsführen-
den Teilen möglich.
Einstellung
Druckwächter am Einstellrad mit
Skala ▌ auf vorgeschriebenen
Drucksollwert einstellen, Bild 2.
Anleitung des Brennerherstellers
beachten!
Druckwächter schaltet bei stei-
gendem Druck: Einstellung Ç.
Druckwächter schaltet bei fal-
lendem Druck: Einstellung È.
Haube wieder aufsetzen!
Réglage des pressostats
Enlever les vis du capot en utilisant
un tournevis N
o
3. ou PZ 2, Fig 1.
Enlever le capot.
La protection n'est pas
garantie, contact avec des
pièces sous tension possible.
Réglage des
Régler le pressostat avec son
bouton gradué ▌ à la valeur désirée
Fig. 2.
Respecter les recommandations
du constructeur du brûleur!
Le pressostat commute par pression
montante: réglage Ç. Le pressostat
commute par pression descen-
dante: réglage È.
Remonter le capot!
1
2 LGW…A2, LGW...A2-7, LGW…A2P
Made in Germany Made in Germany
0,4
2,1
0,6
0 , 9
1,2
1,5
1,8
2,4
2,7
3
mbar
LGW 3 A2P
0,4
2,1
0,6
0 , 9
1,2
1,5
1,8
2,4
2,7
3
mbar
LGW 3 A2
Made in Germany
0,4
2,1
0,6
0 , 9
1,2
1,5
1,8
2,4
2,7
3
mbar
LGW 3 A2P
0,4
2,1
0,6
0 , 9
1,2
1,5
1,8
2,4
2,7
3
mbar
LGW 3 A2
Made in Germany
Made in Germany
0,4
2,1
0,6
0 , 9
1,2
1,5
1,8
2,4
2,7
3
mbar
LGW 3 A2P
0,4
2,1
0,6
0 , 9
1,2
1,5
1,8
2,4
2,7
3
mbar
LGW 3 A2
Prüf-
taste
Prüf-
taste
Prüf-
taste
Prüf-
taste
5 s
p
COM
NO
NC
2
1
3
p
COM
NO
NC
2
1
3
p
COM
NO
NC
2
1
3
Prüftaste
nur LGW…A2P
Bei anstehendem Druck wechselt
der Schalter durch Drücken (Ent-
lüften der unteren Kammer) der
Prüftaste p+ von NO nach NC.
Prüftaste ca. 5 s gedrückt halten.
Wird die Prüftaste freigegeben
wechselt der Schalter von NC
nach NO.
Touche de contrôle
uniquement LGW...A2P
Sous pression le switch commute
de NO vers NC lorsque l'on appuie
sur la touche de contrôle p+ (décom-
pression de la chambre inférieure).
Maintenir appuyée la touche de
contrôle pendant 5 s environ. Si
l’on relâche la touche de contrôle,
le commutateur passe de NC à NO.
Tasto di prova
solo LGW...A2P
Premendo il tasto di prova p+
(deaerazione della camera inferi-
ore), con presenza di pressione,
l’interruttore commuta da NO a
NC.Tenere premuto il tasto per
ca. 5 s. Lasciando libero il tasto
l’interruttore commuta da NC a NO.
Prüf-
taste
Prüf-
taste
Prüf-
taste
Prüf-
taste
5 s
p
COM
NO
NC
2
1
3
p
COM
NO
NC
2
1
3
p
COM
NO
NC
2
1
3
p+
Prüftaste
Test button
Touche de contrôle
Tasto di prova
Test button
only LGW...A2P
When pressure is present, the
switch changes from NO to NC
when test button p+ is pressed
(vents lower chamber). Press test
button for about 5 s. When the
test button is released, the switch
changes from NC to NO.
 Loading...